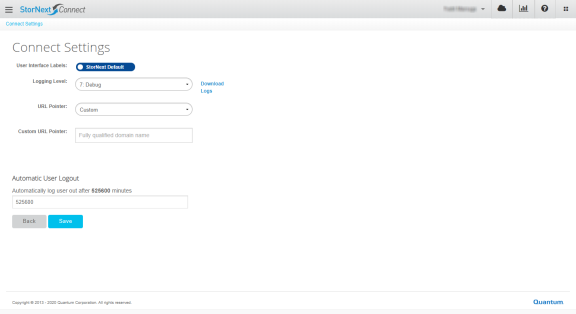
In the Connect Settings area, you can configure StorNext Connect settings.

Some GUI elements within StorNext Connect are driven by the type of user interface label you select.
-
If you select the StorNext Default user interface labels...
...then the File System and Cluster labels are displayed throughout the GUI.
-
If you select the Volume/Workspace user interface labels...
...then the Volume and Workspace labels are displayed throughout the GUI.
Use this procedure to configure your StorNext Connect user interface labels.
- Click the Hamburger icon.
- Click System.
-
Click Connect Settings. The Connect Settings page appears.

- In the User Interface Labels field, click StorNext Default or Volume/Workspace.
- Click Save to submit your changes, or click Back to discard your changes and return to the previous page.
The Logging option is a robust debugging tool which enables you to configure tracing for various system components. The feature is useful if you have been asked by Quantum Service personnel to enable debugging for one or more components in order to help identify and diagnose a particular error.
By default, logging is enabled at a level of 6 (Information). You can configure the logging level to any of the following options:
- 0 (Emergency)
- 1 (Alert)
- 2 (Critical)
- 3 (Error)
- 4 (Warning)
- 5 (Notice)
- 6 (Information)
- 7 (Debug)
- Click the Hamburger icon.
- Click System.
-
Click Connect Settings. The Connect Settings page appears.

- In the Logging Level list, click the desired logging level.
- Click Save to submit your changes, or click Back to discard your changes and return to the previous page.
You can download a log file to help identify and diagnose a particular error.
- Click the Hamburger icon.
- Click System.
-
Click Connect Settings. The Connect Settings page appears.

- Click Download Logs. Save the log file to a local destination.
You can configure the URL pointer (the IP address or fully qualified domain name) used by the StorNext GUI (see Access StorNext Connect in the StorNext Documentation Center).
- Click the Hamburger icon.
- Click System.
-
Click Connect Settings. The Connect Settings page appears.

-
In the URL Pointer field, click one of the following options:
- Default
- Connect Host Name
-
Custom
Note: If you click Custom, then you must input a fully qualified domain name in the Custom URL Pointer field.
- Click Save to submit your changes, or click Back to discard your changes and return to the previous page.
The automatic user logout option specifies the predetermined amount of time (in minutes) that elapses until the system automatically logs you out. The default is 60 minutes, and the valid range is from 10 minutes to 525,600 minutes.
- Click the Hamburger icon.
- Click System.
-
Click Connect Settings. The Connect Settings page appears.

-
In the Automatic User Logout field, type a valid integer number to specify the amount of time (in minutes) that elapses until the system automatically logs you out.
Note: The valid range is from 10 minutes to 525,600 minutes.
- Click Save to submit your changes, or click Back to discard your changes and return to the previous page.
