Plan

|
How to Create a PDF |
Note: Customers will need a monitor, keyboard, and mouse to configure the VS1004-NVR system.
The NVR system ships with the following software installed:
Note: Quantum ships the NVR system with "Windows Defender" disabled.
- The camera count could be significantly impacted by 30% or more with Windows Defender enabled as compared to being disabled.
- Refer to Quantum VS-NVR Series specifications for additional information.
-
Windows 10 IoT (Internet of things)
- Milestone Video Management Software (VMS): optional
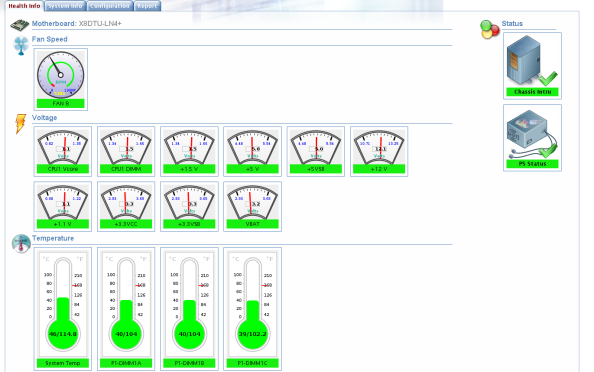
- Click on the SuperDoctor5 Web icon to configure this software.
- SD5 is an agent system that runs on monitored hosts designed by Supermicro to provide local system health and information.
-
SD5 supports a Web-based interface program and a command line interface program for server management.
- You can set up notifications to be sent via email and SNMP traps.
-
Refer to the Alert Configuration section in the SuperDoctor documentation for additional information.
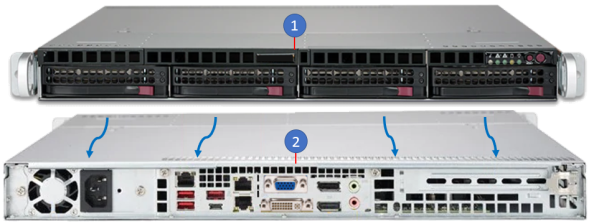
Note: The NVR system ships with all hardware installed per customer's order.
Front hardware includes:
- Control panel (right-top of the unit) with the following:
- Status LEDs: provides system health
- Reset Button: allows the system to be rebooted
- Power Button: enables power on and off of the system
- Drives (HDDs):
- If customer ordered a two-drive system, drives are installed in Drive 0 and 1 slots
- If customer ordered a four-drive system, drives are installed in Drive 0, 1, 2, and 3 slots

| Item | Description |
|---|---|
| 1 | Control Panel |
| 2 | Drive 0 (HDD) |
| 3 | Drive 1 (HDD) |
| 4 | Drive 2 (HDD) |
| 5 | Drive 3 (HDD) |
Note: The NVR system ships with all hardware installed per customer's order.
Rear hardware includes:
- One power supply
- IPMI and GbE LAN ports
- VGA/DVH, display, and audio ports
- PCI-E slot
- USB ports
| Item | Description |
|---|---|
| 1 | 350W Power Supply |
| 2 | IPMI LAN Port |
| 3 | Two RJ45 GbE LAN Ports |
| 4 |
|
| 5 | Two Display Ports |
| 6 | PCI-E 3.0x16 Slot (optional) |
| 7 | Audio Ports: Line Out/Mic In |
| 8 |
|

The form factor of the server is 1U rackmount: 1.75 inches (44.45 mm)
The physical server specifications are:
- Width: 17.2 inch (437 mm)
- Height: 1.7 inch (43 mm)
-
Depth: 19.85 inch (504 mm)
-
Weight
- Packaged - 36 pounds (16.33 kilograms)
- Unpackaged - 24 pounds (10.89 kilograms)
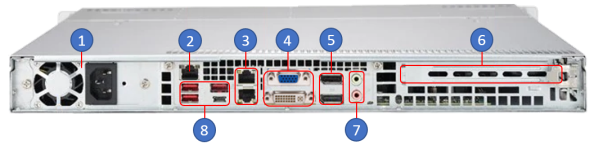
The following image provides a rear view (with callouts) of the NVR system. The receptacle/ports include:
- One AC power supply receptacle
- One IPMI LAN port
- Two GbE LAN ports
- One VGA port
- One DVH port
- One display port
- One audio port
- Three Type A USB ports
- One USB Type C port
| Item | Description |
|---|---|
| 1 | 350W Power Supply |
| 2 | IPMI LAN Port |
| 3 | Two RJ45 GbE LAN Ports |
| 4 |
|
| 5 | Two Display Ports |
| 6 |
PCI-E 3.0x16 Slot (cannot use): Note: Boot SSD installed in motherboard slot |
| 7 | Audio Ports: Line Out/Mic In |
| 8 |
|
The NVR system can have up to four drives within the system.
- Customers can order one of the following configurations:
- Two-drive system (one RAID 1 LUN)
- Four-drive system (one RAID 10 LUN)
- The drives are labeled from left to right (0-3).
- The drives are 3.5 inches units enclosed within a plastic case.
- Drives are extracted from the front of the system.
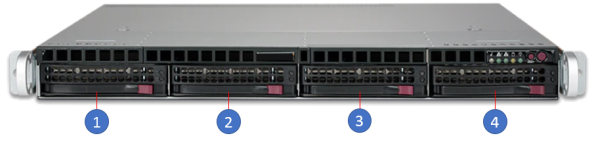
| Item | Description |
|---|---|
| 1 | Drive 0 (HDD) |
| 2 | Drive 1 (HDD) |
| 3 | Drive 2 (HDD) |
| 4 | Drive 3 (HDD) |
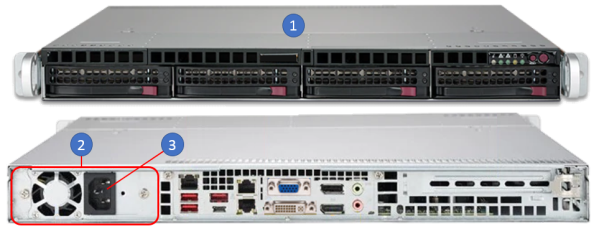
| Item | Description |
|---|---|
| 1 | VS1004-NVR |
| 2 | Power Supply |
| 3 | AC Receptacle |
Ensure you comply with the following cautions when installing your NVR system.
Caution: Connecting your NVR system to your power supply circuitry might affect the circuit overloading, existing over-current protection, and power supply wiring. Consult the equipment nameplate ratings and power specifications.
Caution: A reliable ground must be maintained at all times. To ensure this, the rack itself should be grounded. Particular attention should be given to power supply connections other than the direct connections to the branch circuit (for example, the use of power strips).
The power requirements for the NVR system are as follows:
- Power Supply
One 350W high-efficiency power supply
IEC 320 C14 receptacle
100 VAC - 240 VAC, 50 - 60Hz (auto-switching)
- AC Voltage
Input Voltages: 100-240 VAC
- Input Current: 5-2.5 Amps
- Input Frequency: 50-60 Hz
Note: If the power supply fails, the system will shut down and the power supply must be replaced.
The installation site must have the following environmental conditions:
- RoHS Compliant
- Operating Temp: 0C to 40C (32F to 104F)
- Non-operating Temp: -40C to 70C (-40F to 158F)
- Operating Relative Humidity: 8% to 95% (non-condensing)
- Non-operating Relative Humidity: 5% to 95% (non-condensing)
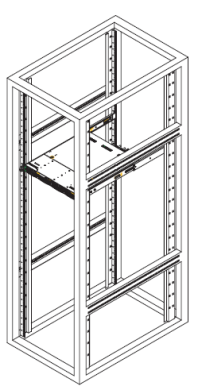
The rack precautions include:
- Ensure that the leveling jacks on the bottom of the rack are extended to the floor so that the full weight of the rack rests on them.
- In single rack installations, stabilizers should be attached to the rack. In multiple rack installations, the racks should be coupled together.
- Always make sure the rack is stable before extending a server or other component from the rack.
Caution: You should extend only one server or component at a time - extending two or more simultaneously may cause the rack to become unstable.
The server precautions include:
- Review the electrical and general safety precautions.
- Determine the placement of each component in the rack before you install the rails.
- Install the heaviest server components at the bottom of the rack first and then work your way up.
- Use a regulating uninterruptible power supply (UPS)
- To protect the server from power surges and voltage spikes.
- To keep your system operating in case of a power failure.
- Allow any drives and power supply modules to cool before touching them.
- When not servicing, always keep the front door of the rack and all covers/panels on the servers closed to maintain proper cooling.
Considerations include:
- If installed in a closed or multi-unit rack assembly, the ambient operating temperature of the rack environment may be greater than the room's ambient temperature.
- Therefore, consideration should be given to installing the equipment in an environment compatible with the manufacturer’s maximum rated ambient temperature (TMRA).
Equipment should be mounted into a rack so that the amount of airflow required for safe operation is not compromised.
The NVR system has five (5) internal fans to cool the system.
- Fan speed is controlled by system temperature via IPMI.
- If a fan fails, the remaining fans will ramp up to full speed.
- Replace any failed fan at your earliest convenience with the exact same type and model (the system can continue to run with a failed fan).
Note: It is very important that the chassis top cover is installed for the cooling air to circulate properly through the chassis and cool the components.
The five (5) fans pull cooling air into the front of the NVR system and the internal air exits at the rear of the unit.
| Item | Description |
|---|---|
| 1 | Front of the system |
| 2 |
Rear of the system Note: Arrows show airflow from front to back of the unit. |
Always consider the following:
- Equipment should be mounted into a rack so that a hazardous condition does not arise due to uneven mechanical loading.
- Install the heaviest server components at the bottom of the rack first and then work your way up.
Consider the following:
- Consideration should be given to the connection of the equipment to the power supply circuitry and the effect that any possible overloading of circuits might have on overcurrent protection and power supply wiring.
- Appropriate consideration of equipment nameplate ratings should be used when addressing this concern.
A reliable ground must be maintained at all times. To ensure this, the rack itself should be grounded. Particular attention should be given to power supply connections other than the direct connections to the branch circuit (i.e. the use of power strips, etc.).
To prevent bodily injury when mounting or servicing this unit in a rack, you must take special precautions to ensure that the system remains stable. The following guidelines are provided to ensure your safety:
- This unit should be mounted at the bottom of the rack if it is the only unit in the rack.
- When mounting this unit in a partially filled rack, load the rack from the bottom to the top with the heaviest component at the bottom of the rack.
- If the rack is provided with stabilizing devices, install the stabilizers before mounting or servicing the unit in the rack.