 minute read
Storage Page Overview
On this page, you can see the current storage configuration on the system, and make necessary changes.
Note: When you use write-cache (write-back cache) on logical volumes in your H-Series product, initiator applications that care about data consistency should always flush the cache when necessary (via SYNCHRONIZE CACHE). The target-side write-back cache software auto-commits cache metadata at a regular time interval and when a blocks-written quantity threshold has been reached, however, in the event of a storage array power loss or firmware crash, the application must flush the cache for any critical writes (for example, data is not guaranteed to be on stable media until an fsync() occurs). If this behavior is not acceptable, you can remove write-cache for the logical volume(s) by running the remove_vol_cache QBSP shell command.
If you create a striped logical volume (a logical volume that uses more than one physical volume [PV]), the stripe size across each PV is equal; if the unit of measure, for a value of a given size, is percentage (%), then the process uses the smallest amount of free/available on one PV, and multiplies this by the number of selected PV’s.
| Item | Description |
|---|---|
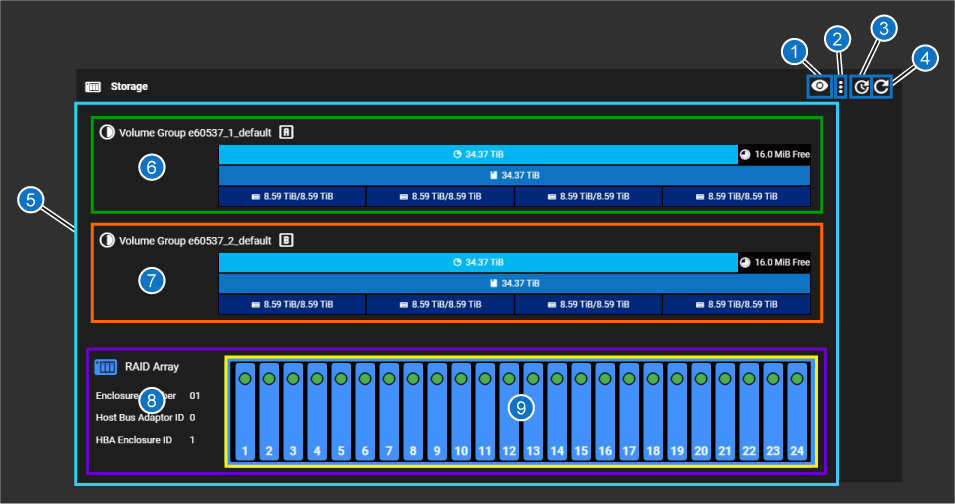
| 1 | Select Physical Volume button – when you click this button, all the physical volumes (8 are configured on the system by default) are displayed. Click one of the physical volumes to view which physical disks make up that volume in the RAID array graphic at the bottom of the above image (item 9 above). |
| 2 | Manage Physical Volumes button – use this to add or remove physical volumes, to detach all degraded drives, or attach all drives ready to be added to the RAID. |
| 3 | Time interval button – use this to change the refresh interval for the CONFIGURATION > Storage page |
| 4 | "Refresh now" button – refreshes the array display immediately when clicked. |
| 5 |
All elements related to the storage array. If there were additional JBODs, they would be listed after the RAID array shown above (light blue box above). Includes items 6-9 below: |
| 6 | Volume Group managed by Controller A (green box above). See Volume Group visual overview. |
| 7 | Volume Group managed by Controller B (orange box above). See Volume Group visual overview. |
| 8 | Information about the RAID array (purple box above). |
| 9 |
Chassis drives diagram – this is a visual representation of the physical chassis with drives numbered from 1 to 12 (for 12 drive chassis) or 24 (for 24-drive chassis; yellow box above). Drives in blue with a green indicator are 100% healthy, configured drives. |
Caution: Quantum recommends leaving the storage configuration unchanged after initial configuration. ONLY change this if absolutely necessary (such as if settings change within your network ecosystem). The system was optimized during initial configuration for your network and storage environment. You could adversely affect efficiency of the system if these settings are changed incorrectly.
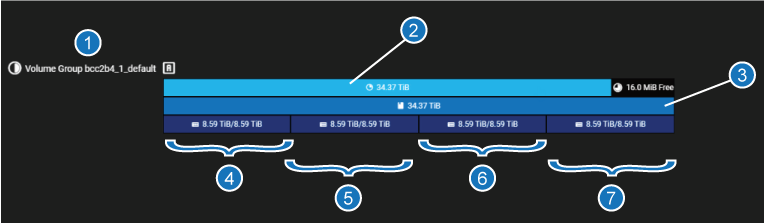
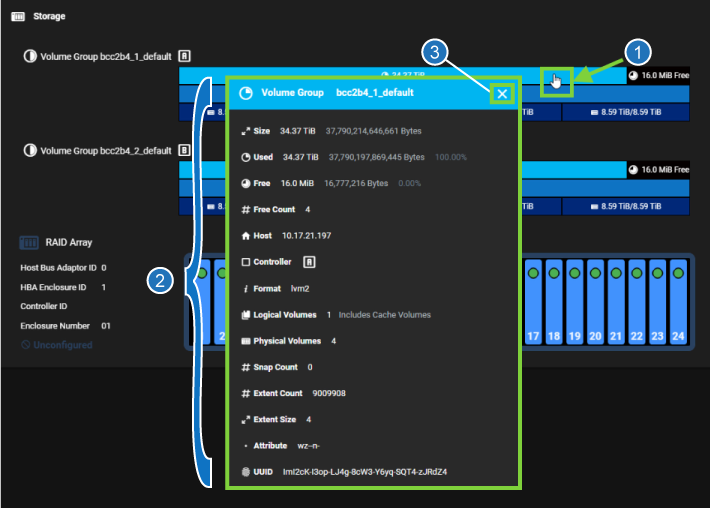
Each "Volume Group" is presented in the F-Series UI graphically as follows:
| Item | Description |
|---|---|
| 1 | Volume Group name and letter (first group, as shown, is the "A" volume group; the controller that manages this group has the same name as the volume group, Controller "A") |
| 2 | Volume Group (provides total storage in use, and free, if applicable) |
| 3 | Logical Volume for this volume group (in this example, there is one; could be many) |
| 4 | Physical Volume/Raid Set (in this example: the first of four) |
| 5 | Physical Volume/Raid Set (in this example: the second of four) |
| 6 | Physical Volume/Raid Set (in this example: the third of four) |
| 7 | Physical Volume/Raid Set (in this example: the fourth of four) |
-
Click the Select Physical Volume button:

-
Choose a physical volume to highlight in the chassis drives diagram on the page.
-
Deselect the physical drives by clicking the Deselect button:

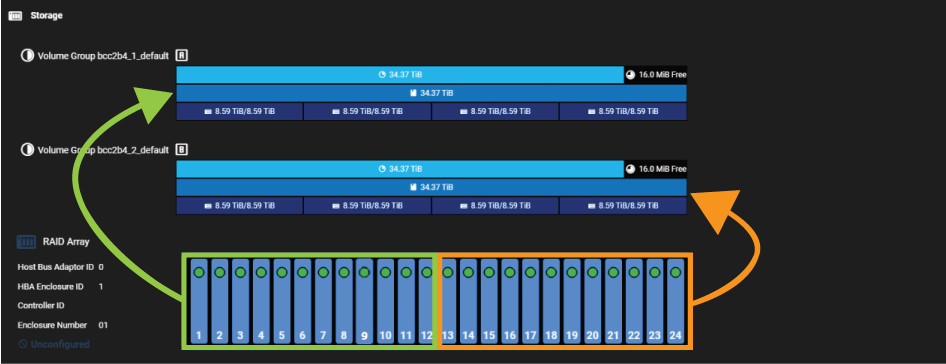
The selected physical drives that make up the physical volume are highlighted in a light blue shade, as indicated in the green box below:

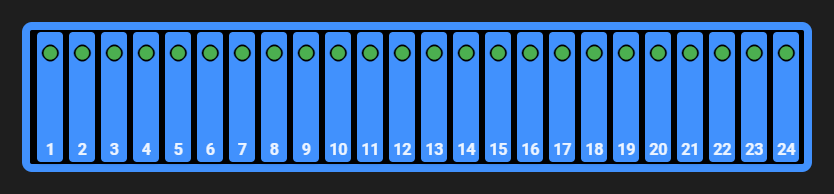
The drives will return to their normal view state:
Since this example is a 24-drive system, the storage is organized into:
- Volume Groups ("RAID"). There are two volume groups in the system comprised of 2 x 12-drive, (1 Volume Group for each set of 12 NVME drives in the system, each of which is managed by its own controller, either Controller A, or Controller B). The following how the 12 physical storage drives per Controller are associated with the Volume Groups shown above them in the F-Series UI:
- Logical Volumes (LUNs) - from the factory, each RAID is configured as a single logical volume
- Physical Volumes (RAID sets)
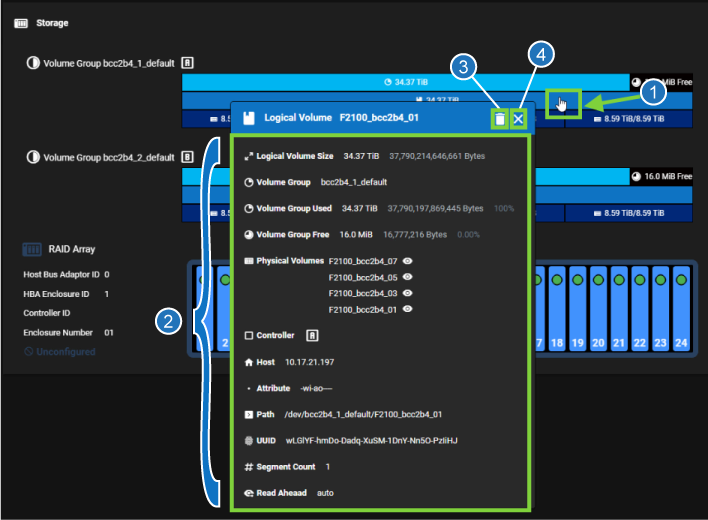
Click on one of the different volume types to see to view information about that volume type, and perform actions on that volume.
| Item | Description |
|---|---|
| 1 | Click on this area to open the "Logical Volume" dialog. |
| 2 | Information displayed for the "Logical Volume". |
| 3 | Close button for the "Logical Volume" dialog. |
Caution: Quantum recommends leaving the storage configuration unchanged after initial configuration. ONLY change this if absolutely necessary (such as if settings change within your network ecosystem). The system was optimized during initial configuration for your network and storage environment. You could adversely affect efficiency of the system if these settings are changed incorrectly.
| Item | Description |
|---|---|
| 1 | Click on this area to open the "Logical Volume" dialog. |
| 2 | Information displayed for the "Logical Volume". |
| 3 |
Delete button used to delete the "Logical Volume". Caution: Once you have configured your system storage, changes to the storage configuration WILL DESTROY DATA in an active storage environment. Make sure you intend to change storage configuration and have backups of ANY CRITICAL DATA prior to making changes, if you have data that you need to keep on the system. |
| 4 | Close button for the "Logical Volume" dialog. |
Caution: Quantum recommends leaving the storage configuration unchanged after initial configuration. ONLY change this if absolutely necessary (such as if settings change within your network ecosystem). The system was optimized during initial configuration for your network and storage environment. You could adversely affect efficiency of the system if these settings are changed incorrectly.
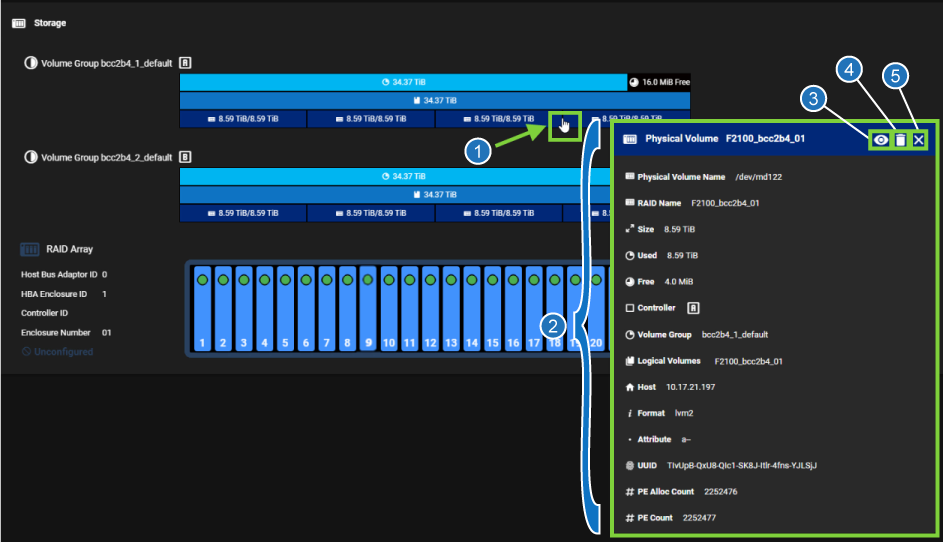
| Item | Description |
|---|---|
| 1 | Click on this area to open the Physical Volume dialog. |
| 2 | Information displayed for the physical volume. |
| 3 | Eye button to highlight the portion of the system lower down on the page to display which drives are part of the physical volume. |
| 4 |
The Delete button is used to delete the physical volume. Note: For storage running QBSP 2.0.1, see "FAILURE" error message when trying to delete a physical volume. Update to 2.0.2 or later to delete physical volumes. Caution: Once you have configured your system storage, changes to the storage configuration WILL DESTROY DATA in an active storage environment. Make sure you intend to change storage configuration and have backups of ANY CRITICAL DATA prior to making changes, if you have data that you need to keep on the system. |
| 5 | Close button for the Physical Volume dialog. |
For systems running QBSP 2.0.1 software, deleting a physical volume is shown in the H-Series UI, but is not currently functional. If you attempt to delete a physical volume, you will see the following error message for the "Storage - remove array" TASK if you attempt to delete a physical volume. The failure is benign, it doesn't indicate a system problem, but simply does not delete the physical volume:
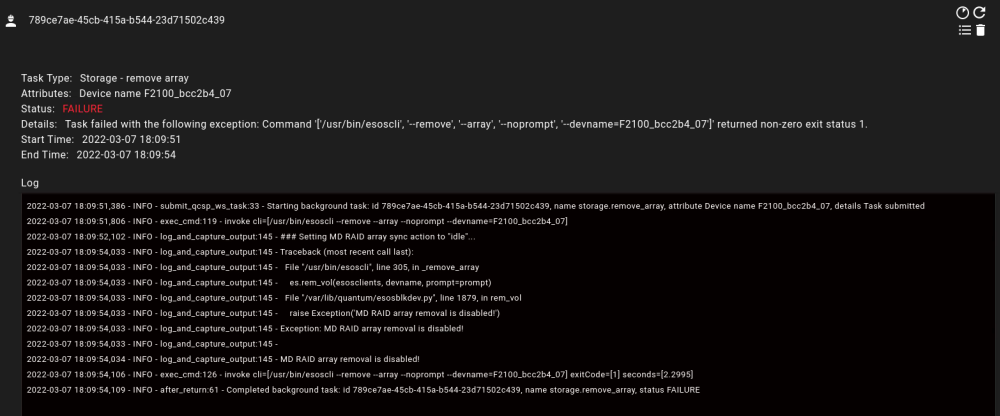
Workaround
This issue was fixed in 2.0.2, so you will no longer see this issue on a system running 2.0.2 or later software.
There is currently no workaround for this issue for systems running 2.0.1 software. See BLK-7955 in the Fixed issues in the 2.0.2 section of the QBSP 2.x Release Notes.
