 minute read
NVMe over Fabrics (NVMe-oF) and StorNext
Beginning with StorNext version 7.2 and QBSP version 2.3.1, you can take advantage of NVMe over fabrics (NVMe-oF) within your Quantum F-Series with Xcellis / SNA 14th generation (14G) NVMe storage array.
NVMe-oF is a technology that extends the high-performance benefits of Non-Volatile Memory Express (NVMe) storage devices over a network. NVMe itself is a protocol designed for efficient communication between a computer's central processing unit (CPU) and solid-state drives (SSDs) or other non-volatile storage devices.
NVMe Basics
-
NVMe is a protocol optimized for flash storage, providing faster data transfer and lower latency compared to traditional storage protocols like SATA and SAS.
-
It is commonly used in local storage configurations where the storage device is directly attached to the host system.
Challenges with Local NVMe
-
While NVMe is excellent for local storage, it can be challenging to scale and share NVMe storage across multiple servers in a data center environment.
NVMe over Fabrics (NVMe-oF)
-
NVMe-oF extends NVMe capabilities over a network, allowing multiple servers to access and share NVMe storage devices remotely.
-
It enables the creation of high-performance storage architectures for distributed and scalable data center environments.
Key Components
-
Initiators: These are the servers or devices that send NVMe commands over the network.
-
Targets: These are the storage devices (such as NVMe SSDs) that respond to the commands from initiators.
-
Fabrics: The network infrastructure, which can be based on technologies like Ethernet or Fibre Channel.
Fabrics Protocols
-
NVMe-oF supports various network fabrics, including Fibre Channel, Ethernet (using protocols like RDMA and TCP), and InfiniBand.
-
The choice of fabric depends on factors such as speed, latency requirements, and existing infrastructure.
NVMe-oF is well-suited for applications that demand low-latency and high-throughput storage access, such as databases, virtualization, and analytics workloads.
Benefits of of NVMe-oF include the following:
-
High Performance: NVMe-oF maintains the low latency and high throughput advantages of local NVMe storage.
-
Scalability: Multiple servers can concurrently access and share NVMe storage resources, allowing for better resource utilization.
-
Flexibility: It supports various network fabrics, providing flexibility in deployment based on specific infrastructure requirements.
To fully take advantage of NVMe-oF with StorNext, your hardware and software configuration must meet the following requirements:
-
Your storage node must be a Quantum F-Series paired with an Xcellis / SNA 14G for NVMe-oF support.
-
The storage node must contain a 100 GbE Ethernet interface card.
Note: NVMe-oF using Fibre Channel (FC) is not supported.
-
-
Your Quantum F-Series paired with an Xcellis / SNA 14G must be running:
-
StorNext software version 7.2 or later.
-
QBSP software version 2.3.1 or later.
-
-
For systems running StorNext software version 7.2, to use NVME-oF devices for the HAFS (shared file system) used by StorNext HA, you must configure the HAFS using the StorNext GUI; you cannot use the Service Menu script /opt/DXi/scripts/scervice.sh.
Note: NVMe-oF using Fibre Channel (FC) is not supported.
-
Since volumes from Quantum F-Series storage arrays are exposed concurrently using SCSI and NVMe, if you have SCSI and NVMe paths to the same storage appliance established on the same StorNext client/initiator host, use the /usr/cvfs/config/cvpaths configuration file (see man 4 cvpaths for more information) to restrict the device types that StorNext uses. Without this file, and SCSI and NVMe paths are established to the same storage array volumes, StorNext is likely to complain about "duplicate disks".
-
As an example, to use only NVMe devices (if SCSI paths are also present for the same storge array), you can use the following cvpaths value:
wildcard=/dev/nvme*n[0-9]
-
This section provides information on how to configure your system to use NVMe-oF.
This section provides information on how to perform the QBSP target-side configuration.
-
Configuring storage Ethernet ports automatically configures BOTH NVMe-oF (using TCP or RDMA) and iSCSI (TCP)/iSER (RDMA); QBSP storage volumes are exported using SCSI and NVMe concurrently.
Note: Using RDMA (RoCE) requires Mellanox Ethernet adapters (ConnectX-5 or ConnectX-6).
-
The method used to connect to the storage volumes from the initiators (clients) determines the storage protocol that is used by those systems.
-
For systems running QBSP 2.3.1, or systems that upgraded to QBSP 2.3.1 or later and had NO storage network interfaces configured, you can configure the storage Ethernet ports for NVMe (and SCSI) using either the UUI, or the QBSP shell interface.
Note: Beginning with QBSP 2.3.1, the storage interfaces are always configured for BOTH SCSI and NVMe protocols.
Example of a UUI Configuration
-
Log in to the UUI.
-
At the top navigation menu, click CONFIGURATION.
-
On the left navigation menu, click Storage Networks.
-
Configure each interface as you would normally for iSCSI/iSER.
Note: The drop down from protocol choices are now iSCSI and NVMe TCP, or iSER and NVMe RDMA (using VLAN PFC or Global Pause).
Example of a QBSP shell Configuration
-
VLAN-PFC RDMA configuration on an F-Series appliance:
conf_iface rdma_pfc s1p1 172.16.11.82 255.255.255.0 100 0 5
conf_iface rdma_pfc s1p2 172.16.12.82 255.255.255.0 100 0 5
conf_iface rdma_pfc s3p1 172.16.13.82 255.255.255.0 100 0 5
conf_iface rdma_pfc s3p2 172.16.14.82 255.255.255.0 100 0 5
-
Global Pause RDMA configuration on an F-Series appliance:
conf_iface rdma_global s1p1 172.16.11.82 255.255.255.0
conf_iface rdma_global s1p2 172.16.12.82 255.255.255.0
conf_iface rdma_global s3p1 172.16.13.82 255.255.255.0
conf_iface rdma_global s3p2 172.16.14.82 255.255.255.0
-
TCP configuration with tagged VLAN 200 on an F-Series appliance:
conf_iface tcp_stor s1p1 172.16.21.82 255.255.255.0 --vlan 200
conf_iface tcp_stor s1p2 172.16.22.82 255.255.255.0 --vlan 200
conf_iface tcp_stor s3p1 172.16.23.82 255.255.255.0 --vlan 200
conf_iface tcp_stor s3p2 172.16.24.82 255.255.255.0 --vlan 200
-
-
For systems running QBSP 2.2 or earlier, and then upgraded to QBSP 2.3.1 or later, and had storage network interfaces configured BEFORE the upgrade, then you must reconfigure these Ethernet interfaces to enable/configure the NVMe target ports. Use the same IP/RDMA configuration; the software detects the NVMe target ports are not configured and adds them automatically during the reconfiguration process.
-
If you use the UUI, you might need to temporarily set a different value (for example, different IP address), and then change the IP to its original value since the Apply button might not become active if the values in the input fields do not change.
-
If you use the QBSP shell, you can use the same IP/RDMA settings to reconfigure the interfaces.
-
-
Use the following QBSP shell commands to perform the NVMe target verification and confirm the subsystem is properly configured:
show_nvme_tgt_ns
This command prints the list of configured namespaces – for dual-head products, there are two namespaces listed for each volume (device), one per controller. The Enabled column should display True for each of these. If the column does not display True, contact Quantum Technical Support (see Contacting Quantum Support).

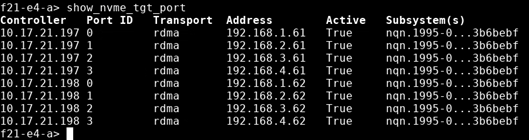
show_nvme_tgt_port
This command prints a list of each configured NVMe target port – there should be one for each storage network/Ethernet interface configured; the transport type (TCP/RDMA) and access IP address is displayed as well. The ports are working/enabled if the Active column displays True. If the column does not display True, contact Quantum Technical Support (see Contacting Quantum Support).
This section provides information on how to perform the Xcellis Workflow Director/Xcellis Workflow Extender initiator-side configuration.
Note: Your system must be running StorNext 7.2 or later. This platform includes the Mellanox OFED driver stack and the NVMe drivers that are supported with Mellanox Ethernet interfaces.
-
The shared file system (HAFS) used in a StorNext HA configuration must remain connected using iSCSI/iSER or Fibre Channel (FC).
Note: NVMe-oF for the HAFS volumes is NOT supported.
-
Run the following command to enable each Ethernet interface you intend to use for iSCSI initiator traffic:
Usage
ip link set p<x>p<x> upExamples
ip link set p1p1 upip link set p1p2 upip link set p2p1 upip link set p2p2 up -
Use the iscsiadm applet found in the qtmcontroller script to configure the Ethernet interfaces just as you would for iSCSI/iSER.
Example Command on SNA node 1 to Configure Four Interfaces for VLAN-PFC RDMA
qtmcontroller -c 'iscsiadm create initiator=rdma_init subnet=p1p1.100,172.16.11.71 subnet=p1p2.100,172.16.12.71 subnet=p2p1.100,172.16.13.71 subnet=p2p2.100,172.16.14.71 netmask=255.255.255.0 iproto=iser mtu=9000 storage_network=converged_net_l2 priority_map=0:5'Example Command on SNA node 2 to Configure Four Iterfaces for VLAN-PFC RDMA
qtmcontroller -c 'iscsiadm create initiator=rdma_init subnet=p1p1.100,172.16.11.72 subnet=p1p2.100,172.16.12.72 subnet=p2p1.100,172.16.13.72 subnet=p2p2.100,172.16.14.72 netmask=255.255.255.0 iproto=iser mtu=9000 storage_network=converged_net_l2 priority_map=0:5' -
Enable the NVMe-oF initiator start-up service to allow sessions to automatically connect upon boot:
systemctl enable nvmf-autoconnect.service -
In the discovery configuration file, add a line for each transport and IP target port that you want to connect to:
echo "--transport=rdma --traddr=172.16.11.91 --trsvcid=4420 --nr-io-queues=8" >> /etc/nvme/discovery.conf
echo "--transport=rdma --traddr=172.16.11.92 --trsvcid=4420 --nr-io-queues=8" >> /etc/nvme/discovery.conf
...
-
Connect to all subsystems/ports defined in the discovery configuration file:
nvme connect-all -
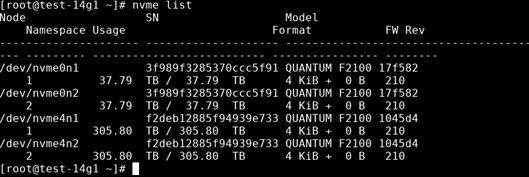
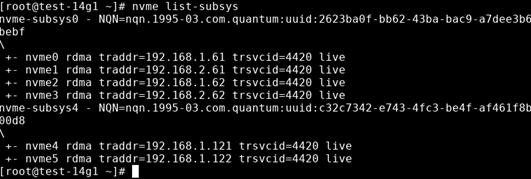
The NVMe-oF sessions to the targets are now established; use the command nvme list to display namespaces available (volumes exported from the QBSP target-side) and the command nvme list-subsys to display the subsystem/path information. After you enable the systemd service above, the sessions automatically establish on boot.
Example Output of the nvme list Command
Example Output of the nvme list-subsys Command

-
You can now use the StorNext user interface or the CLI to create a file system.
This section provides information on how to perform the Linux client initiator-side configuration.
-
Mellanox OFED (MOFED) version 23.07 or higher is required. Install MOFED using the --with-nvmf argument when you execute the mlnxofedinstall installer script:
./mlnxofedinstall --with-nvmfNote: The MOFED drivers include Mellanox NIC drivers and NVMe drivers. If you have trouble loading/using these drivers, verify that the correct drivers (for example, only MOFED, not inbox) are loading.
-
For RoCE/RDMA, if the client/initiator machines are using ConnectX-5 (or newer) Mellanox adapters, Quantum recommends you allow the firmware on the NIC to handle the DCBX settings.
-
Adjust the NIC NVRAM settings if necessary.
Example on a Dual-port ConnectX-5 NIC at 0000:5e:00.0
mstconfig -d /sys/bus/pci/devices/0000:5e:00.0/config set LLDP_NB_DCBX_P1=TRUE LLDP_NB_TX_MODE_P1=2 LLDP_NB_RX_MODE_P1=2 LLDP_NB_DCBX_P2=TRUE LLDP_NB_TX_MODE_P2=2 LLDP_NB_RX_MODE_P2=2 -
Verify the mode is firmware controlled and not operating system controlled on each port.
mlnx_qos -i enp4s0f0np0 -d fw
mlnx_qos -i enp4s0f1np1 -d fw
-
Verify lldpad is not running/enabled since the NIC firmware is handling DCBX.
Note: For RoCE/RDMA, if your client contains an older Mellanox adapter where the firmware does NOT support controlling the DCBX setting, you must use lldpad and the operating system to handle DCBX, or apply all of the PFC settings manually to each client/port.
-
-
Configure the client’s Ethernet adapters for TCP or RoCE (lossless Ethernet), depending on the desired transport (TCP or RDMA).
Note: The configuration is identical to what is used for iSCSI/iSER.
Example Commands using the NetworkManager CLI to Configure Four Interfaces for VLAN-PFC RDMA
nmcli c a ifname rdma_p1_11 type vlan dev enp4s0f0np0 id 100 mtu 9000 ipv4.method manual ipv4.addresses 172.16.11.101/24 vlan.egress-priority-map 0:5
nmcli c a ifname rdma_p2_12 type vlan dev enp4s0f1np1 id 100 mtu 9000 ipv4.method manual ipv4.addresses 172.16.12.101/24 vlan.egress-priority-map 0:5
nmcli c a ifname rdma_p3_13 type vlan dev enp66s0f0np0 id 100 mtu 9000 ipv4.method manual ipv4.addresses 172.16.13.101/24 vlan.egress-priority-map 0:5
nmcli c a ifname rdma_p4_14 type vlan dev enp66s0f1np1 id 100 mtu 9000 ipv4.method manual ipv4.addresses 172.16.14.101/24 vlan.egress-priority-map 0:5
Example Commands using the NetworkManager CLI to Configure Four Interfaces for TCP
nmcli c a ifname tcp_p1_21 type vlan dev enp4s0f0np0 id 200 mtu 9000 ipv4.method manual ipv4.addresses 172.16.21.101/24
nmcli c a ifname tcp_p2_22 type vlan dev enp4s0f1np1 id 200 mtu 9000 ipv4.method manual ipv4.addresses 172.16.22.101/24
nmcli c a ifname tcp_p3_23 type vlan dev enp66s0f0np0 id 200 mtu 9000 ipv4.method manual ipv4.addresses 172.16.23.101/24
nmcli c a ifname tcp_p4_24 type vlan dev enp66s0f1np1 id 200 mtu 9000 ipv4.method manual ipv4.addresses 172.16.24.101/24
-
Modify the systemd service script:
sed 's/WantedBy=default.target/WantedBy=remote-fs.target/' -i /usr/lib/systemd/system/nvmf-autoconnect.service -
Enable the NVMe-oF initiator start-up service to allow sessions to automatically connect upon boot:
systemctl enable nvmf-autoconnect.service -
Add a udev rule for setting the I/O policy to round-robin for NVMe native MPIO:
echo 'ACTION=="add", SUBSYSTEM=="nvme-subsystem", ATTR{model}=="QUANTUM*", ATTR{iopolicy}="round-robin"' > /etc/udev/rules.d/71-nvmf-iopolicy-quantum.rulesudevadm control --reload-rules -
In the discovery configuration file, add a line for each transport and IP target port that you want to connect to:
echo "--transport=rdma --traddr=172.16.11.91 --trsvcid=4420 --nr-io-queues=8" >> /etc/nvme/discovery.conf
echo "--transport=rdma --traddr=172.16.11.92 --trsvcid=4420 --nr-io-queues=8" >> /etc/nvme/discovery.conf
...
-
Connect to all subsystems/ports defined in the discovery configuration file:
nvme connect-all -
The NVMe-oF sessions to the targets are now established; use the command nvme list to display namespaces available (volumes exported from the QBSP target-side) and the command nvme list-subsys to display the subsystem/path information. After you enable the systemd service above, the sessions automatically establish on boot.
Example Output of the nvme list Command

Example Output of the nvme list-subsys Command
-
The NVMe block devices are available and you can now mount your file system(s).
This section provides information on how to perform the Windows Server client (SNFS client) initiator-side configuration.
-
Use the StarWind NVMe-oF Initiator software from StarWind Software Inc. to connect Windows Server instances to NVMe targets uinsg TCP or RDMA; Windows Server (for example, Windows Server 2019) is required since it has the Multipath I/O (MPIO) Windows feature and the NVMe-oF stack from StarWind utilizes this native Windows MPIO capability – SCSI ALUA target port states are emulated using the NVMe ANA port states. Windows client operating systems such as Windows 10 do NOT have the MPIO feature, and cannot run I/O round-robin across paths, nor can that operating system tolerate a controller-down scenario with dual-head QBSP storage arrays.
Note: The StarWind NVMe-oF Initiator application is commercial software and you must purchase a license to use it.
The NVMe-oF initiator stack from StarWind Software Inc. acts as a shim layer/driver between NVMe and the iSCSI initiator and MPIO features found in the Windows Server OS – you’ll connect to the NVMe targets using the CLI tool (StarNVMeoF_Ctrl.exe) provided by StarWind Software Inc. For more information, see the README document included with the software bundle, available after you install the software.
-
If you use RDMA (RoCE) for connectivity, verify RDMA-capable network drivers are installed (for example, WinOF2 from Mellanox), and also verify Network Direct support is enabled for the NICs (located under the Advanced Adapter options/setting):
-
To configure Windows Server with a global pause style RoCE setup, see How to configure RoCE in Windows environment (global pause).
-
To configure Windows Server with a PFC style RoCE setup, see How to configure SMB direct (RoCE) over PFC on Windows 2012 Server.
-
-
To enable the path verification for Windows MPIO, use Windows PowerShell and execute the following command:
Set-MPIOSetting -NewPathVerificationState Enabled -
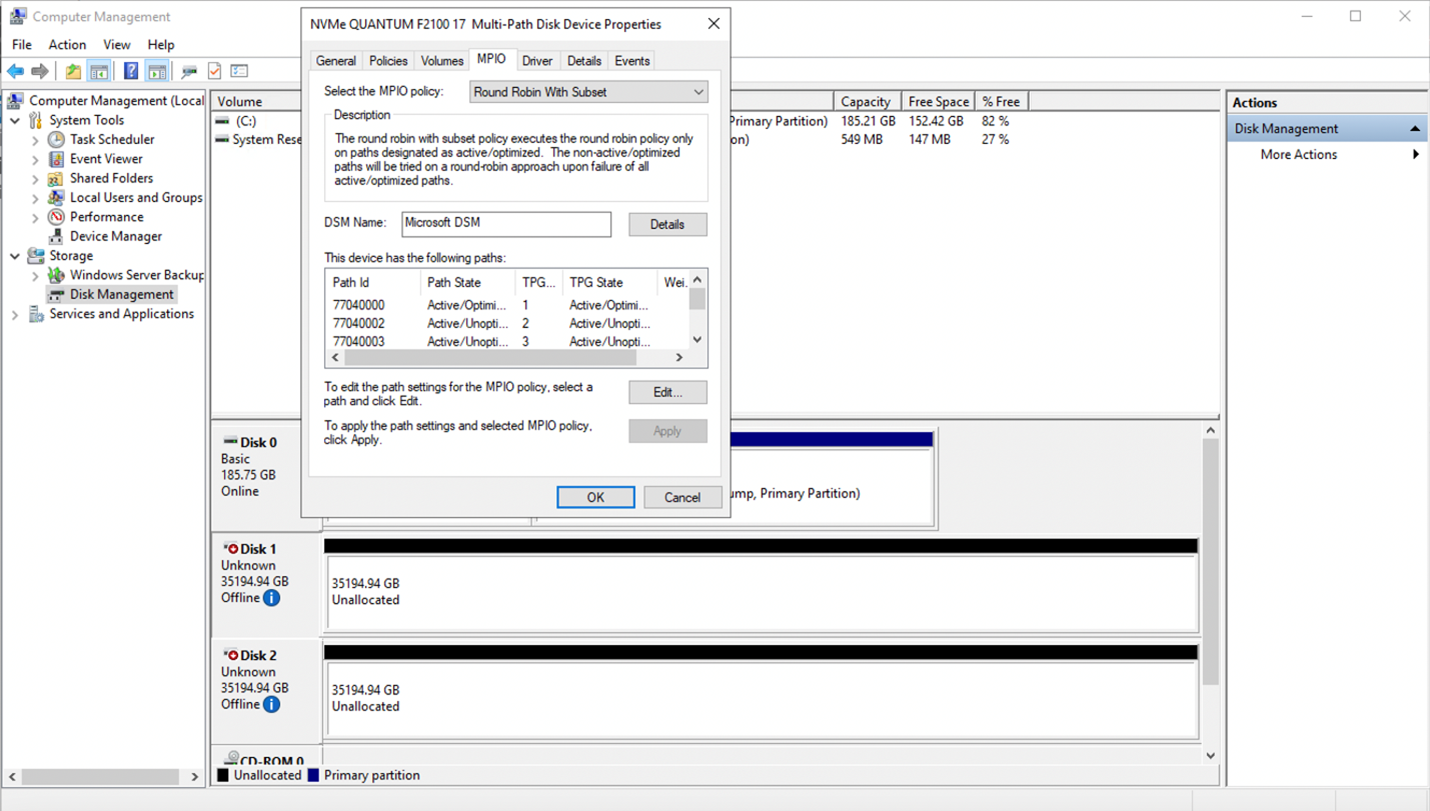
To enable MPIO functionality (required for optimal performance and supporting controller failover/failback), you must claim the devices just as you would for normal SCSI ALUA in the MPIO settings applet – the devices appears as NVMe devices, click Add for each device and then reboot.
Troubleshooting
On the initiator (client) side, under some conditions, the Mellanox NICs can run out of resources; namely, "memory regions" (MRs) when attempting to initiate NVMe-oF connections:
# nvme connect...
Failed to write to /dev/nvme-fabrics: Cannot allocate memory
The corresponding error message is observed in the kernel log:
...
[579688.992799] nvme nvme10: creating 32 I/O queues.
[579691.466634] mlx5_core 0000:3b:00.1: mlx5_cmd_out_err:832:(pid 2145638): CREATE_MKEY(0x200) op_mod(0x0) failed, status limits exceeded(0x8), syndrome (0x59c8a4), err(-12)
[579691.476394] nvme nvme10: failed to initialize PI MR pool sized 128 for QID 27
[579691.490867] nvme nvme10: rdma connection establishment failed (-12)
...
You can workaround this behavior by limiting the number of I/O queues, instead of using the default value, which is the number of logical CPUs in the initiator host. To limit the number of I/O queues, use a smaller value in the discovery.conf file or if initiating connections on the command line:
--nr-io-queues=8You might need to perform some tests to determine the adequate value to achieve the desired performance from the NVMe-oF paths.
When you use synthetic I/O test/benchmark tools such as vidio, you might need to apply a CPU affinity using the taskset command to realize the actual performance achievable by the NVMe-oF storage.
Example
taskset -c 0,2,4,6,8,10,12,14,16,18,20,22 ./vidio -f fa4k -N 500 -n 500 -q 4 -c -w /stornext/snfs1/vidio{7..9}Note: When you configure MPIO, only one disk/physical drive per namespace/volume appears in Windows Disk Manager.
-
Regarding performance, the StarWind NVMe-oF Initiator software contains a known issue, where it only issues 64 KiB I/O requests (in other words, any large I/O is broken into 64 KiB segments), and these I/O’s arrive on the target-side as 64 KiB – this small of I/O not optimal for large frame M&E workloads.
StarWind Software support recommends you introduce the MaxTransferLength (DWORD) parameter in the registry HKEY_LOCAL_MACHINE\SYSTEM\CurrentControlSet\Services\StarNVMeoF\Parameters; however, that does not allow for larger I/O requests. In fact, setting the parameter to 524288 yields an I/O error if you attempt to issue larger requests.
Note: The known issue remains open with StarWind Software and it is not clear if the limitation is within the Windows Server OS or within the StarWind NVMe-oF Initiator software stack.
