Site Planning
The Quantum ActiveScale P200™ is the next generation hardware platform for ActiveScale object storage. It provides a simplified deployment by converging the system and storage node functions into a single server and has virtually unlimited scaling capabilities.
 Build Space Requirements
The P200 is delivered on one or more pallets and is installed on-site. This section describes the space required for unpacking and installation.
Use the following guidelines regarding build space during installation:
-
Plan an unpacking and installation sequence if there is not enough space to unpack and store all of the components at once.
-
While installing system components, a minimum of 48 in (1220 mm) of space is required at the front of the rack. This allows for the largest system component to be installed by two people. If space is not available in the location where the system will operate, consider building the system outside the operational location and moving it into location when finished.
-
If the system will be moved after being built, measure the size of the rack and check the walking path to ensure that the rack will fit as it moves through the deployment site.
Note: Before moving the system, verify that the rack can support the dynamic load of the system weight during movement.
During the receiving process, the system will need to be moved through the facility until it reaches the data center or computer room where it will be installed. This section describes the considerations that the installation team should make before receiving the system and moving it through the facility.
Walking paths must be clear of obstructions and wide enough to allow passage of the packaged system to the location where it will be unpacked. The following is a list of obstructions to consider when conducting a walking path inspection:
| Cables | Consider removing cables, including ramped cable covers, from the walking path before moving the pallet. Leaving the cables in place creates a safety hazard for the installation team and can damage the cables. |
| Lift Locations | There may be locations along the walking path where the system must be lifted in order to proceed. Make sure that lift equipment is available at this location on the day of the delivery. |
| Elevators | Ensure that any elevators that will be required to lift the equipment to the data center/computer room are rated to carry the full load of the system plus passengers. |
| Security | Make sure that all site security requirements adhered to and that all personnel are made aware of the parameters under which they must work. |
Environmental Specifications
|
Parameter |
Specification |
|---|---|
| Operating Temperature |
10°C ~ 35°C (50°F ~ 95°F) |
| Non-operating Temperature |
-40°C to 60°C (-40°F to 140°F) |
| Operating Relative Humidity |
8% to 90% (non-condensing) |
| Non-operating Relative Humidity |
5% to 95% (non-condensing) |
The front and rear of the system must be clear of any materials that could block or disrupt system airflow. Disruption of airflow can cause performance issues or system damage due to overheating.
Use the following guidelines to ensure proper system airflow:
-
The airflow in and out of the equipment must not be restricted.
-
Controlled air conditioners that are functional and can sufficiently maintain specified system operating temperatures should be located in the facility where the system will be installed.
-
If rack doors will be used, ensure that the solution used with the system does not prevent airflow from the cold aisle from entering the system freely.
Hardware Overview
P200 1U12 Chassis - Front

| Item | Description |
|---|---|
| 1 | Rack Ears. |
| 2 | Locking Levers. |
| 3 | 2.5" SSD Drives. |
| 4 | Control Panel (see Control Panel below). |
Control Panel
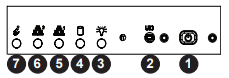
| Item | Description |
|---|---|
| 1 | Power button. The main power switch applies or removes primary power from the power supply to the server but maintains standby power. To perform most maintenance tasks, unplug the system to remove all power. |
| 2 | UID Button. Depressing the Unit Identifier button illuminates an LED on both the front and rear of the chassis for easy system location in a rack configuration. The LED will remain on until the button is pushed a second time. Another UID button on the rear of the chassis serves the same function. |
| 3 | Power LED. Indicates power is being supplied to the system power supply units. This LED is illuminated when the system is operating normally. |
| 4 | HDD LED. Indicates activity on the storage drive when flashing. |
| 5 | NIC LED. Indicates network activity on the LAN when flashing. |
| 6 | NIC LED. Indicates network activity on the LAN when flashing. |
| 7 | Information LED. Alerts operator to several states, as noted in the table below. |
Universal Information LED
| Status | Description |
|---|---|
| Continuously on and red | An overheat condition has occurred. (This may be caused by cable congestion) |
| Blinking red (1 Hz) | Fan failure: check for an inoperative fan. |
| Blinking red (0.25 Hz) | Power failure: check for an inoperative power supply. |
| Solid red and Power LED blinking green | Fault detected. |
| Blue and red blinking at 10Hz | Recovery mode. |
| Solid blue | UID has been activated locally to locate the server in a rack environment. |
| Blinking blue at 1Hz | UID has been activated using IPMI to locate the server in a rack environment. |
| Blinking blue at 2Hz | UID has been activated using the BMC to locate the server in a rack environment. |
| Blinking blue at 4Hz | BMC is resetting (press the UID button on the front panel for six seconds to initiate) |
| Blinking blue at 10Hz and Power LED blinking green | BMC/BIOS firmware is updating |
P200 1U12 Chassis - Rear

| Item | Description |
|---|---|
| 1 | 800W Power Supply (PSU). |
| 2 | I/O Ports (see I/O Ports below). |
| 3 | 2 port, 10/25 GbE full-height AIOM network adapter card. |
I/O Ports
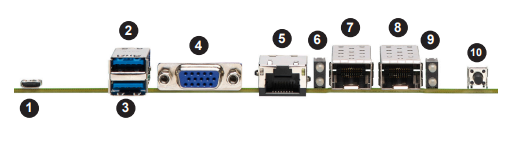
| Item | Description |
|---|---|
| 1 | COM1 Port |
| 2 | USB2 (3.0) |
| 3 | USB3 (3.0) |
| 4 | VGA Port |
| 5 | Dedicated IPMI LAN Port |
| 6 | SFP28 Port 0 Link/Activity LED |
| 7 | SFP28 Port 0 |
| 8 | SFP28 Port 1 |
| 9 | SFP28 Port 1 Link/Activity LED |
| 10 | UID Switch |
Physical Specifications
1U12 Chassis Specifications
|
Parameter |
Specification |
|---|---|
| Chassis |
1U Rackmount W x H x D: 17.6" (447 mm) x 1.7" (43 mm) x 37" (940 mm) 60 lbs (27.2 kg) |
| Drives |
3.5" 16 TB, 18 TB, 22 TB, or 24 TB HDD hot swap drives (12) 2.5" 960 GB SSD drives (2) |
| Capacity |
16 TB Option: 192 TB per chassis, 576 TB raw capacity per one base node and two server expansion (minimum configuration). 18 TB Option: 216 TB per chassis, 648 TB raw capacity per one base node and two server expansion (minimum configuration). 22 TB Opstion: 264 TB per chassis, 792 TB raw capacity per one base node and two server expansion (minimum configuration). 24 TB Opstion: 288 TB per chassis, 864 TB raw capacity per one base node and two server expansion (minimum configuration). |
| Cooling | 40 x 40 x 56 mm cooling fans (6) |
| Memory | DDR4,16 GB,RDIMM,3200 MT,2Rx8 (4) |
| Motherboard | X11DPD-M25; E-ATX form factor, 12" (L) x 13" (W) (30.48 mm x 33.02 mm) |
| Power Supply | 800W redundant power supply (2) |
| Processor | Dual Intel® Xeon® Scalable SP and 2nd Gen Intel® Xeon® Scalable SP processors |
960 GB Drive (SSD) Specifications
|
Parameter |
Specification |
|---|---|
| Capacity | 960 GB |
| Dimensions | W x H x D: 2.75" (69.85 mm) x .27" (6.8 mm) x 3.9" (100.2 mm) |
| Hot Swappable | Yes |
| Operating Relative Humidity | 5-95% |
| Operating Temperature |
0-158° F 0-70° C |
| Quantity (per node) | 2 each |
| Type | U.2 NVMe |
16 TB, 18 TB, 22 TB, and 24 TB SAS Drive (HDD) Specifications
|
Parameter |
Specification |
|---|---|
| Capacity | 16 TB, 18 TB, 22 TB, or 24 TB |
| Dimensions | W x H x D: 4.0" (101.85 mm) x 1.0" (26.1 mm) x 5.8" (147 mm) |
| Hot Swappable | Yes |
| Operating Relative Humidity | 8-90% |
| Operating Temperature |
41-140° F 5-60° C |
| Quantity (per node) | 12 each |
| Type | SAS |
Power Specifications
Each P200 chassis contains two 800 watt power supply units (PSU) for redundancy.
|
Parameter |
Specification |
|---|---|
| Power Cable | C13/C14 (2) |
| AC Input Voltages | 100-240 VAC |
| Rated Current | 4.344 - 1.81 A |
| Rated Input Frequency | 50-60 Hz |
| Rated Power | 432W |
| Rated Inrush Power | 351W |
| Rated Output Voltages | 50A (+12V) |
The P200 does not come with its own power distribution unit (PDU). To prevent the potentially negative effects of excessive inrush current on the system, Quantum recommends selecting a PDU that can stagger the start-up sequence of the system components. If a PDU that cannot stagger the start-up sequence is used, ensure that the PDU is rated to support the inrush current caused by a simultaneous start-up.
Rack Requirements
The P200 is installed into a customer-supplied rack. Use the guidelines in this section to choose an appropriate rack mounting solution.
Note: The absolute minimum depth requirement for the P200 is 42.12 in (1070 mm). However, Quantum recommends selecting a rack with a minimum depth of 48 in (1200 mm) to allow for proper PDU installation and cable routing.
Use the following additional guidelines when choosing a rack mounting solution for the P200:
| System Dimensions |
Select a rack mounting solution that has the appropriate depth to accommodate the following:
|
| P200 Rail Kits |
|
| System Weight |
Select a rack mounting solution that can withstand the following:
|
| Cable Management | The system is designed so the cables are wired at the back of the system. Ensure that the system cabling can be routed safely and efficiently through the selected route. |
| Grounding | Ensure that both the electrical components used to power the system and the rack itself can be grounded safely. |
Regulatory Compliance
| Electromagnetic Emissions | FCC Class A, EN 55032 Class A, EN 61000-3-2/3-3, CISPR 32 Class A |
| Electromagnetic Immunity | EN 55024/CISPR 24, (EN 61000-4-2, EN 61000-4-3, EN 61000-4-4, EN 61000-4-5, EN 61000-4-6, EN 61000-4-8, EN 61000-4-11), CNS14336-1, CNS13438, GB4943.1-2011, GB9254-2008(Class A) and GB17625.1-2012 |
| Safety | CSA/EN/IEC/UL 60950-1 Compliant, UL or CSA Listed (USA and Canada), CE Marking (Europe) |
| Other | VCCI-CISPR 32 and AS/NZS CISPR 32 |
|
Environmental |
Directive 2011/65/EU and Delegated Directive (EU) 2015/863 and Directive 2012/19/EU |
Servicing Space Requirements
Note: Mounting a PDU or other equipment vertically in the rack can hinder the ability to service components.
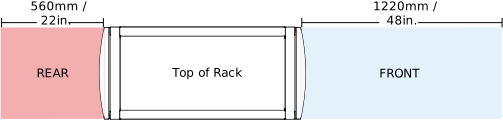
To properly install and service system components, the Quantum recommends the following space at the front and rear of the system.
Table 1: Space requirement specifications
|
Specification |
Value |
|
Minimum front of rack space |
48 in (1220 mm) |
|
Minimum rear of rack space |
22 in (560 mm) |
Figure 1: Minimum servicing space required
Shipping Specifications
Base System Node and Server Expansion Nodes
The P200 shipment includes a minimum of 1 1U12 base system node and 2 1U12 server expansion nodes shipped on a pallet.
| Base System Node | Server Expansion Node 1 | Server Expansion Node 2 | |
|---|---|---|---|
| Box Dimensions |
45.75 x 21.75 x 7.75 (inches) 116.2 x 55.2 x 19.7 (cm) |
45.75 x 21.75 x 7.75 (inches) 116.2 x 55.2 x 19.7 (cm) |
45.75 x 21.75 x 7.75 (inches) 116.2 x 55.2 x 19.7 (cm) |
| Box Weight |
76 lbs 34 kg |
76 lbs 34 kg |
73 lbs 33.1 kg |
| Pallet Weight |
261 lbs 118 kg |
||
Each base system node carton contains the following:
| Quantity | Item |
|---|---|
| 1 | 1U12 Server Chassis (drives installed) |
| 2 | C13/14 13A/250V Power Cables (5ft.) |
| 1 | Base System Kit (inlcudes Getting Started Guide and anti-static wrist strap. |
| 1 | Rail mounting Kit |
| 3 | CAT 6A, RJ45 Cables (6 ft.) |
| 6 | 10/25 Gbe SFP28 Direact Attach Cables (3 meters) |
Each server expansion node carton contains the following. The CAT and DAC cables are placed in the Server Expansion Node 1 box.
| Quantity | Item |
|---|---|
| 1 | 1U12 Server Chassis (drives installed) |
| 2 | C13/14 13A/250V Power Cables (5ft.) |
| 1 | Rail mounting Kit |
| 3 | CAT 6A, RJ45 Cables (6 ft.) |
| 6 | 10/25 Gbe SFP28 Direact Attach Cables (3m) |
External Connectivity Kit
| Server Expansion Node 1 | |
|---|---|
| Box Dimensions |
19.0 x 12.25 x 3.0 (inches) 48.3 x 30.5 x 7.6 (cm) |
| Box Weight |
1.9 lbs .86 kg |
Each external connectivity kit contains the following.
| Quantity | Item |
|---|---|
| 6 | 25 GbE SFPs |
| 6 | 10 GB FC cable, 5m. |
Switch Bundle
The P200 switch bundle includes 2 packaged switches in a single overpack box.
| Overpack Box | |
|---|---|
| Box Dimensions |
26.5 x 26.5 x 21 (inches) 67.3 x 67.3 x 53.3 (cm) |
| Box Weight |
Overpack Box 66 lbs 30 kg Switch 1 30 lbs 13.6 kg Switch 2 30 lbs 13.6 kg |
Each switch in the overpack box contains the following:
| Quantity | Item |
|---|---|
| 1 | 10/25 GbE 48 port switch |
| 1 | Panel filler, vented |
| 1 | Rail kit |
| 2 | C13/14 13A/250V Power Cables (5ft.) |
Switches
Two Quantum-supplied (pictured below) or customer-supplied data switches are required to provide the back-end network for the P200. Additional data switches may be required depending on the size of the deployment.
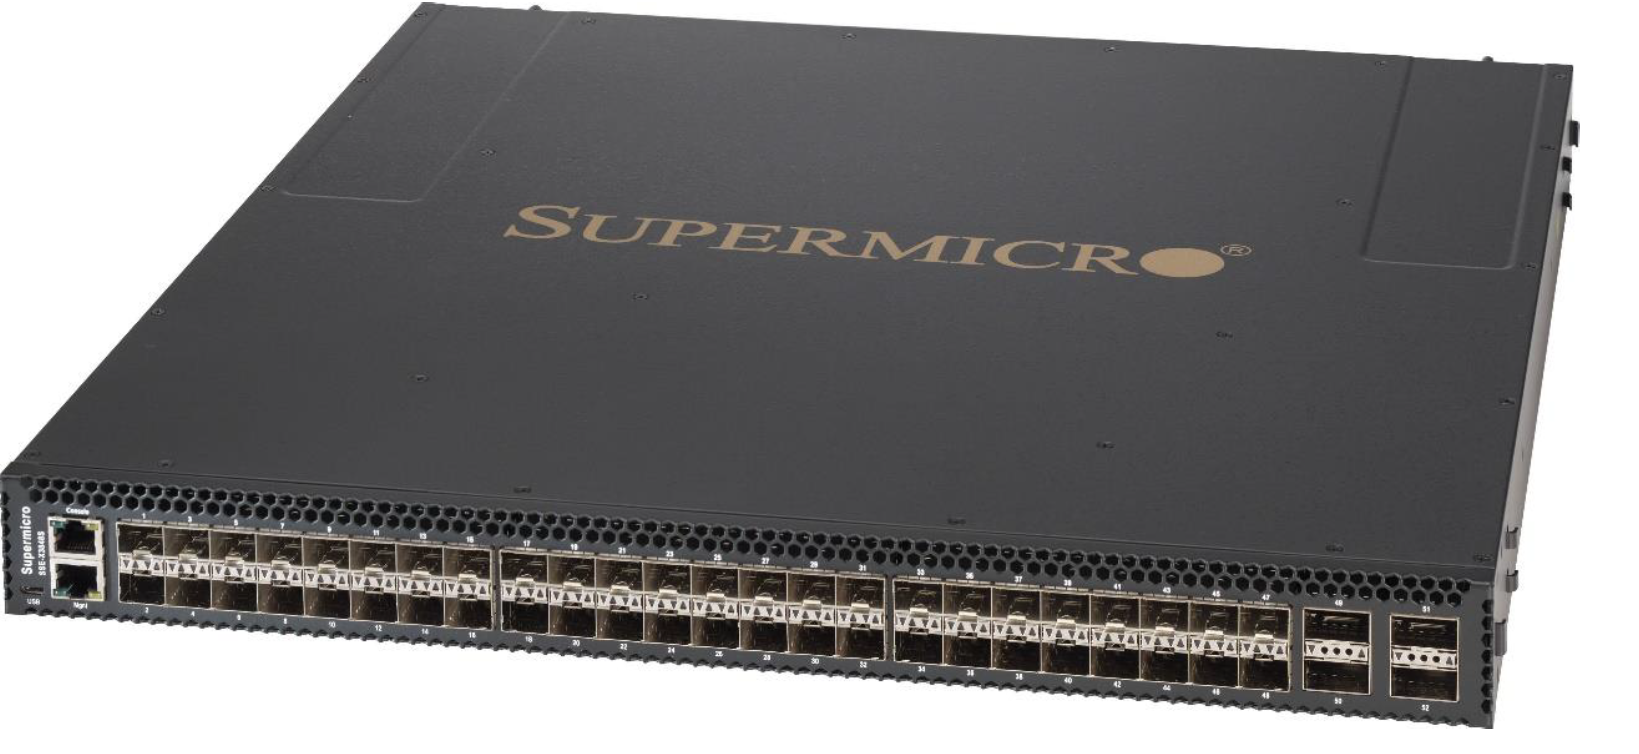

P200 Switch Requirements for High Availability
This section gives a high-level overview of the requirements and quantities of networking components for P200 systems, mainly for planning purposes. Note that the P200 Sizing Tool also reports this output when sizing a system.
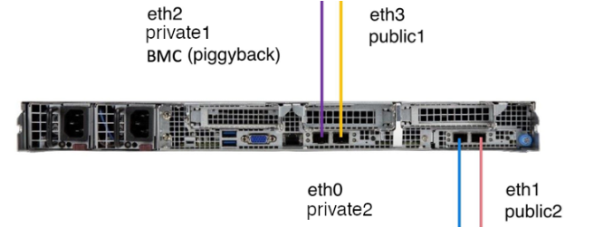
The networking setup for a High-Available ActiveScale P200 system consists of several different networks and networking components. The public traffic to and from the system goes via 2 networks which usually have their own dedicated switch(es). The internal traffic is also handled by 2 dedicated and independent networks, where each network typically has dedicated switches to guarantee High Availability when a switch goes down. One of the internal networks also hosts the IPMI connectivity for all the nodes. No additional network connections or ports need to be foreseen for these, since the IPMI traffic piggybacks on one of the internal 10/25 GbE connections.
A high-level overview of the physical networking layout for each node within an ActiveScale P200 system is shown in this picture:
Switches for the P200 Internal Traffic
To accommodate the P200 internal traffic 10/25GbE switches are required. 25GbE is recommended, since 10GbE will result in lower performance of the ActiveScale P200 system.
All the internal traffic will be spread across 2 independent networks for HA reasons. Therefore, an even number of 10/25GbE switches is recommended.
Data Switch Requirements
These data switches need to have the following requirements:
-
Layer-3 switch with full non-blocking backplane, support for static IP routing, 802.1Q (tagged VLANs), port-based VLANs and Telnet/SSH for remote login and management.
-
Each P200 1U12 node has 4 10/25GbE network ports. Half of the ports of each node will be used for internal traffic, so we need 2 10/25GbE ports per node to be connected to the internal data traffic switches. If 2 switches are used for internal connectivity, then 1 of the connections need to go to switch 1 and the one to switch 2. If only a single switch is used (not recommended), then all 2 internal connections need to go to this single switch.
These ports need to support either 10 or 25 GbE (via DAC cables or SFP+/SFP28 optical transceivers).
-
During the ActiveScale software installation, the VM installer will have to be connected to the 1st internal network using a connection that offers a network speed of 1 GbE or better. Therefore, 1 additional switch port should be foreseen in the 1st internal network. This port will only be used during the ActiveScale software installation and can be repurposed when the install is complete.
-
When there will be more than 2 internal data traffic switches, at least 2 ports per switch need to be configured as scale-out ports (to provide interconnectivity between the switches).
-
These scale-out ports need to support either 40/100GbE (recommended, via DAC cables or QSFP/QSFP28 optical transceivers), or 10/25GbE (via DAC cables or SFP+/SFP28 optical transceivers).
-
For performance reasons it might be required to have more than 2 ports per switch configured as scale-out ports.
-
-
For 3-Geo deployments at least 1 port per switch needs to be used for inter-geo connectivity.
-
These inter-geo connectivity ports need to support either 40/100GbE (recommended; via DAC cables or QSFP/QSFP28 optical transceivers), or 10/25GbE (via DAC cables or SFP+/SFP28 optical transceivers).
-
For performance reasons it might be required to have more than 1 port per switch configured as inter-geo connectivity ports.
-
Switches for the P200 Public Traffic
To accommodate the public traffic 10/25GbE switches are required. 25GbE is recommended, since 10GbE will result in lower performance of the system. If NIC bonding will be used on the public interfaces, then these switches need to support Dynamic link aggregation (802.3ad, LACP).
The public traffic can be spread across multiple switches for HA reasons, or only a single switch can be used. The same switches as for the internal traffic can be used, or different switches can be used.
These switches need to have the following requirements:
-
The system needs a total of 2 10/25GbE ports per P200 node on the public switches. These ports need to support either 10/25GbE (via DAC cables or SFP+/SFP28 optical transceivers).
-
The ports on the switch connected to the ActiveScale public interfaces should be able to receive UNTAGGED traffic, because ActiveScale public interfaces can’t be configured to tag traffic for a certain VLAN. Therefore, these switch ports should be set in access mode (not trunk):
switchport mode access
Required Number of Switch Ports for Common P200 Configurations
The table below contains the number of required switch ports for some common 1-Geo P200 configurations:
| P200 Configuration | Switch ports for Internal Network 1 | Switch ports for Internal Network 2 | Switch ports for public traffic |
|---|---|---|---|
| 3 x P200 1U12 node | 4 x 10/25 GbE | 3 x 10/25 GbE | 6 x 10/25 GbE |
| 6 x P200 1U12 node | 7 x 10/25 GbE | 6 x 10/25 GbE | 12 x 10/25 GbE |
| 60 x P200 1U12 node (using 48-port 10/25 GbE switches) | 61 x 10/25 GbE (distributed over 2 48-port switches) 2 x 40/100 GbE (to interconnect these 2 switches) | 60 x 10/25 GbE (distributed over 2 48-port switches) 2 x 40/100 GbE (to interconnect these 2 switches) | 120 x 10/25 GbE |
The table below contains the number of required switch ports for some common 3-Geo P200 configurations:
| P200 Configuration | Switch ports for Internal Network 1 | Switch ports for Internal Network 2 | Switch ports for public traffic |
|---|---|---|---|
| 9 x P200 1U12 node (3 x 1U12 node per Geo) | 10 x 10/25 GbE (4 in 1 Geo, 3 in other Geo’s) | 9 x 10/25 GbE (3 per Geo) | 18 x 10/25 GbE (6 per Geo) |
| 18 x P200 1U12 node (6 x 1U12 node per Geo) | 19 x 10/25 GbE (7 in 1 Geo, 6 in other Geo’s) | 18 x 10/25 GbE (6 per Geo) | 36 x 10/25 GbE (12 per Geo) |
| 180 x 1U12 node (60 x 1U12 node per Geo; using 48-port 10/25 GbE switches) | 181 x 10/25 GbE (61 in Geo 1, 60 in other Geo’s; distributed over 2 48-port switches per Geo) 12 x 40/100 GbE (4 per Geo; to interconnect the switches and for inter-geo connectivity) | 180 x 10/25 GbE (60 per Geo; distributed over 2 48-port switches per Geo) 12 x 40/100 GbE (4 per Geo; to interconnect the switches and for inter-geo connectivity) | 360 x 10/25 GbE (120 per Geo) |
System Configuration
A P200 system minimum configuration consists of 1 1U12 base system node and 2 1U12 server expansion nodes. Each node contains one of the following drive configurations:
-
12 3.5" 16 TB HDDs, for a total of 576 TB of raw capacity.
-
12 3.5" 18 TB HDDs, for a total of 648 TB of raw capacity.
-
12 3.5" 22 TB HDDs, for a total of 792 TB of raw capacity.
-
12 3.5" 24 TB HDDs, for a total of 864 TB of raw capacity.
Figure 2: P200 Minimum Configuration
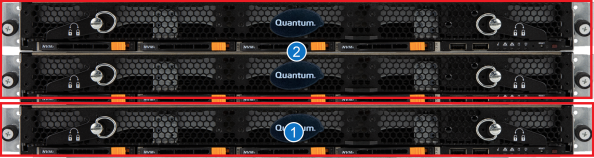
| Item | Description |
|---|---|
| 1 | P200 Base System Node (1) |
| 2 | P200 Server Expansion Node (2) |
Flexible Node Configurations
Starting with ActiveScale 7.0 and above, Quantum now offers flexible server expansion node configurations above the minimum configuration.
In most cases, when performing an expansion of a P200 system after the initial installation, the number of nodes added during an expansion has to be equal to or larger than the total number of nodes in the original installed system.
For example, on a P200 system initially installed with the minimum system configuration (1 base system node + 2 server expansion nodes), 3 additional expansion server nodes would be included in the expansion.
