Replace Server CRUs
WARNING: Whenever you need to lift the system, get others to assist you. To avoid injury, do not attempt to lift the system by yourself.
WARNING: Opening or removing the system cover while the system is powered on may expose you to a risk of electric shock.
Caution: Do not operate the system without the cover for a duration exceeding five minutes. Operating the system without the system cover can result in component damage.
Caution: Many repairs may only be done by a certified service technician. You should only perform troubleshooting and simple repairs as authorized in your product documentation, or as directed by the online or telephone service and support team. Damage due to servicing that is not authorized by Quantum is not covered by your warranty. Read and follow the safety instructions that are shipped with your product.
Note: It is recommended that you always use an antistatic mat and antistatic strap while working on components inside the system.
Caution: To ensure proper operation and cooling, all bays in the system and system fans must be always populated with a component or a blank.
- Key to the bezel lock.
Note: Only required when you have a locking bezel.
- #2 Phillips screwdriver
- #1 Phillips screwdriver
- T6, T8, T10, and T15 Torx screwdrivers
- Push the bezel latch in from the left, and pull the left end of the bezel outward, away from the server node.
- Detach the right end of the bezel, and remove.

- Attach the right end of the bezel onto the server node.
- Attach the left side of the bezel onto the server. You should hear an audible "click" when it is installed correctly.
To maintain proper server cooling, make sure that all empty drive slots have drive blanks installed. Use the following tasks to remove and install your server's 2.5 inch drive blanks.
Review the following prerequisites before removing or installing drive blanks.
- Read the Safety Instructions. See Safety Information.
- If installed, remove the bezel. See Remove and Install the Server Bezel.
- Press the release button.
- Slide the drive blank out of the drive slot.
![]()
- Insert the drive blank into the drive slot.
- Make sure the release button clicks into place.
- Install the front bezel, as applicable.
![]()
Review the following prerequisites before working with drive carriers.
- Read the Safety Instructions. See Safety Information.
- #1 Phillips screwdriver.
- Remove the drive carrier from the server. See Replace Server CRUs.
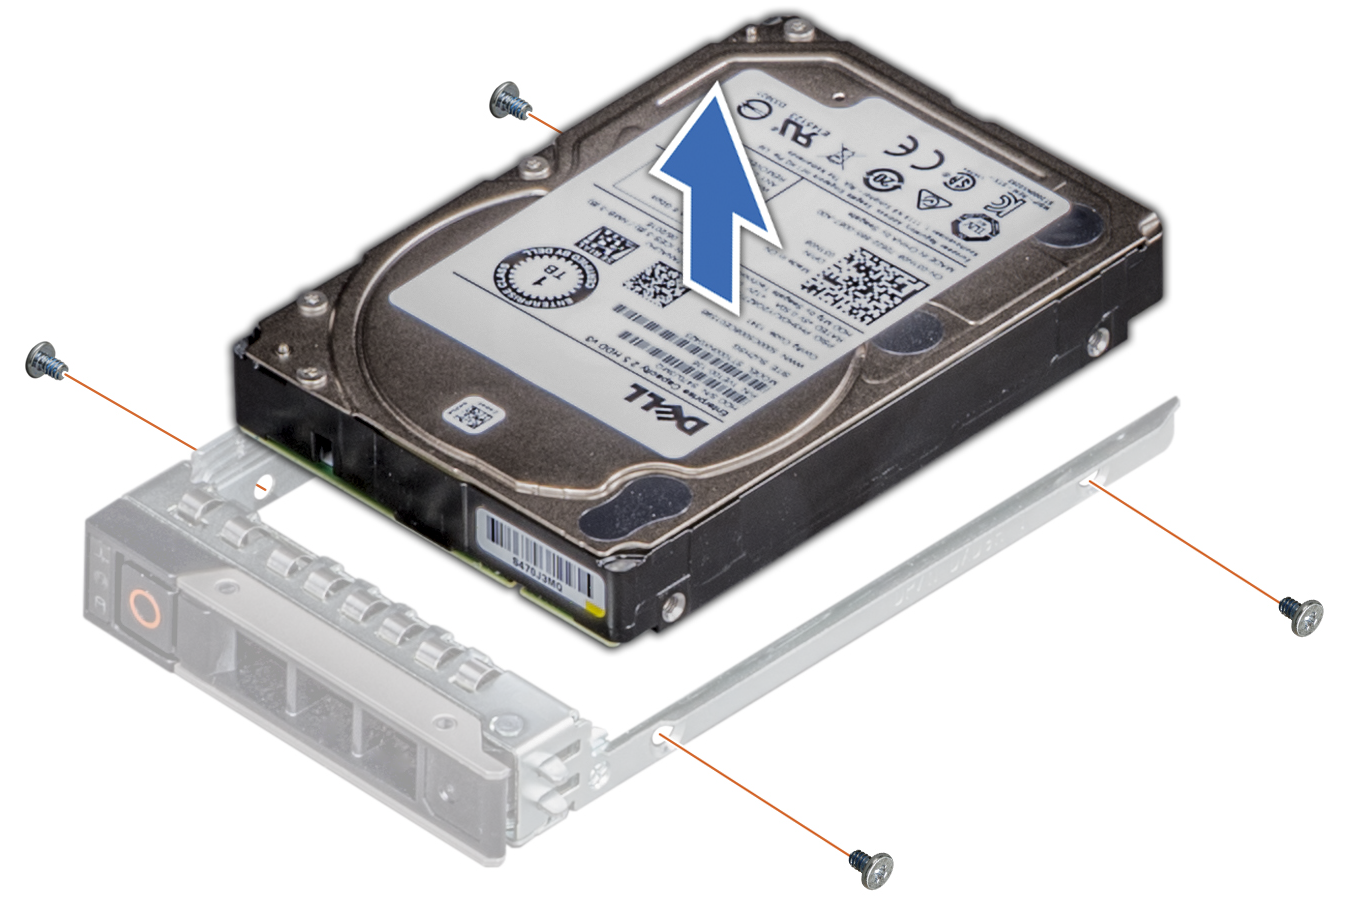
- Remove the screws from the slide rails on the drive carrier.
- Lift the drive out of the drive carrier.
-
With the connector end of the drive toward the back, insert the drive into the drive carrier.
-
Align the screw holes on the drive with the set of screw holes on the drive carrier.
When aligned correctly, the back of the drive is flush with the back of the drive carrier.
- Attach the screws to secure the drive to the carrier.

Boot drive locations
The two left-most boot SSD drives shown below in blue for a server node with a hardware RAID (PERC RAID controller card) are configured as a RAID pair:

Safety instructions
Read the Safety Instructions. See Safety Information.
Bezel
If installed, remove the bezel. See Remove and Install the Server Bezel.
Proper server cooling
To maintain proper server cooling, make sure that all empty drive slots have drive blanks installed if the drive will be removed for longer than 5 minutes. See Remove and Install Drive Blanks.
Adjacent drives
When installing a drive, ensure that the adjacent drive or drive blank is fully installed.
If you insert a drive carrier and attempt to lock its handle next to a partially installed carrier, the partially installed carrier's shield spring can be damaged and rendered unusable.
Replacement drive
If you install a replacement hot-swap boot drive when the server is powered on, the drive automatically begins to rebuild.
Use the blank replacement CRU drive supplied by Quantum, which will be the exact type and capacity as the drive it is replacing. Otherwise, make sure that the drive is the exact type and capacity as the drive it is replacing, and is blank or contains data that you do not need. Any data on the replacement drive is lost during drive configuration.
For these StorNext releases, before replacing the boot drive, in order to delay an issue and further delay the replacement later on in the configuration, Quantum recommends you reboot the system first, in order to unmount the file system on the boot drive.
For StorNext 7.1 and later
If a boot drive fails, order a replacement drive. The drive will automatically rebuilds. Follow ALL steps below to rebuild the drive.This applies to all systems running StorNext 7.1 and later, and servers
For StorNext 6.2 through 7.0.3:
If the boot drive fails, order a replacement drive. When you replace the failed drive with a new one, the drive will automatically rebuild.
Complete Step 1 and Step 2 below to replace the drive.
Note: This DOES NOT apply to systems upgraded to StorNext 7.1 and later, on systems that come with StorNext 7.1 or later) pre-installed, or servers shipped with a software RAID (no PERC card installed).
For StorNext 6.1.1 and earlier:
If the boot drive fails, order a replacement drive. If this drive fails and you are running StorNext 6.1.1 or earlier, and you are able within your environment, upgrade to StorNext 6.2 or later, and complete Step 1 and Step 2 below to replace the drive. If your system needs to remain at StorNext 6.1.1 or earlier, contact Quantum Support for assistance with the replacement.
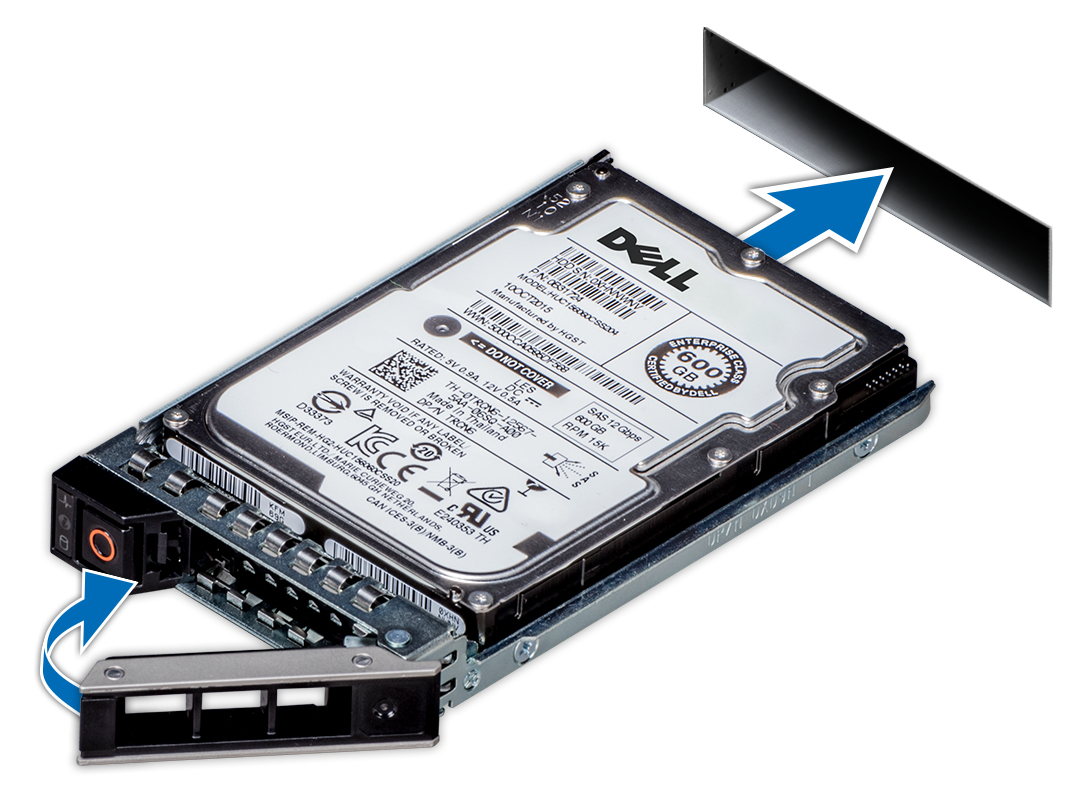
- Press the release button to open the drive handle.
- Slide the drive carrier out of the drive slot.
Note: If you are not immediately replacing the drive, insert a drive blank in the empty drive slot.
- Remove the drive from the drive carrier:
- Remove the screws from the slide rails on the drive carrier.
- Lift the drive out of the drive carrier.
- Install the drive into its carrier:
-
With the connector end of the drive toward the back, insert the drive into the drive carrier.
-
Align the screw holes on the drive with the set of screw holes on the drive carrier.
When aligned correctly, the back of the drive is flush with the back of the drive carrier.
- Attach the screws to secure the drive to the carrier.
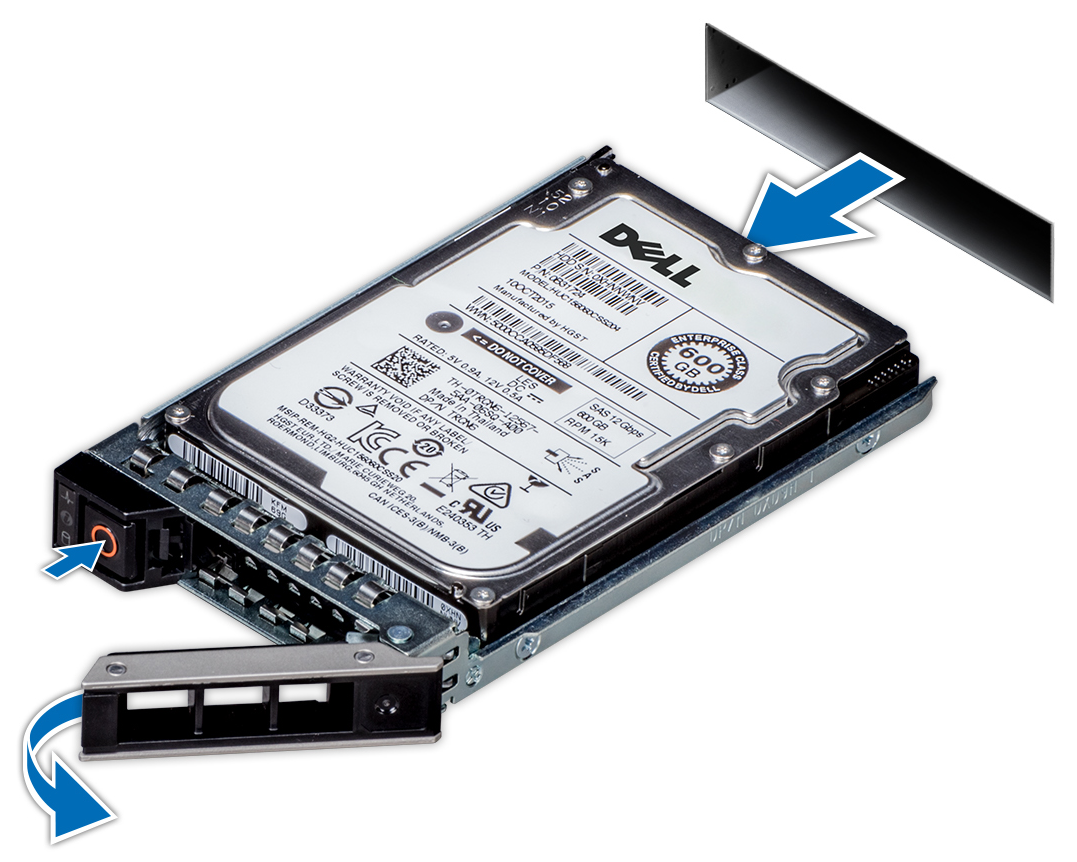
- Press the release button on the front of the drive carrier and open the drive handle.
- Insert the drive carrier into the drive slot until the carrier seats fully into the server (engages the backplane).
- Close the drive handle to lock the drive in place.
- Install the front bezel, as applicable.
Boot drive locations
The two boot SSD drives shown in blue and located below the DVD drive for a server node WITH a software RAID (no PERC RAID controller card) are configured as a virtual RAID pair:

Safety instructions
Read the Safety Instructions. See Safety Information.
Bezel
If installed, remove the bezel. See Remove and Install the Server Bezel.
Proper server cooling
To maintain proper server cooling, make sure that all empty drive slots have drive blanks installed if the drive will be removed for longer than 5 minutes. See Remove and Install Drive Blanks.
Adjacent drives
When installing a drive, ensure that the adjacent drive or drive blank is fully installed.
If you insert a drive carrier and attempt to lock its handle next to a partially installed carrier, the partially installed carrier's shield spring can be damaged and rendered unusable.
Replacement drive
If you install a replacement hot-swap boot drive when the server is powered on, the drive automatically begins to rebuild.
Use the blank replacement CRU drive supplied by Quantum, which will be the exact type and capacity as the drive it is replacing. Otherwise, make sure that the drive is the exact type and capacity as the drive it is replacing, and is blank or contains data that you do not need. Any data on the replacement drive is lost during drive configuration.
For these StorNext releases, before replacing the boot drive, in order to delay an issue and further delay the replacement later on in the configuration, Quantum recommends you reboot the system first, in order to unmount the file system on the boot drive.
For StorNext 7.1 and later
If a boot drive fails, order a replacement drive. The drive will
For StorNext 6.2 through 7.0.3:
If the boot drive fails, order a replacement drive. When you replace the failed drive with a new one, the drive will automatically rebuild.
Complete Step 1 and Step 2 below to replace the drive.
Note: This DOES NOT apply to systems upgraded to StorNext 7.1 and later, on systems that come with StorNext 7.1 or later) pre-installed, or servers shipped with a software RAID (no PERC card installed).
For StorNext 6.1.1 and earlier:
If the boot drive fails, order a replacement drive. If this drive fails and you are running StorNext 6.1.1 or earlier, and you are able within your environment, upgrade to StorNext 6.2 or later, and complete Step 1 and Step 2 below to replace the drive. If your system needs to remain at StorNext 6.1.1 or earlier, contact Quantum Support for assistance with the replacement.
- Press the release button to open the drive handle.
- Slide the drive carrier out of the drive slot.
Note: If you are not immediately replacing the drive, insert a drive blank in the empty drive slot.
- Remove the drive from the drive carrier:
- Remove the screws from the slide rails on the drive carrier.
- Lift the drive out of the drive carrier.
- Install the drive into its carrier:
-
With the connector end of the drive toward the back, insert the drive into the drive carrier.
-
Align the screw holes on the drive with the set of screw holes on the drive carrier.
When aligned correctly, the back of the drive is flush with the back of the drive carrier.
- Attach the screws to secure the drive to the carrier.
- Press the release button on the front of the drive carrier and open the drive handle.
- Insert the drive carrier into the drive slot until the carrier seats fully into the server (engages the backplane).
- Close the drive handle to lock the drive in place.
- Install the front bezel, as applicable.
- Log in to the CLI of the server node with the replaced boot drive:
- Open an SSH connection to the appropriate server and use the IP address assigned to the node on the Management or LAN Client network.
- Initiate an ssh session to the system using Terminal or PuTTY:
- Log in to the command line using the following credentials:
- User name:
stornext - Password:
<stornext user account password>Note: "
password" is the default password for the stornext user account. If the password has been changed, use the current password. Beginning with StorNext 7.0.2, you must change the default password for the stornext user account. As of StorNext 7.0.2, the first time you log in, you will be prompted to change the password to a different one.
- User name:
- Enter
sudo rootshto gain root user access. - Enter the password for the
stornextuser account again. - Open the Service Menu as
-admin: Launch the Service Menu as the
 adminUserTo launch the Service Menu, enter:
sh /opt/DXi/scripts/service.sh -adminThe Service Menu displays.
-
Select More Tools > SW RAID Tools > SW RAID Repair.
-
The failed disk is reported and a prompt appears requesting if you want to proceed with the software RAID disk repair.

-
Press y to begin the software RAID disk repair process.
-
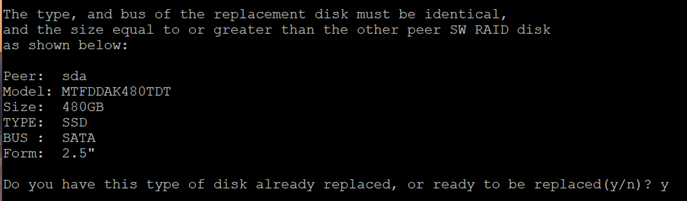
The required replacement drive information is displayed and a prompt appears requesting that you confirm the replacement drive is already inserted. If you have the replacement drive ready or already inserted, press y to continue.
-
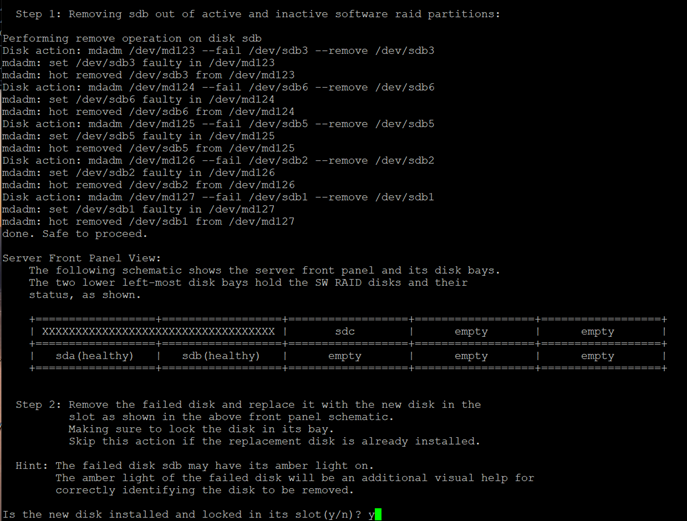
The failed partitions from the failed drive are removed from the RAID mirror and a prompt appears requesting that you confirm the new drive is installed and locked in its slot. Insert the new drive, if the new drive is not already inserted, and press y.
-
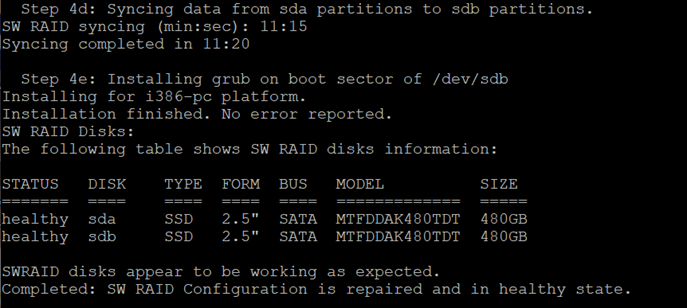
The RAID partitions are created on the new drive and the SW RAID disks are repaired to include the new partitions on the new drive. The RAID re-synchronization process is initiated and the Service Menu displays the progress of the re-synchronization process.
Note: Quantum recommends you wait until this process is completed, before you perform other activities on your system.

-
Open an additional SSH session and enter the following to monitor the progress of the rebuild activity:
cat /proc/mdstatA recovery percentage complete displays for each partition that is being rebuilt.
-
When the re-synchronization process is complete, the output displays a healthy status for the RAID disks.