The Command-line Interface (CLI)
If the system has previously been configured, and is on the network, connect to the system remotely over the StorNext management/public network. Use the appropriate IP address for your configured system on that network.
Configure the network settings on a laptop before accessing the system on the StorNext management/public network.
Keep in mind that the following specific steps may differ slightly, depending on your version of macOS.
- Select the Apple menu > System Preferences> Network, and select the Ethernet connection.
- In the Configure IPv4 drop-down list, select Manually.
- Enter the IP address and subnet mask values required for the network.
- Click Apply.
- Close the Network dialog.
Wait a couple minutes for the laptop network connection to be functional.
Keep in mind that the following steps may differ slightly, depending on your version of Windows.
- For Windows laptops, access the Network Connections dialog.
- From the Start menu, search for and open the View Network Connections dialog.
- Right-click the network connection that corresponds to the Ethernet port on the computer, such as Local Area Connection, and select Properties.
- From the list of connections, select Internet Protocol Version 4 (TCP/IPv4), and then click Properties to display the Internet Protocol Version 4 (TCP/IPv4) Properties dialog box.
We recommend writing down the settings in this dialog box before you change them. You can refer to this information when you set the the settings back to their original values — after you are finished using this local network connection.
- Click the Use the following IP address radio button, and enter the appropriate IP address and Subnet mask values (leave gateway blank):
- Click OK.
- Click Close.
Wait a couple minutes for the laptop network connection to be functional.
- Open an SSH connection to the appropriate server and use the IP address assigned to the node on the Management/LAN Client network.
- Log in to the command line using the following credentials:
- User name:
stornext - Password:
<stornext user account password>Note: "
password" is the default password for the stornext user account. If the password has been changed, use the current password. Beginning with StorNext 7.0.2, you must change the default password for the stornext user account. As of StorNext 7.0.2, the first time you log in, you will be prompted to change the password to a different one.
- User name:
- Enter
sudo rootshto gain root user access. - Enter the password for the
stornextuser account again.
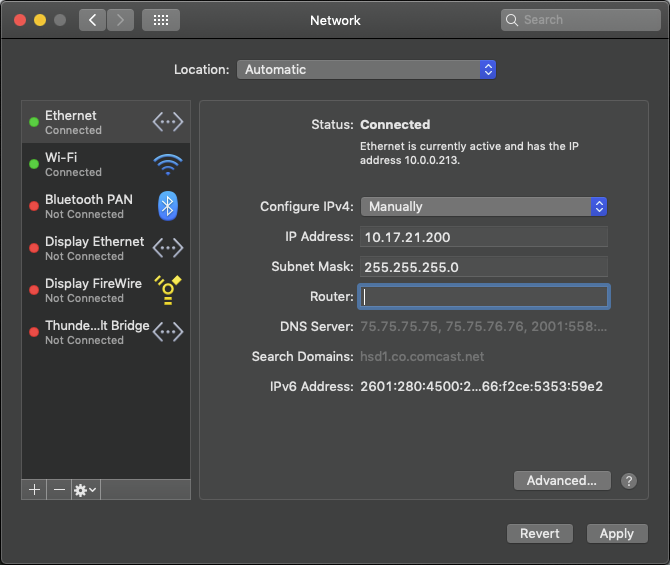
Configure the IPv4 network settings for the ethernet connection on the computer you will access the system directly from while connected to the Service Port.
- IP Address (Mac); TCP/IPv4 address (Windows) – 10.17.21.200
- Subnet mask – 255.255.255.0
- Router (Mac); Gateway (Windows) – blank
These steps may differ slightly for your version of macOS.
- Click an open area of the Mac desktop, and select Apple menu> System Preferences> Network or click the System Preferences icon from the Dock:
- Click the Network icon in System Preferences:
- Select the Ethernet connection being used.
- In the Configure IPv4 drop-down list, select Manually.
We recommend writing down the settings in this dialog box before you change them. You can refer to this information later when you set the settings back to their original values — after you are finished using this network connection.
- Enter the IP address and subnet mask values (leave router blank):
- IP Address - 10.17.21.200
- Subnet Mask - 255.255.255.0
- Router - blank
- Click Apply.
- Close the Network dialog.


Example (Mojave)
It may take a couple minutes to enable the network connection.
Keep in mind that the following steps may differ for your situation, depending on your version of Windows.
- Access the Network Connections dialog:
- For Windows 10 (method 1), right-click the Start menu icon, click Network Connections and click Change Adapter Options in the right pane of the dialog.
- For Windows 10 (method 2), open the Cortana search, and enter View network status and tasks, and click Change adapter settings in the left pane of the dialog.
- From older Windows versions, click the Start menu, search for and open the View Network Connections dialog.
- Right-click the network connection that corresponds to the Ethernet port on the compute being used, something like Ethernet or Local Area Connection, and select Properties.
- From the list of connections, select Internet Protocol Version 4 (TCP/IPv4), and then click Properties to display the Internet Protocol Version 4 (TCP/IPv4) Properties dialog box.
We recommend writing down the settings in this dialog box before you change them. You can refer to this information later when you set the settings back to their original values — after you are finished using this network connection.
- Click the Use the following IP address radio button, and enter the appropriate IP address and Subnet mask values (leave gateway blank):
- TCP/IPv4 address – 10.17.21.200
- Subnet mask – 255.255.255.0
- Gateway – blank
- Click OK.
- Click Close.
It may take a couple minutes to enable the network connection.
Note: You don't need to connect to the Service Port if you will be accessing the system over an ethernet network. For connections over your network, connect to the system using an SSH client like PuTTY using the IP address for the server node over your normal network connection.
Each server node contains an integrated 1GbE Ethernet port that is used for initial system installations, but is also dedicated to Service access once the system is installed.
If you desire to directly connect to the system, connect an Ethernet cable from the Ethernet port of a service laptop to the Service Port on the rear of the Server Node
Service Port - Gen 2 Systems

- Open an SSH connection to the appropriate server and use the IP address assigned to the node on the Management or LAN Client network, or use the Service Port IP address.
- 10.17.21.1
- Initiate an ssh session to the system using Terminal or PuTTY:
- Log in to the command line using the following credentials:
- User name:
stornext - Password:
<stornext user account password>Note: "
password" is the default password for the stornext user account. If the password has been changed, use the current password. Beginning with StorNext 7.0.2, you must change the default password for the stornext user account. As of StorNext 7.0.2, the first time you log in, you will be prompted to change the password to a different one.
- User name:
- Enter
sudo rootshto gain root user access. - Enter the password for the
stornextuser account again.
