Remove and Replace a Drive
Overview
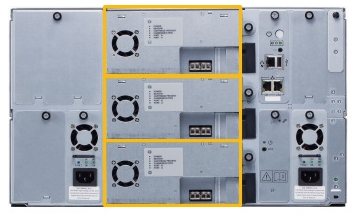
Tape drives are installed in the back of the library. The i6 supports up to three IBM Fibre Channel (FC) LTO-6 and later
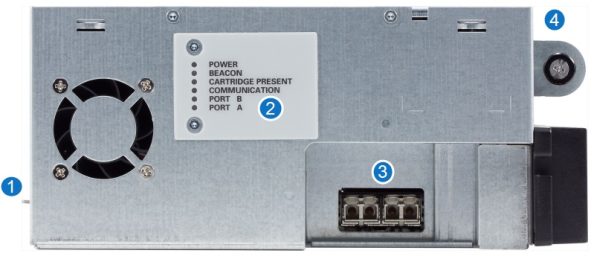
LTO-8 FC Drive
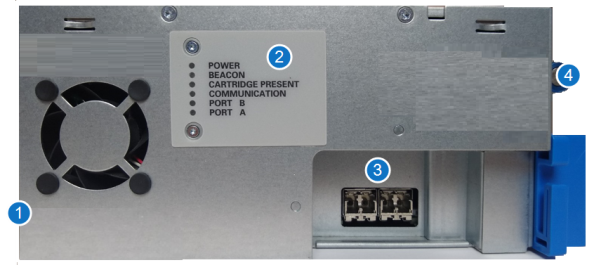
LTO-9 FC Drive
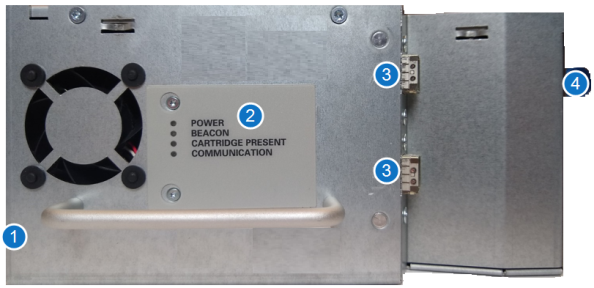
LTO-9 SAS Drive
| Item | Name | Description |
|---|---|---|
|
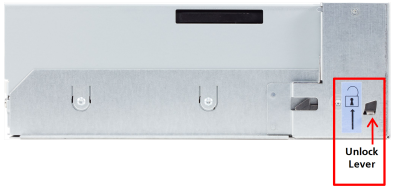
1 |
Unlock Lever |
The unlock lever must be pushed to the unlocked (up) position before the drive sled can be removed from the library. |
| 2 | LEDs |
The drive LEDs provide you with visual information that lets you know the drive is working correctly. After the library is powered up and working, the following indications tell you the drive is operating normally:
|
| 3 | Ports | The ports connect your drives to a server or a switch. You connect Fibre Channel drives with Fibre Channel cables. |
| 4 | Thumbscrews | Thumbscrews secure the drive sled to the chassis. |
Before You Begin
Important Information - Drive Acclimation
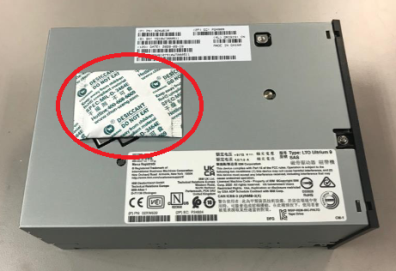
Before opening the sealed ESD bag, the drive should be acclimated to the climate inside the facility or room location where the drive will be installed. Changes in temperature and humidity can cause condensation. It is recommended to leave drives in the packaging for a minimum of 24 hours before opening the sealed bag.
Place the sealed bag away from direct sources of air convection to minimize condensation.
If any external or internal condensation is seen on the sealed bag after 24 hours, remove the drive from the bag and acclimate the drive in the planned location for an extra 12 to 24 hours, or until no visible condensation remains.
Figure 1: Drive in Sealed Bag

Once the bag has been opened, the drive should never be moved to a new location where temperature differences are greater than 5 degrees Celsius. If this type of drive relocation needs to occur, the drive should be placed in a sealed bag with desiccant and allowed to acclimate to the new location for a minimum of four hours.
Figure 2: Drive with Dessicant
Drive temperature and humidity specifications are as follows:
Note: The temperature and humidity specifications below are for LTO drives. For LTO media temperature and humidity specifications, refer to the Environmental Specifications in the Site Planning Guide.
| Mode | Air Inlet Temperature | Relative Humidity (Non-Condensing) | Altitude (Max) |
|---|---|---|---|
| Operating Mode |
10°C to 40°C (50°F to 104°F) |
20% to 80% 26°C (79°F) Wet Bulb Max |
3048 m |
| Recommended Operating Mode |
20°C to 25°C (68°F to 77°F) |
40% to 50% | 3048 m |
| Storage |
-40°C to 60°C (-40°F to 140°F) |
10% to 90% Non-Condensing |
3048 m |
| Shipping |
-40°C to 60°C (-40°F to 140°F) |
10% to 90% Non-Condensing |
12192 m |
Before you begin the removal procedure, take a snapshot of the library and save your library configuration. These will be used to restore your library if any issues occur after the removal and replacement procedure.
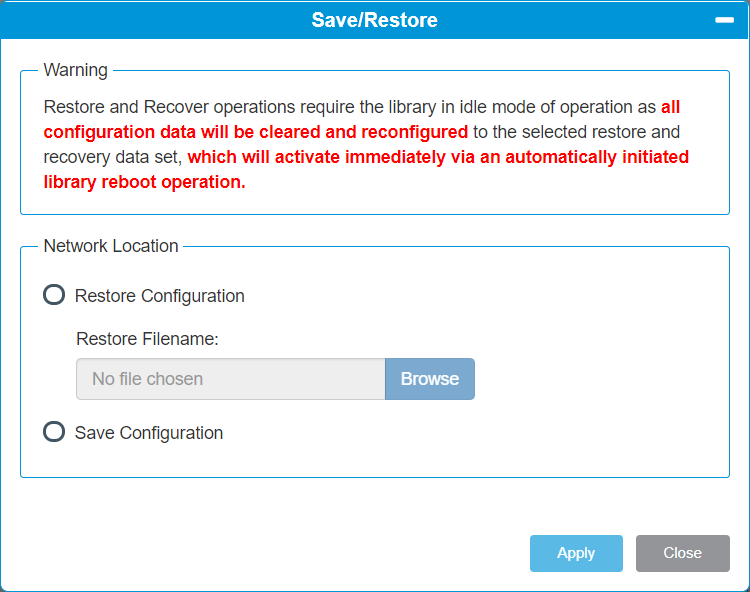
Your library has many configurable items, such as tape drive IDs, partitions, user accounts, Import/Export (I/E) slots, and cleaning slots. The Save/Restore window allows you to save your library's configuration and then restore the library’s firmware and configurable items to a previous state in the event of a hardware failure or firmware upgrade.
Restore a Configuration on the same Library
Before you restore a library configuration, review the following:
- If you have Logical System Addressing (LSA) enabled on the library, the saved configuration is specific to that library only. Do not attempt to clone the configuration to a different library.
- The library must have all the proper licenses installed before restoring a configuration.
Restore a Configuration on a new Library
Before you restore a library configuration, review the following:
- If you have LSA enabled and want to clone the configuration to a new library, you must first disable LSA and save the configuration (see Library Settings).
- If you want to clone a saved configuration to another library, you should only use the saved configuration upon initial installation of a new library. Once a the cloned configuration is on a new library, you should save a configuration specific to that new library.
- If you are cloning a saved configuration to a new library, the new library must have the same minimum license configuration as the library where the saved configuration came from.
- If you are cloning a saved configuration to a new library, the new library must have at least the same minimum module configuration. For example, if the library the saved configuration came from has 4 modules, the new library must have a least 4 or more modules.
| Item | Description | Action |
|---|---|---|
| Restore Configuration |
Restores library to the selected configuration. After the restore, the library will automatically reboot. |
Select the radio button. |
| Restore Filename | Allows you to select the name of the library configuration file you want to restore. | Click the Browse button and navigate to the configuration file you want to use. Click Apply to begin restoring the library configuration. |
| Save Configuration | Saves the current library configuration. | Select the radio button. Click Apply. The library configuration file is downloaded. You can then use the file locally or email it. |
Click Close to exit the window.
The Library Snapshot feature captures detailed information about the entire library in a single ASCII file that can be e-mailed to technical support personnel. The information consists of configuration data, status information, and trace logs for library components. Trace logs collect problem data and provide support personnel with vital library information for troubleshooting and solving problems.
You can e-mail the snapshot file from the WebGUI. You can also download the snapshot file to your computer. However, you cannot print snapshot files directly from the Web client. Depending on the library configuration and your connection speed, saving the snapshot file could take several minutes. The resulting file size can be large. In some cases, your firewall file-size limitations could prohibit you from emailing the file.
- Library SN
- Number of physical slots installed (all slots)
- Number of slots assigned to partitions (host and library managed)
- Number of assigned slots populated with media
- Number of general purpose drives, listed by drive manufacturer and LTO generation
- Drive utilization rate of general purpose drives (even if Advanced Reporting [AR] isn’t licensed)
- Number of EDLM drives
- Drive utilization rate of EDLM drives (even if AR isn’t licensed)
- Dual/single robot
- Number of yellow/red robot-related RAS tickets
- Redundant power – Y/N
- Advanced Reporting license – Y/N
- Number of I/E jobs done
- Largest number of media in a single I/E job
- Number of red/yellow RAS tickets associated with control or drive paths failing or losing connectivity
- From the Navigation panel, select Service.
-
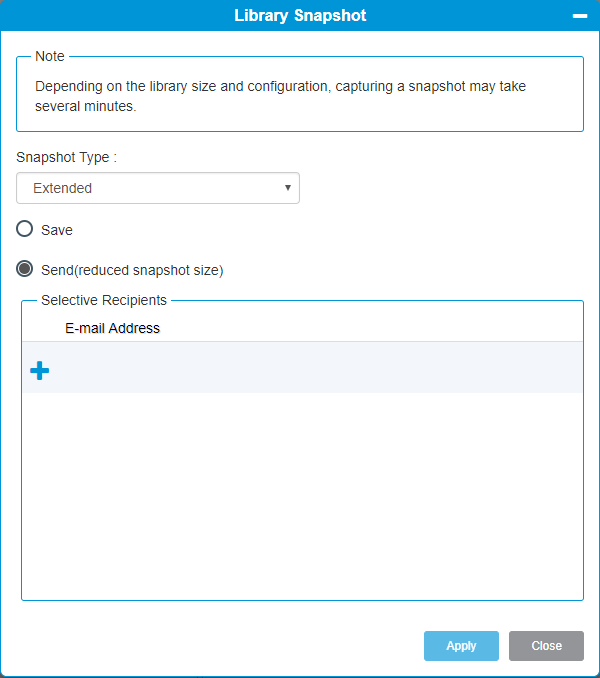
In the Operations panel, click Library Snapshot.

Item Description Action Snapshot Type Select a Standard or Extended library snapshot. - Select Standard to collect the library data documented above.
- Select Extended to collect Standard library data, plus additional log history data and all collected tape drive data dumps.
Note: Extended snapshots cannot be send via email.
Save Allows you to save the snapshot file to a computer. Select the Save radio button and click Apply. Send This feature allows you send the snapshot to any email address you want. Select the Send radio button. E-mail Address This field allows you to enter in an email address. Enter the desired email address and click the icon. Repeat this until all intended email recipients are displayed in the box below the E-mail Address field. When finished, click Apply to send the snapshot. - Click Close to exit the window.
Remove a Drive
Important Information - Before You Begin
Before you begin a drive removal, review the following information.
- Use this procedure for removing and replacing the same drive model type only.
-
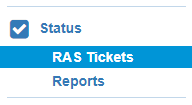
Identify the drive that needs to be replaced by referencing the RAS ticket in the WebGUI (Status > RAS Tickets).
This video shows the drive replacement procedure for a Scalar i6. The overall procedure is the same for the Scalar i3. However, the Scalar i3 supports either Fibre Channel or SAS connectivity whereas the video shows Fibre Channel. In addition, the Scalar i3 supports half-height drives whereas the video shows full-height drives.
Before removing a drive, check to see that it doesn't contain a tape. You can perform this check visually by looking in the window of the library. Or, you can use the WebGUI to verify that the drive does not contain a tape.
Drives can be visually inspected for tapes by looking in the front window of the module.
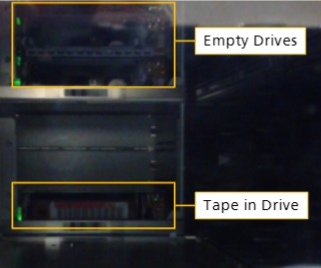
In the WebGUi, go to Library > Drives. A tape in a drive will be indicated under the Media column.
- From the Navigation panel, select Drives.
- In the North Panel, select the check box next to the drive(s) you want to eject media from.
-
In the Operations panel, click Eject.
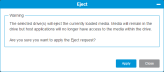
-
Click Apply to save your settings.
-
Click Close to exit the window.

Note: If you experience a stuck tape while trying to eject the tape, vary the drive off and on. When it is back to ready, select the drive and click Eject. If the tape remains stuck, continue to Step 2 below.
- From the Navigation panel, select Drives.
- Select a drive from the North Panel by clicking the checkbox next to it.
- Click the Remove/Vary-Off button. The drive state will display as Varied Off after the operation is complete.
-
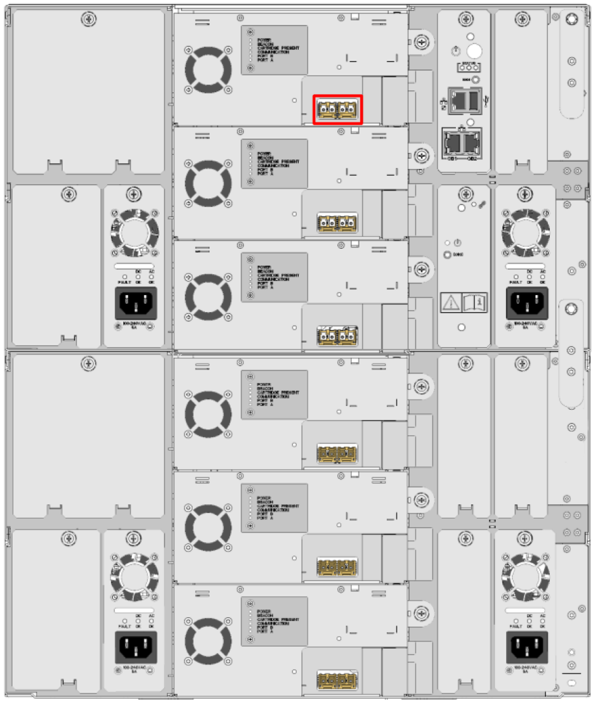
Identify the drive that was varied off. All drive state LEDs on the back of the drive should be off.
-
Disconnect the Fibre or SAS cable from the drive. The example below is a Fibre Channel drive.
-
Loosen the drive thumbscrew.
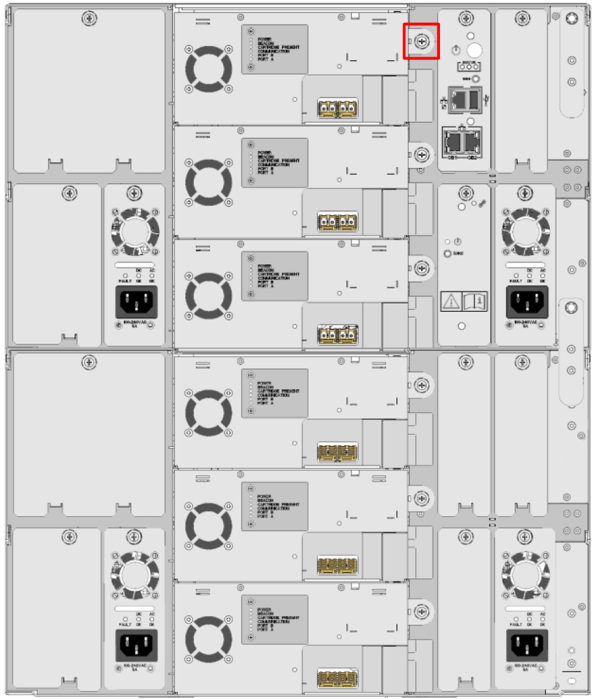
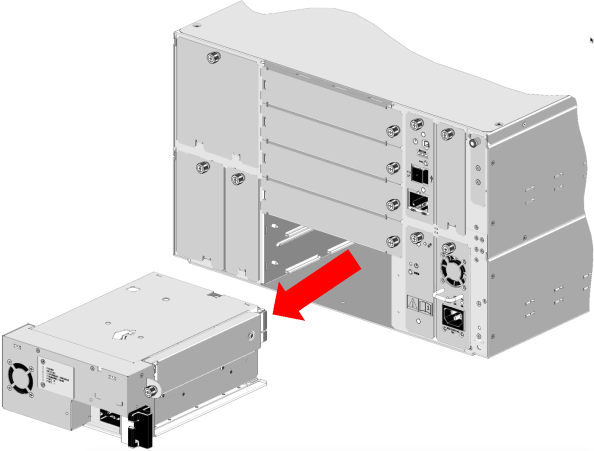
-
On the left side of the drive sled, press the lock lever up and slide the drive out of the drive bay.
Note: If you removed a drive that contained a stuck tape, contact Quantum Service and Support for further assistance. In addition, you should also clear any RAS tickets in the library related to the stuck tape in the drive.
Replace a Drive
This video shows the drive replacement procedure for a Scalar i6. The overall procedure is the same for the Scalar i3. However, the Scalar i3 supports either Fibre Channel or SAS connectivity whereas the video shows Fibre Channel. In addition, the Scalar i3 supports half-height drives whereas the video shows full-height drives.
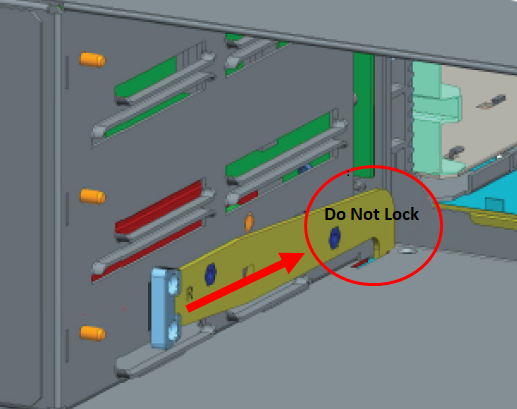
Important Information - Bottom Module Latches
Do not lock the rear latches of a Series 2 chassis containing the bottom cover in the module stack. The latches will interfere with tape drives being properly set into the chassis.
-
Slide the drive gently into the drive bay until the lock lever is in the down position.
-
Tighten drive thumbscrew.
-
Attach the FC or SAS cable to the drive. The example below is a Fibre Channel drive.
Note: The Fibre/SAS cable must be connected back to the original drive position location.
Note: EDLM drives do not require a cable.
- From the Navigation panel, select Drives.
- Select a drive from the North Panel by clicking the checkbox next to it.
-
Click the Replace/Vary-On button. The drive state will display as Varied On after the operation is complete.
Note: The drive firmware may auto-level after the drive is varied on.
- From the Navigation panel in the WebGUI, select Diagnostics.
- Select Drive Assembly Test from the North Panel.
-
From the Operations panel, select Test.
Item Description Action Starting Drive Allows you to select the first drive to be tested. Select a drive from the drop-down box. Ending Drive Allows you to select the final drive to be tested.
Select a drive from the drop-down box. Scratch Tape Location Allows you to select a scratch tape from anywhere in your library. Select a scratch tape from the drop-down box. Progress Area Provides status on Drive Assembly Test. Information only. -
Click Apply to save your settings.
-
Click Close to exit the window.
