Multi-Module Installation
Overview
Use this procedure for a 6U or greater (2 or more modules) Scalar i3.
WARNING: Scalar i3 MUST be installed in a rack and the bottom cannot be resting on a flat surface.
Before you begin an installation:
- Review the planning section on stack configurations and get familiar with the rules and considerations of installing your library.
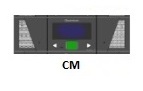
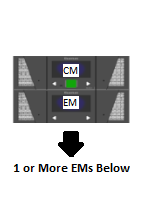
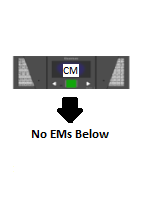
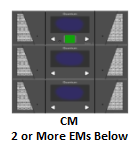
- The first EM added to a CM must be below the CM.
- Determine where your
- Determine the top and bottom module in the library stack. The top and bottom covers come from the factory mounted on the
- After racking the
Multi-Module Library Configurations
If the Scalar i3 system will be installed in the following configuration, do not use the multi-module installation procedure. Follow the Single Module Installation procedure.
|
|
|
If the Scalar i3 system will be installed in the following configuration, you will need to remove the robot during installation. Follow the Installation Procedure - Remove Robot procedure below.
|
|
If the Scalar i3 system will be installed in the following configuration, you will not need to remove the robot during installation. Follow the Installation Procedure - Do Not Remove Robot procedure below.
|
Note: For maximum future scalability, Quantum recommends that you stack as many EMs below the CM as is practical given your rack constraints. |
The following parts come with your library.


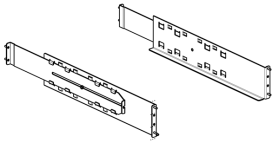
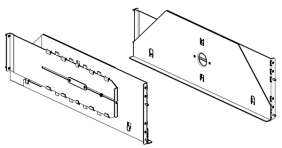
| Name | Quantity | Image | Included with... |
|---|---|---|---|
| Module Spacers | 6 |
|
Accessory Kit, Expansion Module, Scalar i3 |
| PDU Bracket | 2 | 
|
Control Module, 3U, Scalar i3 Control Module, 6U, Scalar i3 |


Before You Begin
Important Information - Drive Acclimation
Before opening the sealed ESD bag, the drive should be acclimated to the climate inside the facility or room location where the drive will be installed. Changes in temperature and humidity can cause condensation. It is recommended to leave drives in the packaging for a minimum of 24 hours before opening the sealed bag.
Place the sealed bag away from direct sources of air convection to minimize condensation.
If any external or internal condensation is seen on the sealed bag after 24 hours, remove the drive from the bag and acclimate the drive in the planned location for an extra 12 to 24 hours, or until no visible condensation remains.
Figure 1: Drive in Sealed Bag
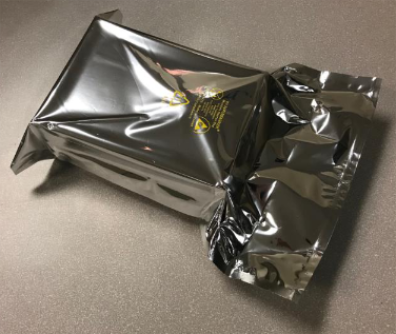
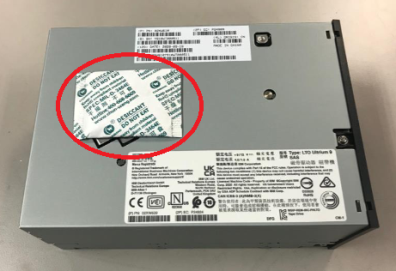
Once the bag has been opened, the drive should never be moved to a new location where temperature differences are greater than 5 degrees Celsius. If this type of drive relocation needs to occur, the drive should be placed in a sealed bag with desiccant and allowed to acclimate to the new location for a minimum of four hours.
Figure 2: Drive with Dessicant
Drive temperature and humidity specifications are as follows:
Note: The temperature and humidity specifications below are for LTO drives. For LTO media temperature and humidity specifications, refer to the Environmental Specifications in the Site Planning Guide.
| Mode | Air Inlet Temperature | Relative Humidity (Non-Condensing) | Altitude (Max) |
|---|---|---|---|
| Operating Mode |
10°C to 40°C (50°F to 104°F) |
20% to 80% 26°C (79°F) Wet Bulb Max |
3048 m |
| Recommended Operating Mode |
20°C to 25°C (68°F to 77°F) |
40% to 50% | 3048 m |
| Storage |
-40°C to 60°C (-40°F to 140°F) |
10% to 90% Non-Condensing |
3048 m |
| Shipping |
-40°C to 60°C (-40°F to 140°F) |
10% to 90% Non-Condensing |
12192 m |
Installation Procedure - Remove Robot
Each module comes in its own box. Any drives and redundant power supplies will come in separate boxes.
- Remove all packing materials. Retain these materials in case you need to ship your library in the future.
- With another person, carefully remove the module and place it on a work space.
- Remove all plastic covering.
- Remove all parts. This includes rack shelves, screw kits and ferrules.
-
Find the Library Assembly Tool and review how it's used. You will need this tool for various steps during installation procedure.
- Remove all drive bay covers from back of module(s).
-
Remove all magazines.

Library Assembly Tool - Functions
You have been provided with the only tool you will need to assemble your library. The assembly tool allows you to perform the following functions:
- Eject the magazines manually
- Remove the T10 Torx screws from the library’s top cover so you can remove the top cover
- Remove the T10 Torx screw from the bottom cover retaining tab so you can remove the bottom cover
- Install the two T10 Torx front screws that secure each module to the module below
- Install the two T10 Torx rear screws that secure each module to the module below
- Tighten the two T10 Torx rare screws to 10 inch-pounds of torque
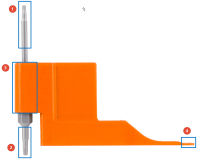
Note: To ensure Library Assembly Tool integrity, some Library Assembly Tools have a plug that needs to be removed. Once the plug is removed, the metal torx bit can be pushed in to create the tool shown in the image above.
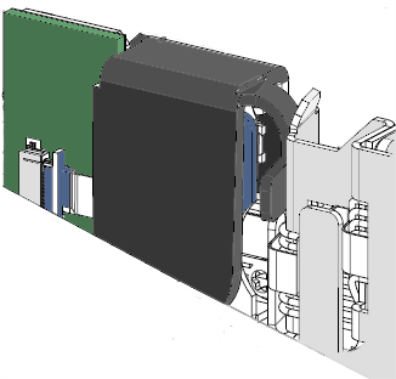
| Item | Name | Description |
|---|---|---|
|
1 |
T8 Torx | Allows you to eject magazines manually |
| 2 | T10 Torx |
Allows you to:
|
| 3 | Torque Wrench | Used with the T10 Torx, allows you to tighten the rear module connection screws to 10 inch-pounds |
| 4 | Screw Holder | Holds the rear module connection screws so you can get them started |

The Torx driver is inserted into the torque wrench to tighten the rear module connection screws to 10 inch-pounds. For all other steps, remove the Torx driver from the torque wrench.
Video - Using the Torque Wrench
The following video shows how to use the torque wrench to properly tighten a screw to 10 inch-pounds. The video shows the torque wrench being used to tighten the top cover screws. Do not use the torque wrench to perform this procedure. This video is for demonstration purposes only.
Turn up your volume for this video.
As noted in the video above, the screw is tightened until the Torx driver slips in the torque wrench. This makes a distinctive clicking sound.
- If tapes are loaded in the magazine, mark the magazines so they can be placed back in their original bay.
-
Insert the T8 end of the assembly tool into the magazine release hole until the magazine pops out. Remove the magazine.
There are two different versions of the top cover available on Scalar i3 systems, one with screws and one without screws. Select from the options below:
- If you did not remove the magazines while unpacking the library, do so at this time.
-
Using the empty magazine slots for access, use both hands to gently push up and forward on the inside of the top cover. This will release the top catch and side stops.
-
Slide the top cover off.
Required Tools: T-10 Torx Driver (included with library assembly tool)
-
Use the assembly tool to remove the 8 cover screws.

- Remove cover. Be careful not to let the cover sag in the middle or at the ends.
-
Unscrew the finger knobs.
- Remove the two (2) restraints completely.
Note: Retain the restraints in case you need to ship the library in the future.
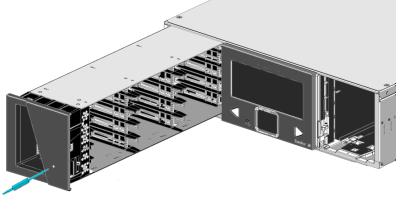
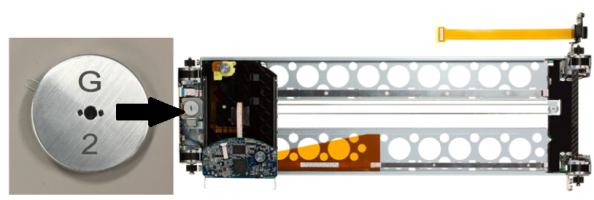
There are two methods to identify a Gen1 or Gen2 robot in the Scalar i3 system.
In the WebGUI, select System. The Information Panel will indicate if the robot is a Gen1 or Gen2.
Figure 3: Information Panel - Robotics Generation

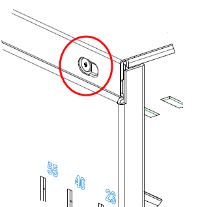
Gen2 Robots have "G2" stamped on the robot (see figure below). Gen1 Robots do not have a stamp.
Figure 4: Gen2 Robot Hardware Identification
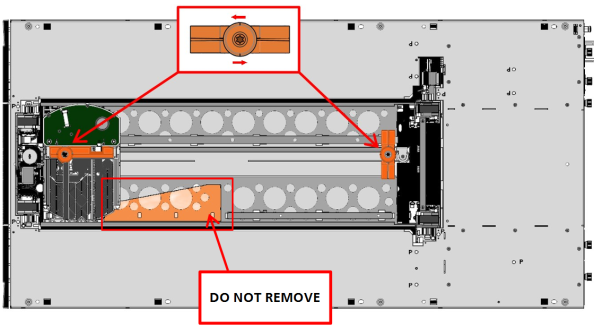
-
Using the lift bar and the lift tab, pull upward until the gears are free from the rack.
-
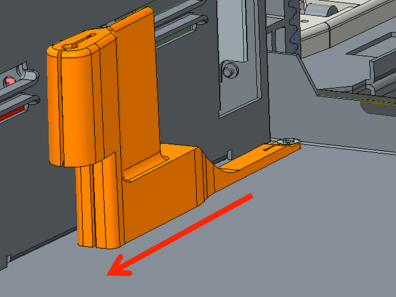
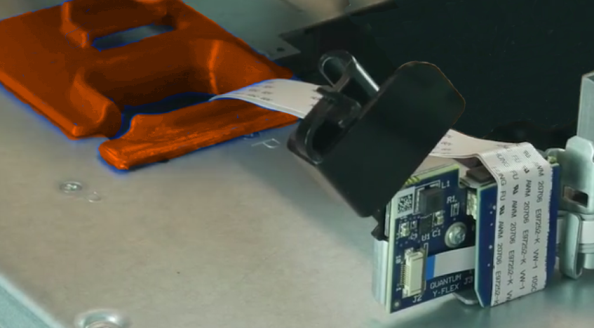
Set the robot on the module chassis a few inches toward the front.
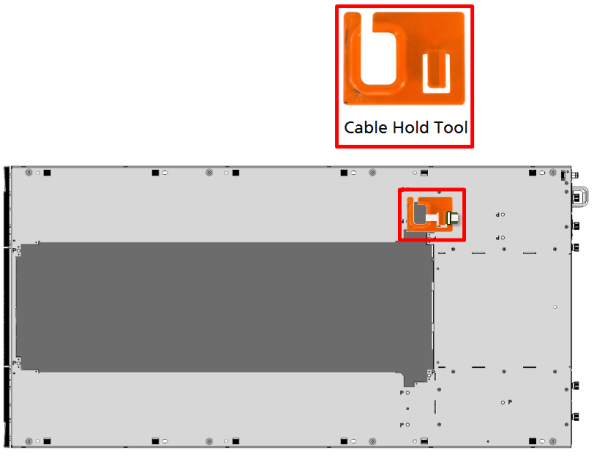
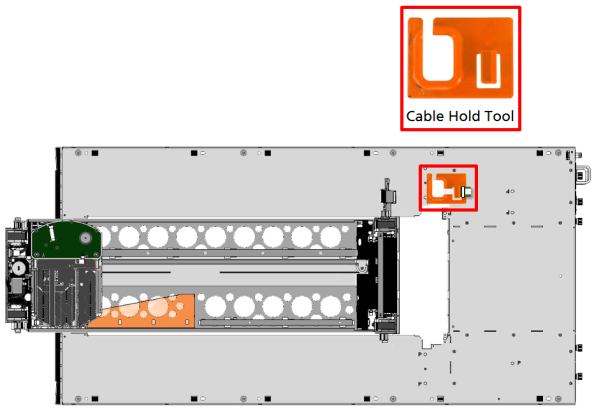
- Insert cable hold tool.
- Lift the robot cable cover up.
-
Disconnect the robot cable from robot and attach the robot cable to the cable hold tool. DO NOT RELEASE THE CABLE.
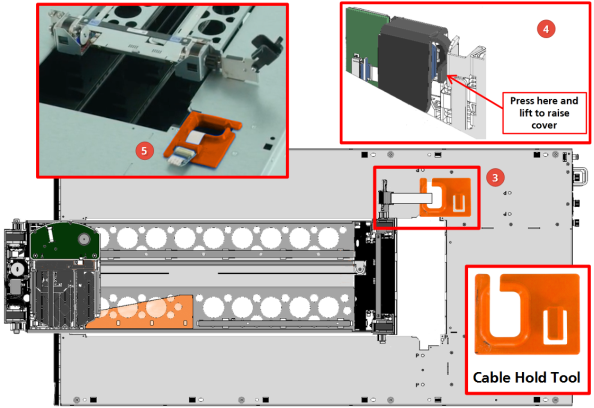
- Using the two lift points, set the robot away from the library on a level surface.
-
If you’ve just removed the robot from this module, the cable hold tool will be in place. Hold the cable, remove the cable hold tool, and let the cable retract gently back into the cable spool.
-
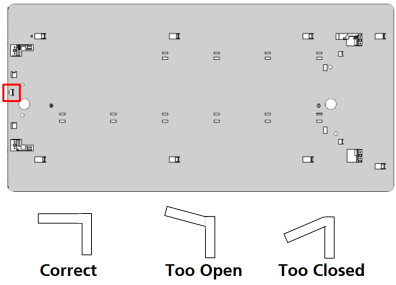
Remove bottom cover retaining tab. Set it aside for later use.
- Turn the module over so the bottom is facing up.
-
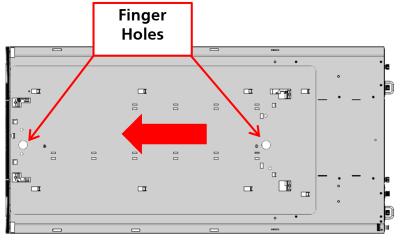
Using the finger holes, slide the cover towards the rear of the module.

- Remove the bottom cover and set it aside.
- Find the module that is going to be the bottom module in the library.
- Turn the module over so the bottom is facing up.
- Set the cover on the bottom of the module so that the tabs line up with the slots.
-
Using the finger holes, slide the cover towards the front of the library.
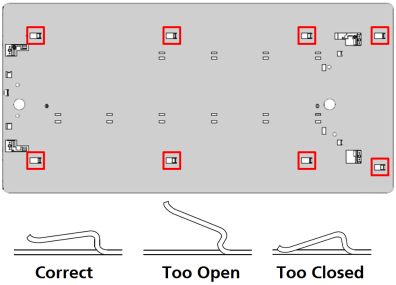
If the bottom cover is too loose or cannot be attached easily, you may have bent clips.
 Repair - Bent Clips
The bottom cover mounts to the bottom of the library with nine (9) clips. Eight (8) clips are the same type, one(1) clip is slightly different.
Although not likely, it’s possible that during installation or handling, clips can get bent. A bent clip can make the bottom cover impossible to install, or it can interfere with the proper operation of the library.
If your bottom cover clips get accidentally bent, you can fix the problem quite easily. Just bend them back to the correct orientation. Refer to the images below.
- Turn the module over so the top is facing up.
- Install the bottom cover retaining tab.
-
Go back to the Control Module (CM). If you let the robot cable retract into the cable spool in an earlier step, retrieve it now and attach the cable hold tool.
APC Racks
If you purchased an APC rack and PDU installation kit with your Scalar i3 library, review the installation instructions below.
Click here to review and download the APC rack installation instructions.
The PDU Rackmount Kit (9-07340-01) contains the following parts.
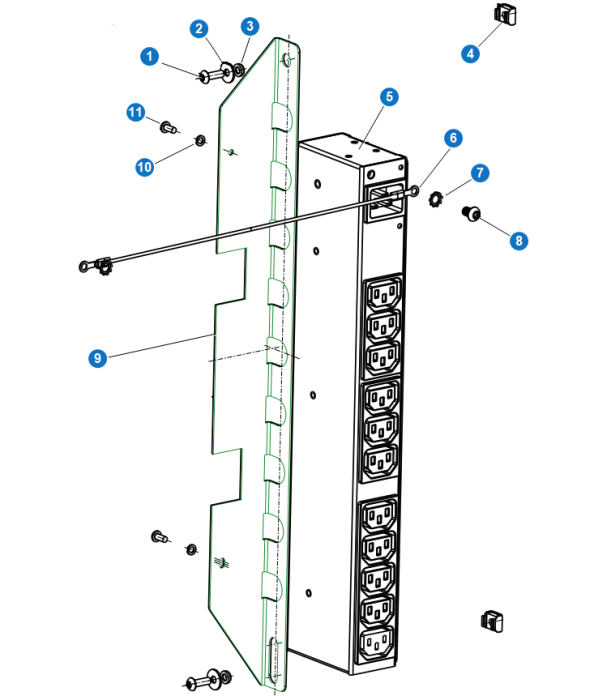
| Part Name | Quantity | |
|---|---|---|
| 1 | M5 x 16 Screw | 2 |
| 2 | Flat Washer | 2 |
| 3 | Ferrule | 2 |
| 4 | Cage Nut | 2 |
| 5 | PDU | 1 |
| 6 | Stranded Ground Cable | 1 |
| 7 | External Tooth Washer | 2 |
| 8 | Pan Head Screw | 2 |
| 9 | PDU Bracket | 1 |
| 10 | Split Washer | 2 |
| 11 | 8-32 Screw | 2 |
-
Insert the top Cage Nut into the rack at the desired location.
-
Insert the second Cage Nut approximately 460mm below the first Cage Nut.
-
Attach the PDU to the PDU Bracket using the two 8-32 Screws and Split Washers.
-
Assemble the attachment screw:
-
Place a Flat Washer on a M5 x 16 Screw.
-
Thread a Ferrule on to the screw.
-
Repeat steps A and B for the second attachment screw.
-
-
Attach the PDU Bracket on to the rack using the attachment screws assembled in Step 4.
-
Using the Pan Head Screw and External Tooth Washer, attach the Stranded Ground Cable to the thread hole above the single outlet on the PDU.
-
Using the second Pan Head Screw and External Tooth Washer, attach the other end of the Stranded Ground Cable to the rack. This will ensure proper grounding for the PDU.
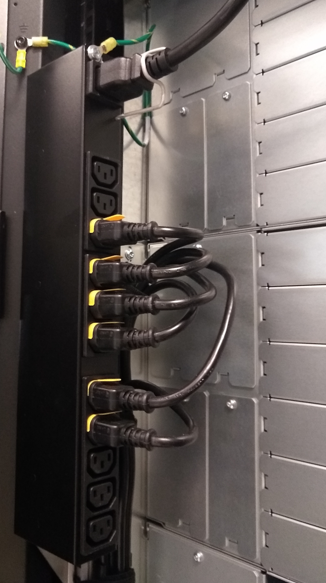
An example of a successfully installed PDU in an APC rack is displayed below.
If you did not purchase an APC rack with your Scalar i3 library, review the important information below.
The Scalar i3 library must be installed in a rack (no desktop versions). The rack should be a standard 19”, four-post rack. The external rack depth must be at least 42.13” (1070 mm); alternatively, check that the internal rack space can support the library product depth of 36.4” (924.5 mm). An example of a qualified rack is the APC AR3100.
Quantum supplies a PDU bracket with your library to change the orientation of the rack PDU to face the back door. This orientations allows for more cable space.
Additional Information
- You must use a high quality rack that meets the following requirements:
- Rack is appropriately leveled.
- The front of the rack is perpendicular to the rack sides.
- There is no rack bowing.
- The Scalar i3 library is intended to be mounted in a square holed cabinet.
- Quantum recommends the use of rack leveling feeds rather than rack wheels. Moving a rack with wheels on a non-flat floor can bend the rack and cause robotic issues in the library.
- Airflow on the Scalar i3 library is from front to back.
- The Scalar i3 library is longer than other rack-based libraries or components.
- To accommodate various racks, flooring types, and larger library configurations, the rack shelf that the library sits on has a small float in the rear. This allows larger multi-module library configurations to be slightly tilted as needed.
-
Screw eight (8) ferrules on to the eight (8) shelf studs with your fingers.
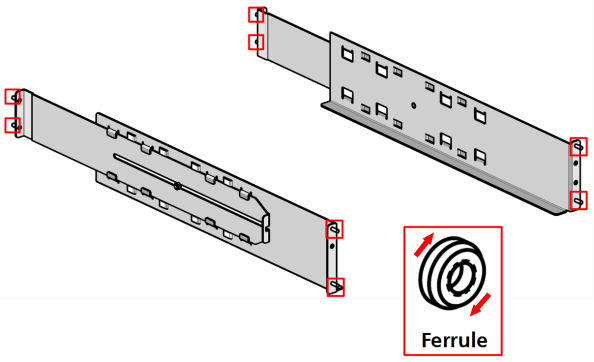
Use the larger ferrules for racks with square holes. Use the smaller ferrules for racks with round holes. The tapered side of the ferrule faces out.
-
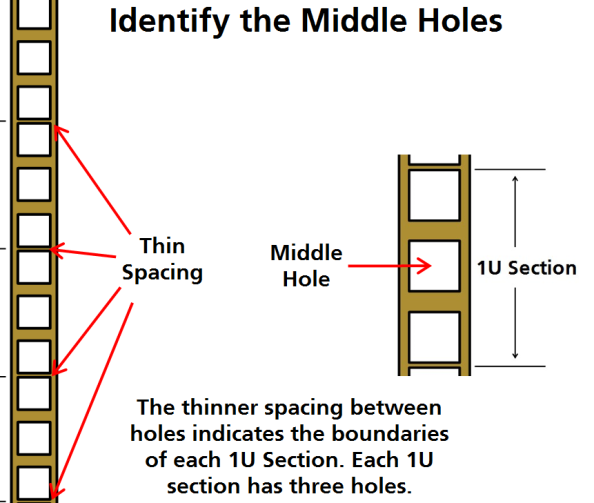
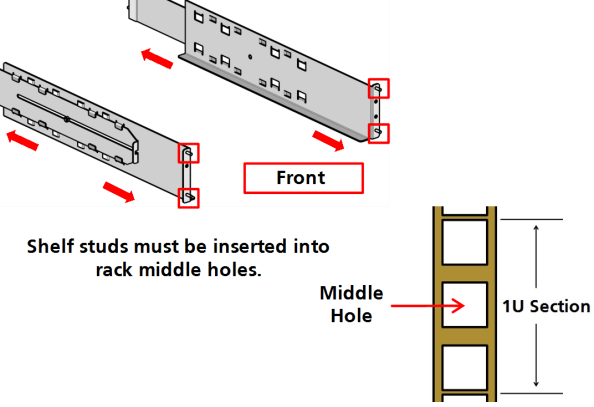
In order to properly install the shelves, you need to identify the middle hole of a 1 U section of the rack.
-
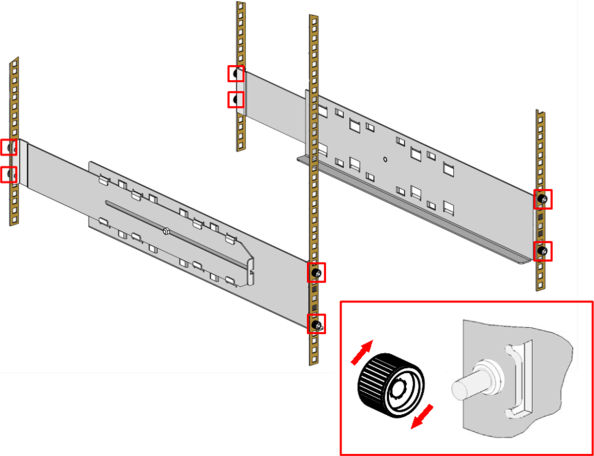
Extend the shelves by hand into the rack. The studs should protrude from the rack holes. Make sure the shelves are level with each other.
Note: When the shelves are installed correctly, you will have clear access to holes for attaching the rack clamps in Step 5.
-
Screw eight (8) thumbnuts on to the shelf studs with your fingers.
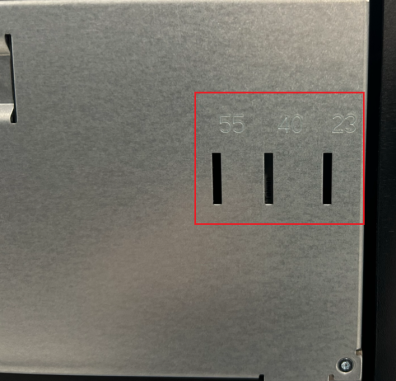
Note: The ear slots on the side of the chassis are 23, 40, and 55 mm from the front of the magazine.
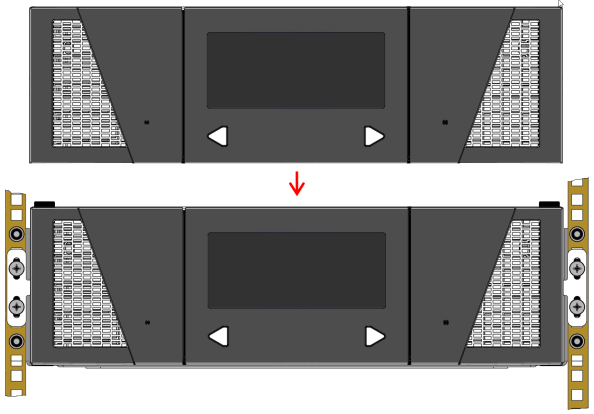
- With the help of a second person, place the module with the bottom cover on the rack shelves.
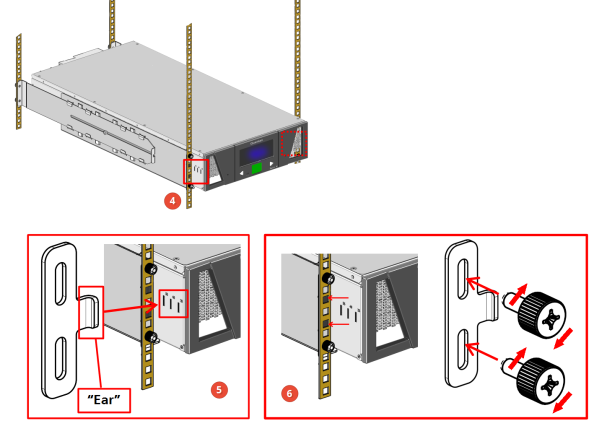
- Insert the “ear” of the rack mount clamp into one of the three (3) slots on the side of the library. Choose the slot based on how much of the library you want to extend beyond the front and back of the rack.
-
Screw the four (4) thumbscrews through the rack mount clamp slots into the threaded holes in the rack shelves.
Note: On larger multi-module configurations, Quantum recommends that you do not the tighten module thumbscrews until all modules are installed and screwed into the rack.
-
-
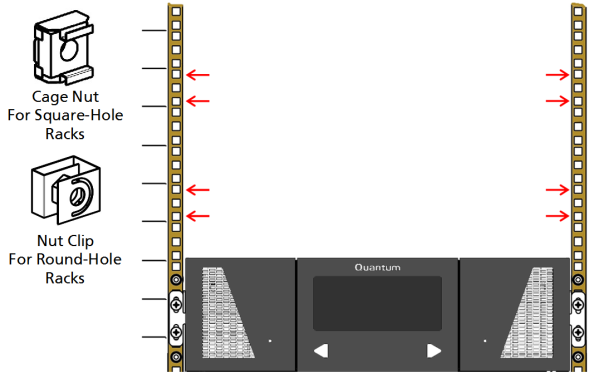
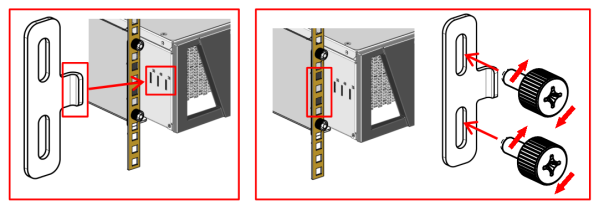
Attach the nut clips to the rack holes that will allow you to attach rack clamps to all the modules you’re installing.
To add a module to a system, follow the steps below:
WARNING: The library will not operate properly if the spacers are not installed correctly.
-
Install the six (6) spacers in every module you plan to install, except the module you plan to put on top.

-
Install the spacers by pressing them down into the spacer slots in the chassis. With the flat side flush with the edge of the library, angle the spacer to get the outside edge in and then pinch the spacer near the clips to insert.
WARNING: Inserting the spacers straight down or using force to install them can cause slivers of plastic to fall into the module.

-
Place the module on top of the previously placed module.
-
Insert the “ear” of the rack mount clamp in one of the three slots on the side of the library. Choose the slot based on how much of the library you want to extend beyond the front and back of the rack.
If your rack has a door, you want to make sure you can close the door when the library is mounted in the rack.
-
Screw the 4 thumbscrews through the rack mount clamp slots into the threaded holes in the rack shelves.
Note: If you are adding the module to another module, don’t tighten the thumbscrews until you’ve aligned and attached the module. When the two alignment pins are down and the four module attachment screws have been tightened, tighten the rack thumbscrews.
-
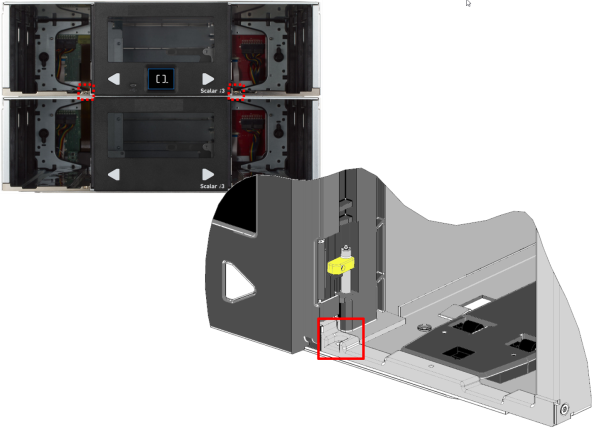
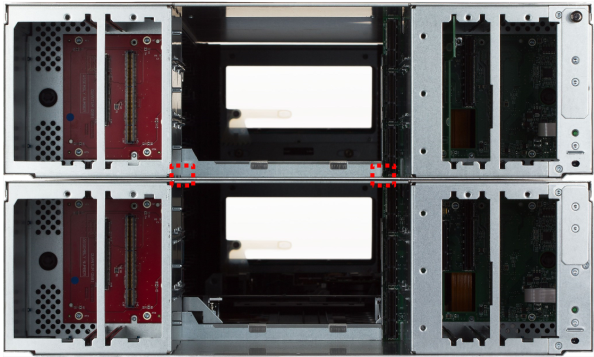
Align the new module with the module below by eye.
Note: The images display yellow alignment pins. Newer modules have blue alignment pins.
-
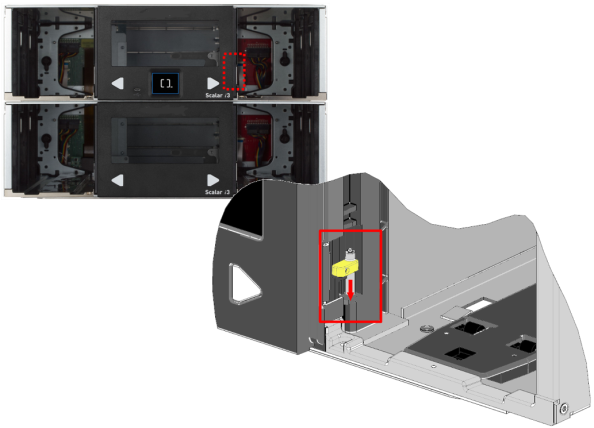
Using the yellow/blue tab, slide the front alignment pin down into the hole on the module below.
- Using the yellow/blue tab, slide the rear alignment pin down into the hole on the module below.
WARNING: Do not use the Module Interconnect to help align the modules. Work to get the alignment pins engaged before moving on to next steps.
There are two different version of the chassis available on the Scalar i3 system: a Series 1 chassis and Series 2 chassis.
Identify Your Chassis Series
- Series 1 - A Series 1 chassis uses screws to attach modules together.
- Series 2 - A Series 2 chassis contains latches on the front and rear of the chassis. These latches are used to attach modules together. A Series 2 chassis is backwards compatible with the Series 1 chassis.
-
To attach the module to the module below, use the two (2) long screws in the holes at the front of the module in the magazine bays.
Caution: Tighten using the Torx. Do not use the torque wrench.
-
To attach the module to the module below, use the two (2) short screws in the holes at the back of the module in the drive bay
-
Insert a short screw into the screw holder on the assembly tool.
-
Use the screw holder and the assembly tool torx wrench to get the rear screws started.
-
Pull straight back on the tool to release the screw.
-
Tighten the screw until you hear a click, or until you feel the torx wrench slip in the torque wrench. When it clicks or slips, the screw is torqued to 10 inch pounds.
Note: To ensure Library Assembly Tool integrity, some Library Assembly Tools have a plug that needs to be removed. Once the plug is removed, the metal torx bit can be pushed in to create the tool shown in the image below.
-
If magazines are in the chassis, remove the magazines to access the front and rear latches in the chassis.
-
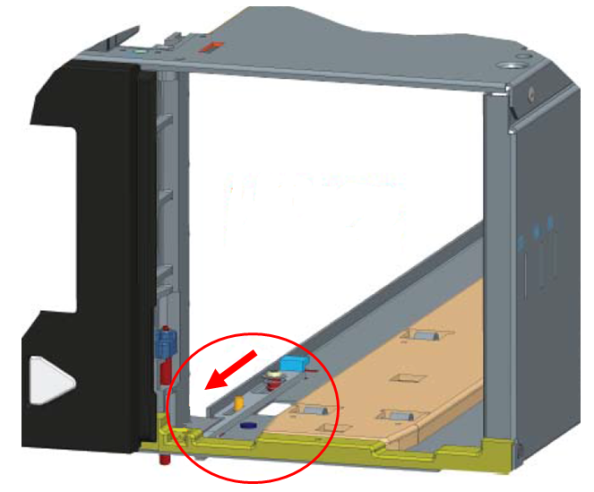
There are latches on the left and right front of the chassis. To lock, pull the latch towards the front of the chassis until it lifts and engages the front catch.
-
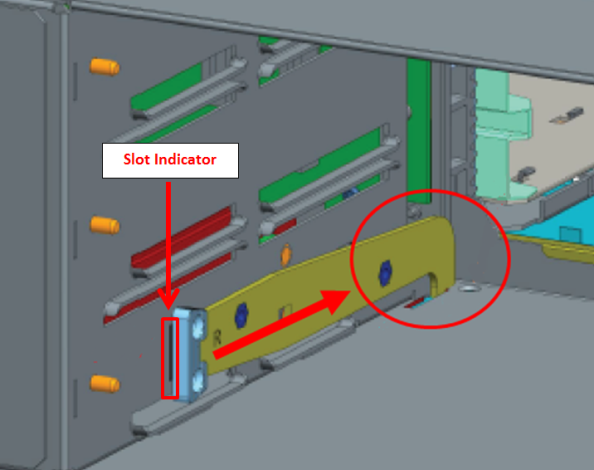
There are latches on the left and right rear of the chassis. To lock, push the latch forward until it moves down and engages the catch. A slot indicator on the side frame will also appear behind the latch when it is fully engaged into the catch.
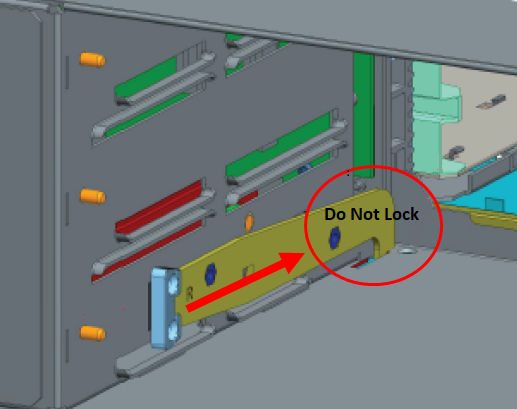
Important Information - Bottom Module Latches
Do not lock the rear latches of the chassis containing the bottom cover in the module stack. The latches will interfere with tape drives being properly set into the chassis.
-
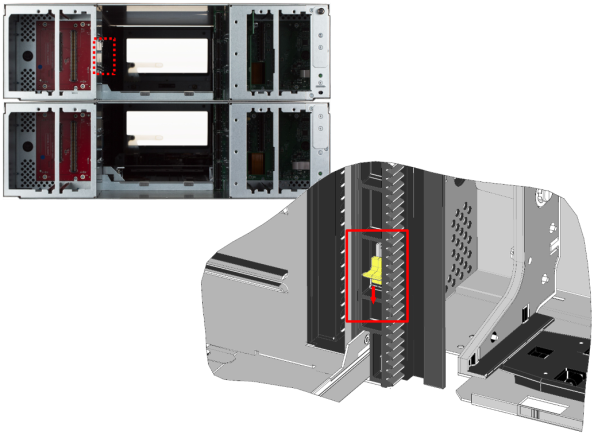
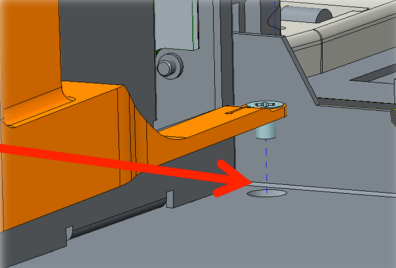
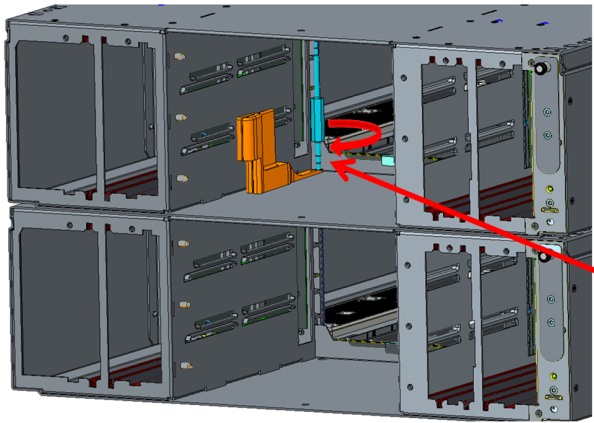
Pull out on the pin and slide the module interconnect up.
-
Tighten the rack thumbscrews on the module you just added.
If the Scalar i3 system is in one the following configurations, go to the Install Components step once you have added all additional modules.
|
|
|
If the Scalar i3 system is in one of the following configurations, go to the Install the Robot step once you have added all additional modules.
|
|
|
|
|
|
-
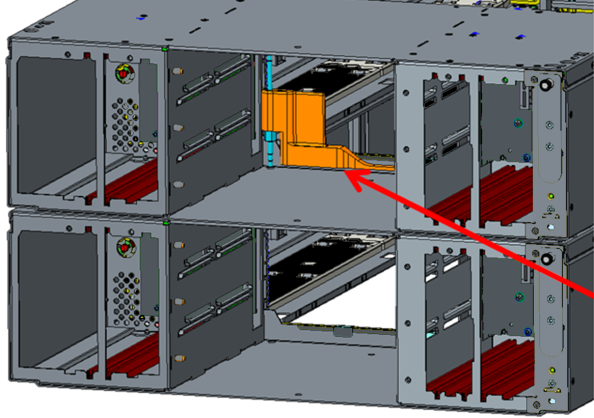
Using the two lift points, place robot on top of library.
- Connect the robot cable to the robot.
-
If the cable hold tool is present, remove it.
- Close the robot cable cover until it clicks into place.
-
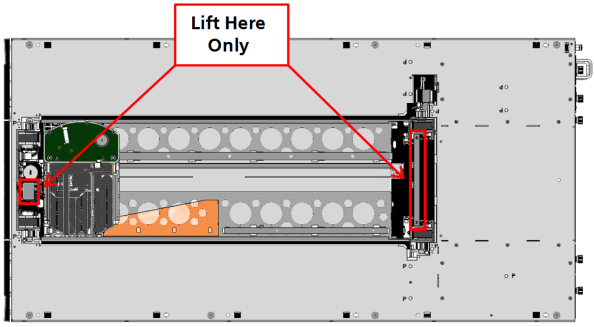
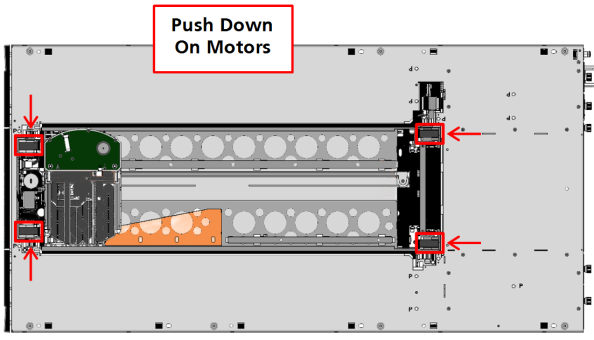
Align the robot gears with the library rails. Push down on the lift tab and the lift bar until the robot is lower than the top of the module frame.
Caution: Do not push down on the robot anywhere other than the identified touch points. Damage to robot may
There are two different versions of the top cover available on Scalar i3 systems, one with screws and one without screws.
-
If the top cover is new, remove the plastic wrap from the cover.
-
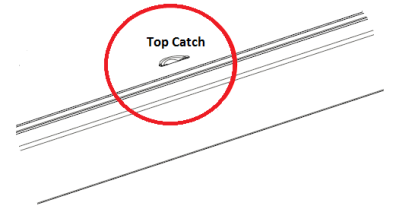
Hold the cover with the top catch facing towards you.
-
Slide the cover on top of the module until the side stops and top catch lock the cover into place.
- Insert the magazines back into their slots.
Required Tools: T-10 Torx Driver (included with library assembly tool)
-
Place the cover on top of the module and attach using the screws.
Important Information - Bottom Module Latches
Do not lock the rear latches of a Series 2 chassis containing the bottom cover in the module stack. The latches will interfere with tape drives being properly set into the chassis.
-
Starting with the Control Module (CM) (module that has the touchscreen), fill the slots from the bottom to the top. Slide the drive into the slot and push in until you feel the drive’s connector slip into the module’s connector. Tighten the drive thumbscrew.
- Install any remaining drives in the module immediately above or below the CM. Fill the slots from bottom to top. Repeat in adjacent modules until all drives are installed.
Additional Information
- If you install drives in an Expansion Module (EM), you must install a power supply in that EM.
- If you need to remove a drive, you will need to push up on the lock lever on the left side of the drive as you slide the drive out.
The Scalar i3 has two different types of power supplies: 315 W and 440W. All modules shipped prior to version i2 came with 315W power supplies.
Additional Information
- Power supplies IN a module must match. It is ok if some modules in the library have 315W and others have 440W, but within a module, they must match.
- Modules that contain an iBlade, must use 440W power supplies
- If a RAS ticket is generated showing a power supply mismatch, replace existing 315W power supply with a 440W power supply
-
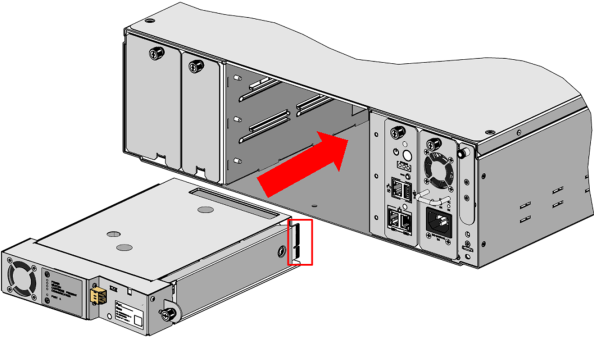
If your library came with the redundant power supply, install it now.
- Remove the power supply cover from the redundant power supply slot.
- Slide the power supply into the library until you feel the power supply connector slip in to the library connector.
Note: If you have drives in Expansion Modules (EM), you must install a power supply in one of the power supply slots in the EM.

- Tighten the power supply thumbscrew.
- Reattach drive bay covers where necessary and re-insert magazines.
If your library came with an iBlade, install it now.
-
Slide the iBlade into the library until you feel the iBlade connector slip into the library connector.

- Tighten the iBlade thumbscrew.
Magazine eject stops enable the Ransom Block (Airgap) feature in the Scalar i3 library (see Airgap Policies). If your magazine was ordered with magazine eject stops, install them now.
Required Tools: T-10 Torx Driver (included with library assembly tool)
| Name | Quantity | Included with... |
|---|---|---|
| Left Magazine Eject Stop | 1 | Magazine Eject Stop Kit |
| Right Magazine Eject Stop | 1 | Magazine Eject Stop Kit |
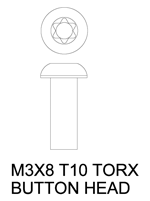
| M3 x 1 T10 Torx Button Head Screws | 2 | Magazine Eject Stop Kit |
Important Information
Install the magazine stops one at a time. This will ensure the electronics behind the bezel stay in place.
-
Remove the plug above the magazine eject button.
Item Description 1 Airgap Magazine Eject Stop Hole - Remove the screw from the magazine eject stop hole.
-
Install the magazine eject stop into the hole. The arrow should be pointing towards the center of the module.
Item Description 1 Airgap Magazine Eject Stop -
Insert the M3 x 1 screw provided with the magazine eject stops into the magazine eject stop hole and tighten.
Item Description 1 M3 x 1 Torx Screw -
Repeat steps 1-3 for each magazine eject stop.
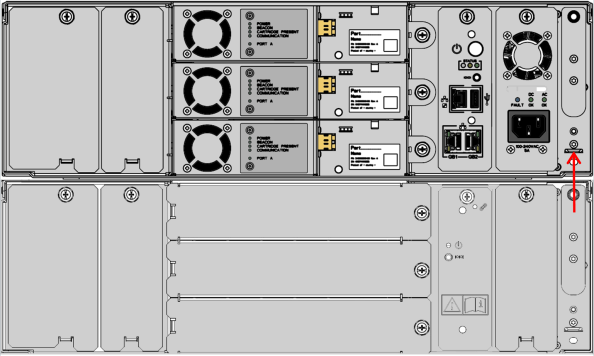
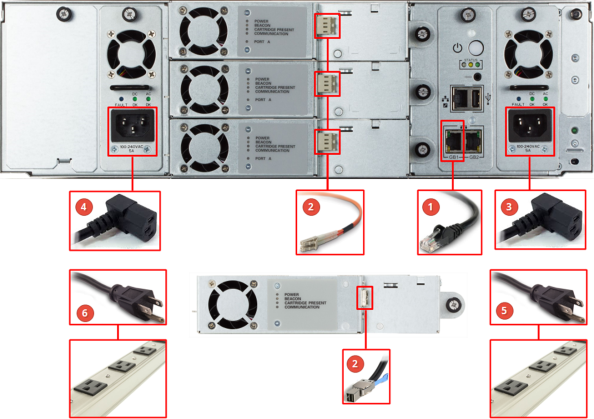
Caution: If you have EMs with power supplies, cable the EMs before cabling the CM. Once the CM is cabled for power, the library will begin its start up sequence. If you power the CM first, you will get RAS tickets.
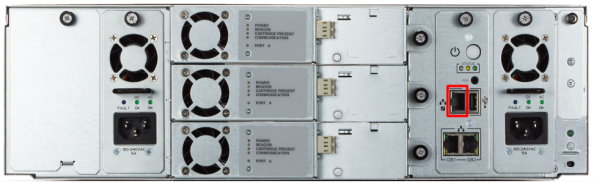
- If available, connect the library to a DHCP server on your network with an Ethernet cable. If you are only using a single network connection, use Gb1 (Callout 1 below).
- Connect Fibre Channel drives with Fibre Channel cables. Connect SAS drives with SAS Mini HD cables (Callout 2 below)
- Plug the 90 degree connector into the primary power supply’s power connector (Callout 3 below)
- Plug the 90 degree connector into the redundant power supply’s power connector (Callout 4 below)
- Plug the primary power supply connector into a power source. The library will begin to initialize (Callout 5 below).
- Plug the redundant power supply connector into a power source. If possible, the redundant power supply should be connected to a power source on a different circuit (Callout 6 below).
When your library starts up, you will see one of the following two images.
DHCP Connection
If you are connected to a DHCP server, you will see the image below. Continue with the procedure below.
No DHCP Connection
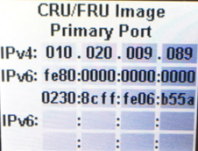
If you are not connected to a DHCP server, you will see the image below. Connect to the library using the service port.
![]()
Important Information - Windows PC
You must use a Windows PC when connecting to the service port and do not use Internet Explorer to connect to the WebGUI.
If your company's network is not set up to use DHCP or you do not have access to the Internet, follow the steps below.
-
Download the latest firmware package
Note: You'll need your library serial number to download the firmware file. Click here to see where to find your serial number.
- Using an Ethernet cable, plug a windows laptop into your library's service port.
-
Open a browser and type 169.254.1.1 in the Address Bar.
If the Firmware Installation screen does not appear immediately, wait a few minutes. If it still does not appear, you may have to enter a static IP address into your laptop. If you decide to do this, use 169.254.1.100.
-
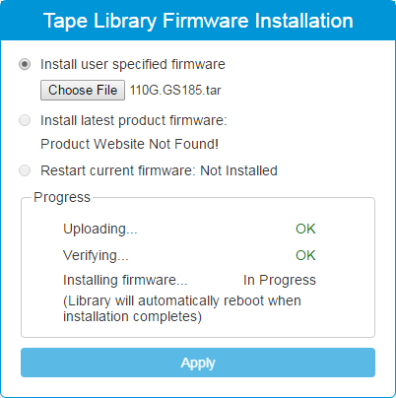
Click the Choose File button and browse to the library firmware image you downloaded.
- Click Apply. The library will start the install and will reboot after it is finished. This may take up to 20 minutes.
-
After the library reboots, the login screen will appear. Enter the User Name and Password.
User Name admin Password password - You will be prompted to change your password.
- Once you are logged into the library, you'll need to change your network settings by entering in the static IP address you want to use for your library. Go to IPv4 Settings to enter in your static IP details.
Note: To view new firmware packages for updates, visit the Scalar i3 page and click the Firmware tab.
-
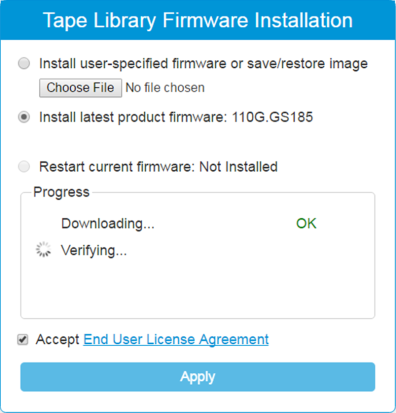
The screen below will display on your browser. Select the radio button for Install latest product firmware.
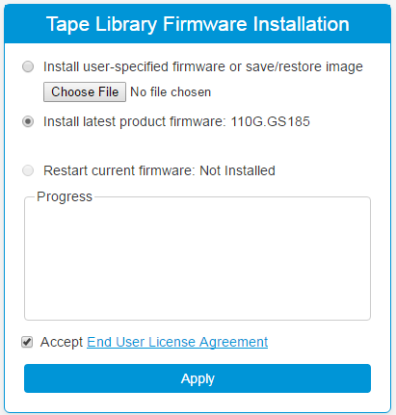
- Select the Accept End User License Agreement checkbox.
-
Click Apply to install the firmware. The firmware installation process may take 10 minutes or more.
Caution: If you have an iBlade, updating Scalar
Note: Refresh your browser before logging on to the WebGUI.
-
Enter the following User Name and Password.
User Name admin Password password 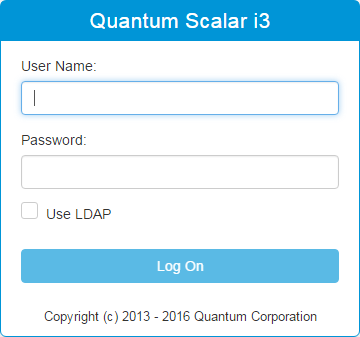
- Click Log On.
-
Next, change your default password. The new password cannot be the default "password". Passwords must be 8-64 characters long and may contain any printable characters except back tick (`) and tilde (~).
Note: Five (5) failed login attempts within five (5) minutes will lock an account for 15 minutes.
Additional Information
- Once the system installation is complete, LDAP can be configured. See Configure LDAP for more details.
IVT is a diagnostic test that verifies basic library functionality. It performs a complete library installation test to verify robotic operation within the current library configuration. IVT tests determine proper installation and operation by performing robotic self tests, by scanning tape cartridges, and performing GET/PUT tape cartridge tests at storage slot, I/E slot, and drive sled locations.
IVT uses existing tape cartridges for in-place GET/PUT testing, and moves a scratch tape to empty locations to verify proper slot and/or drive sled accessibility.
A complete IVT should be run as part of the installation process.
IVT Prerequisites
Review the following before running an IVT test:
- The library should have no unresolved RAS tickets.
- The library WebGUI accurately reflects the actual number of modules and drives in the system.
- The library is in a READY state all magazines are properly inserted.
- A scratch tape must be provided and placed into the first slot of the configured I/E area (Control Module's top right magazine, first column, bottom slot). If an I/E area is not configured, this slot position will be used by the library to locate the scratch tape, even if this slot is assigned as a storage slot to a partition.
-
Do Not use any cleaning tape as an IVT scratch tape. The IVT may fail due to timeout conditions.
- Do Not use an uncalibrated LTO-9 tape as an IVT scratch tape. If you do, the test will immediately fail and the drive will continue to calibrate the tape until it is complete. You will then need to manually remove the (now calibrated) tape and re-run IVT.
- If you do not have a calibrated LTO-9 scratch tape to run IVT, vary off the LTO-9 drives (see Vary Drive On or Off). This will prevent the test from failing due to LTO-9 calibration operations.
In addition to the prerequisites above, Quantum recommends that the scratch tape is read-capable by all drive generations in the library. If the tape cartridge media generation is not supported by a drive generation in the library, drive tests are skipped. The skipped drive tests will then need to be repeated with a scratch tape of compatible read format.
-
Press the right magazine release button on the Control Module (CM). The magazine will “pop” out. Pull the magazine until the first set of slots is exposed.
-
Insert a scratch tape. A scratch tape is a blank tape or one you don’t mind being overwritten. Insert the tape into the bottom front slot in the right magazine. This is the designated I/E slot for the library.

-
Select Diagnostics from the WebGUI menu.

- Select the Installation Verification Test checkbox from the North Panel.
-
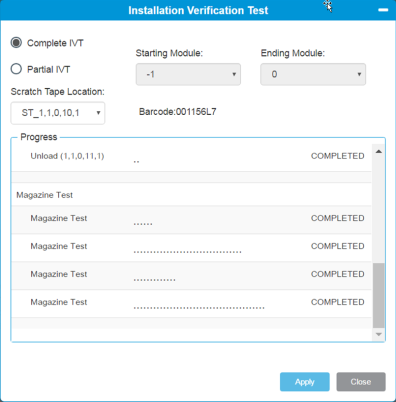
Click the Test button in the Operation Panel. The Installation Verification Test window displays.

- The Complete IVT radio button should be pre-selected. If it’s not, select it.
-
Click Apply. The Progress area of the dialog window will display the test progress.
Note: You must wait until the library has finished initialization before you can begin the IVT process.
-
The results of each of the IVT tests displays in the Progress area.
Caution: The library will display a Ready status during IVT. Disregard and do not try and perform any library operations. When each Magazine Test is complete, the library will be ready.
Installation Procedure - Do Not Remove Robot
Each module comes in its own box. Any drives and redundant power supplies will come in separate boxes.
- Remove all packing materials. Retain these materials in case you need to ship your library in the future.
- With another person, carefully remove the module and place it on a work space.
- Remove all plastic covering.
- Remove all parts. This includes rack shelves, screw kits and ferrules.
-
Find the Library Assembly Tool and review how it's used. You will need this tool for various steps during installation procedure.
- Remove all drive bay covers from back of module(s).
-
Remove all magazines.
Library Assembly Tool - Functions
You have been provided with the only tool you will need to assemble your library. The assembly tool allows you to perform the following functions:
- Eject the magazines manually
- Remove the T10 Torx screws from the library’s top cover so you can remove the top cover
- Remove the T10 Torx screw from the bottom cover retaining tab so you can remove the bottom cover
- Install the two T10 Torx front screws that secure each module to the module below
- Install the two T10 Torx rear screws that secure each module to the module below
- Tighten the two T10 Torx rare screws to 10 inch-pounds of torque
Note: To ensure Library Assembly Tool integrity, some Library Assembly Tools have a plug that needs to be removed. Once the plug is removed, the metal torx bit can be pushed in to create the tool shown in the image above.
| Item | Name | Description |
|---|---|---|
|
1 |
T8 Torx | Allows you to eject magazines manually |
| 2 | T10 Torx |
Allows you to:
|
| 3 | Torque Wrench | Used with the T10 Torx, allows you to tighten the rear module connection screws to 10 inch-pounds |
| 4 | Screw Holder | Holds the rear module connection screws so you can get them started |
The Torx driver is inserted into the torque wrench to tighten the rear module connection screws to 10 inch-pounds. For all other steps, remove the Torx driver from the torque wrench.
Video - Using the Torque Wrench
The following video shows how to use the torque wrench to properly tighten a screw to 10 inch-pounds. The video shows the torque wrench being used to tighten the top cover screws. Do not use the torque wrench to perform this procedure. This video is for demonstration purposes only.
Turn up your volume for this video.
As noted in the video above, the screw is tightened until the Torx driver slips in the torque wrench. This makes a distinctive clicking sound.
- If tapes are loaded in the magazine, mark the magazines so they can be placed back in their original bay.
-
Insert the T8 end of the assembly tool into the magazine release hole until the magazine pops out. Remove the magazine.
There are two different versions of the top cover available on Scalar i3 systems, one with screws and one without screws.
Select from the options below:
- If you did not remove the magazines while unpacking the library, do so at this time.
-
Using the empty magazine slots for access, use both hands to gently push up and forward on the inside of the top cover. This will release the top catch and side stops.
-
Slide the top cover off.
Required Tools: T-10 Torx Driver (included with library assembly tool)
-
Use the assembly tool to remove the 8 cover screws.
- Remove cover. Be careful not to let the cover sag in the middle or at the ends.
-
Unscrew the finger knobs.
- Remove the two (2) restraints completely.
Note: Retain the restraints in case you need to ship the library in the future.
APC Racks
If you purchased an APC rack and PDU installation kit with your Scalar i3 library, review the installation instructions below.
Click here to review and download the APC rack installation instructions.
The PDU Rackmount Kit (9-07340-01) contains the following parts.
| Part Name | Quantity | |
|---|---|---|
| 1 | M5 x 16 Screw | 2 |
| 2 | Flat Washer | 2 |
| 3 | Ferrule | 2 |
| 4 | Cage Nut | 2 |
| 5 | PDU | 1 |
| 6 | Stranded Ground Cable | 1 |
| 7 | External Tooth Washer | 2 |
| 8 | Pan Head Screw | 2 |
| 9 | PDU Bracket | 1 |
| 10 | Split Washer | 2 |
| 11 | 8-32 Screw | 2 |
-
Insert the top Cage Nut into the rack at the desired location.
-
Insert the second Cage Nut approximately 460mm below the first Cage Nut.
-
Attach the PDU to the PDU Bracket using the two 8-32 Screws and Split Washers.
-
Assemble the attachment screw:
-
Place a Flat Washer on a M5 x 16 Screw.
-
Thread a Ferrule on to the screw.
-
Repeat steps A and B for the second attachment screw.
-
-
Attach the PDU Bracket on to the rack using the attachment screws assembled in Step 4.
-
Using the Pan Head Screw and External Tooth Washer, attach the Stranded Ground Cable to the thread hole above the single outlet on the PDU.
-
Using the second Pan Head Screw and External Tooth Washer, attach the other end of the Stranded Ground Cable to the rack. This will ensure proper grounding for the PDU.
An example of a successfully installed PDU in an APC rack is displayed below.
If you did not purchase an APC rack with your Scalar i3 library, review the important information below.
The Scalar i3 library must be installed in a rack (no desktop versions). The rack should be a standard 19”, four-post rack. The external rack depth must be at least 42.13” (1070 mm); alternatively, check that the internal rack space can support the library product depth of 36.4” (924.5 mm). An example of a qualified rack is the APC AR3100.
Quantum supplies a PDU bracket with your library to change the orientation of the rack PDU to face the back door. This orientations allows for more cable space.
Additional Information
- You must use a high quality rack that meets the following requirements:
- Rack is appropriately leveled.
- The front of the rack is perpendicular to the rack sides.
- There is no rack bowing.
- The Scalar i3 library is intended to be mounted in a square holed cabinet.
- Quantum recommends the use of rack leveling feeds rather than rack wheels. Moving a rack with wheels on a non-flat floor can bend the rack and cause robotic issues in the library.
- Airflow on the Scalar i3 library is from front to back.
- The Scalar i3 library is longer than other rack-based libraries or components.
- To accommodate various racks, flooring types, and larger library configurations, the rack shelf that the library sits on has a small float in the rear. This allows larger multi-module library configurations to be slightly tilted as needed.
-
Screw eight (8) ferrules on to the eight (8) shelf studs with your fingers.
Use the larger ferrules for racks with square holes. Use the smaller ferrules for racks with round holes. The tapered side of the ferrule faces out.
-
In order to properly install the shelves, you need to identify the middle hole of a 1 U section of the rack.
-
Extend the shelves by hand into the rack. The studs should protrude from the rack holes. Make sure the shelves are level with each other.
Note: When the shelves are installed correctly, you will have clear access to holes for attaching the rack clamps in Step 5.
-
Screw eight (8) thumbnuts on to the shelf studs with your fingers.
Note: The ear slots on the side of the chassis are 23, 40, and 55 mm from the front of the magazine.
- With the help of a second person, place the module with the bottom cover on the rack shelves.
- Insert the “ear” of the rack mount clamp into one of the three (3) slots on the side of the library. Choose the slot based on how much of the library you want to extend beyond the front and back of the rack.
-
Screw the four (4) thumbscrews through the rack mount clamp slots into the threaded holes in the rack shelves.
Note: On larger multi-module configurations, Quantum recommends that you do not the tighten module thumbscrews until all modules are installed and screwed into the rack.
-
-
Attach the nut clips to the rack holes that will allow you to attach rack clamps to all the modules you’re installing.
To add a module to a system, follow the steps below:
WARNING: The library will not operate properly if the spacers are not installed correctly.
-
Install the six (6) spacers in every module you plan to install, except the module you plan to put on top.
-
Install the spacers by pressing them down into the spacer slots in the chassis. With the flat side flush with the edge of the library, angle the spacer to get the outside edge in and then pinch the spacer near the clips to insert.
WARNING: Inserting the spacers straight down or using force to install them can cause slivers of plastic to fall into the module.
-
Place the module on top of the previously placed module.
-
Insert the “ear” of the rack mount clamp in one of the three slots on the side of the library. Choose the slot based on how much of the library you want to extend beyond the front and back of the rack.
If your rack has a door, you want to make sure you can close the door when the library is mounted in the rack.
-
Screw the 4 thumbscrews through the rack mount clamp slots into the threaded holes in the rack shelves.
Note: If you are adding the module to another module, don’t tighten the thumbscrews until you’ve aligned and attached the module. When the two alignment pins are down and the four module attachment screws have been tightened, tighten the rack thumbscrews.
-
Align the new module with the module below by eye.
Note: The images display yellow alignment pins. Newer modules have blue alignment pins.
-
Using the yellow/blue tab, slide the front alignment pin down into the hole on the module below.
- Using the yellow/blue tab, slide the rear alignment pin down into the hole on the module below.
WARNING: Do not use the Module Interconnect to help align the modules. Work to get the alignment pins engaged before moving on to next steps.
There are two different version of the chassis available on the Scalar i3 system: a Series 1 chassis and Series 2 chassis.
Identify Your Chassis Series
- Series 1 - A Series 1 chassis uses screws to attach modules together.
- Series 2 - A Series 2 chassis contains latches on the front and rear of the chassis. These latches are used to attach modules together. A Series 2 chassis is backwards compatible with the Series 1 chassis.
-
To attach the module to the module below, use the two (2) long screws in the holes at the front of the module in the magazine bays.
Caution: Tighten using the Torx. Do not use the torque wrench.
-
To attach the module to the module below, use the two (2) short screws in the holes at the back of the module in the drive bay
-
Insert a short screw into the screw holder on the assembly tool.
-
Use the screw holder and the assembly tool torx wrench to get the rear screws started.
-
Pull straight back on the tool to release the screw.
-
Tighten the screw until you hear a click, or until you feel the torx wrench slip in the torque wrench. When it clicks or slips, the screw is torqued to 10 inch pounds.
-
If magazines are in the chassis, remove the magazines to access the front and rear latches in the chassis.
-
There are latches on the left and right front of the chassis. To lock, pull the latch towards the front of the chassis until it lifts and engages the front catch.
-
There are latches on the left and right rear of the chassis. To lock, push the latch forward until it moves down and engages the catch. A slot indicator on the side frame will also appear behind the latch when it is fully engaged into the catch.
Important Information - Bottom Module Latches
Do not lock the rear latches of the chassis containing the bottom cover in the module stack. The latches will interfere with tape drives being properly set into the chassis.
-
Pull out on the pin and slide the module interconnect up.
-
Tighten the rack thumbscrews on the module you just added.
There are two different versions of the top cover available on Scalar i3 systems, one with screws and one without screws.
-
If the top cover is new, remove the plastic wrap from the cover.
-
Hold the cover with the top catch facing towards you.
-
Slide the cover on top of the module until the side stops and top catch lock the cover into place.
- Insert the magazines back into their slots.
Required Tools: T-10 Torx Driver (included with library assembly tool)
-
Place the cover on top of the module and attach using the screws.
Important Information - Bottom Module Latches
Do not lock the rear latches of a Series 2 chassis containing the bottom cover in the module stack. The latches will interfere with tape drives being properly set into the chassis.
-
Starting with the Control Module (CM) (module that has the touchscreen), fill the slots from the bottom to the top. Slide the drive into the slot and push in until you feel the drive’s connector slip into the module’s connector. Tighten the drive thumbscrew.
- Install any remaining drives in the module immediately above or below the CM. Fill the slots from bottom to top. Repeat in adjacent modules until all drives are installed.
Additional Information
- If you install drives in an Expansion Module (EM), you must install a power supply in that EM.
- If you need to remove a drive, you will need to push up on the lock lever on the left side of the drive as you slide the drive out.
The Scalar i3 has two different types of power supplies: 315 W and 440W. All modules shipped prior to version i2 came with 315W power supplies.
Additional Information
- Power supplies IN a module must match. It is ok if some modules in the library have 315W and others have 440W, but within a module, they must match.
- Modules that contain an iBlade, must use 440W power supplies
- If a RAS ticket is generated showing a power supply mismatch, replace existing 315W power supply with a 440W power supply
-
If your library came with the redundant power supply, install it now.
- Remove the power supply cover from the redundant power supply slot.
- Slide the power supply into the library until you feel the power supply connector slip in to the library connector.
Note: If you have drives in Expansion Modules (EM), you must install a power supply in one of the power supply slots in the EM.
- Tighten the power supply thumbscrew.
- Reattach drive bay covers where necessary and re-insert magazines.
If your library came with an iBlade, install it now.
-
Slide the iBlade into the library until you feel the iBlade connector slip into the library connector.
- Tighten the iBlade thumbscrew.
Caution: If you have EMs with power supplies, cable the EMs before cabling the CM. Once the CM is cabled for power, the library will begin its start up sequence. If you power the CM first, you will get RAS tickets.
- If available, connect the library to a DHCP server on your network with an Ethernet cable. If you are only using a single network connection, use Gb1 (Callout 1 below).
- Connect Fibre Channel drives with Fibre Channel cables. Connect SAS drives with SAS Mini HD cables (Callout 2 below)
- Plug the 90 degree connector into the primary power supply’s power connector (Callout 3 below)
- Plug the 90 degree connector into the redundant power supply’s power connector (Callout 4 below)
- Plug the primary power supply connector into a power source. The library will begin to initialize (Callout 5 below).
- Plug the redundant power supply connector into a power source. If possible, the redundant power supply should be connected to a power source on a different circuit (Callout 6 below).
When your library starts up, you will see one of the following two images.
DHCP Connection
If you are connected to a DHCP server, you will see the image below. Continue with the procedure below.
No DHCP Connection
If you are not connected to a DHCP server, you will see the image below. Connect to the library using the service port.
![]()
Important Information - Windows PC
You must use a Windows PC when connecting to the service port and do not use Internet Explorer to connect to the WebGUI.
If your company's network is not set up to use DHCP or you do not have access to the Internet, follow the steps below.
-
Download the latest firmware package
Note: You'll need your library serial number to download the firmware file. Click here to see where to find your serial number.
- Using an Ethernet cable, plug a windows laptop into your library's service port.
-
Open a browser and type 169.254.1.1 in the Address Bar.
If the Firmware Installation screen does not appear immediately, wait a few minutes. If it still does not appear, you may have to enter a static IP address into your laptop. If you decide to do this, use 169.254.1.100.
-
Click the Choose File button and browse to the library firmware image you downloaded.
- Click Apply. The library will start the install and will reboot after it is finished. This may take up to 20 minutes.
-
After the library reboots, the login screen will appear. Enter the User Name and Password.
User Name admin Password password - You will be prompted to change your password.
- Once you are logged into the library, you'll need to change your network settings by entering in the static IP address you want to use for your library. Go to IPv4 Settings to enter in your static IP details.
Note: To view new firmware packages for updates, visit the Scalar i3 page and click the Firmware tab.
-
The screen below will display on your browser. Select the radio button for Install latest product firmware.
- Select the Accept End User License Agreement checkbox.
-
Click Apply to install the firmware. The firmware installation process may take 10 minutes or more.
Caution: If you have an iBlade, updating Scalar
Note: Refresh your browser before logging on to the WebGUI.
-
Enter the following User Name and Password.
User Name admin Password password
- Click Log On.
-
Next, change your default password. The new password cannot be the default "password". Passwords must be 8-64 characters long and may contain any printable characters except back tick (`) and tilde (~).
Note: Five (5) failed login attempts within five (5) minutes will lock an account for 15 minutes.
Additional Information
- Once the system installation is complete, LDAP can be configured. See Configure LDAP for more details.
IVT is a diagnostic test that verifies basic library functionality. It performs a complete library installation test to verify robotic operation within the current library configuration. IVT tests determine proper installation and operation by performing robotic self tests, by scanning tape cartridges, and performing GET/PUT tape cartridge tests at storage slot, I/E slot, and drive sled locations.
IVT uses existing tape cartridges for in-place GET/PUT testing, and moves a scratch tape to empty locations to verify proper slot and/or drive sled accessibility.
A complete IVT should be run as part of the installation process.
IVT Prerequisites
Review the following before running an IVT test:
- The library should have no unresolved RAS tickets.
- The library WebGUI accurately reflects the actual number of modules and drives in the system.
- The library is in a READY state all magazines are properly inserted.
- A scratch tape must be provided and placed into the first slot of the configured I/E area (Control Module's top right magazine, first column, bottom slot). If an I/E area is not configured, this slot position will be used by the library to locate the scratch tape, even if this slot is assigned as a storage slot to a partition.
-
Do Not use any cleaning tape as an IVT scratch tape. The IVT may fail due to timeout conditions.
- Do Not use an uncalibrated LTO-9 tape as an IVT scratch tape. If you do, the test will immediately fail and the drive will continue to calibrate the tape until it is complete. You will then need to manually remove the (now calibrated) tape and re-run IVT.
- If you do not have a calibrated LTO-9 scratch tape to run IVT, vary off the LTO-9 drives (see Vary Drive On or Off). This will prevent the test from failing due to LTO-9 calibration operations.
In addition to the prerequisites above, Quantum recommends that the scratch tape is read-capable by all drive generations in the library. If the tape cartridge media generation is not supported by a drive generation in the library, drive tests are skipped. The skipped drive tests will then need to be repeated with a scratch tape of compatible read format.
-
Press the right magazine release button on the Control Module (CM). The magazine will “pop” out. Pull the magazine until the first set of slots is exposed.
-
Insert a scratch tape. A scratch tape is a blank tape or one you don’t mind being overwritten. Insert the tape into the bottom front slot in the right magazine. This is the designated I/E slot for the library.
-
Select Diagnostics from the WebGUI menu.
- Select the Installation Verification Test checkbox from the North Panel.
-
Click the Test button in the Operation Panel. The Installation Verification Test window displays.
- The Complete IVT radio button should be pre-selected. If it’s not, select it.
-
Click Apply. The Progress area of the dialog window will display the test progress.
Note: You must wait until the library has finished initialization before you can begin the IVT process.
-
The results of each of the IVT tests displays in the Progress area.
Caution: The library will display a Ready status during IVT. Disregard and do not try and perform any library operations. When each Magazine Test is complete, the library will be ready.
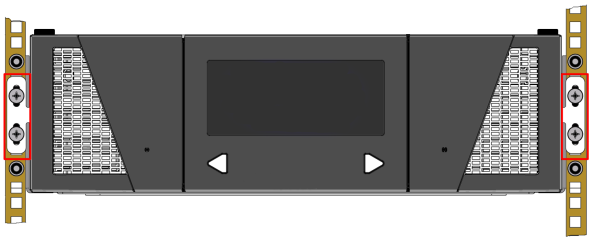
Getting Started
_594x359.png)
| Item | Name | Description |
|---|---|---|
|
1 |
Magazines | Contains the slots that hold the tape cartridges. Each magazine contains 25 slots. |
| 2 | Window | Allows you to view the internal components. |
| 3 | Local User Interface |
Allows you to perform some library functions when you can’t access the WebGUI. Note: The LUI is only available on a control module. |
| 4 | Mini USB Port | Not used at this time. |
| 5 | Magazine Release | Releases the corresponding magazine for removal. |
| 6 | Left Magazine Manual Release | Allows you to release the left magazine when the library is not powered on. |
| 7 | Right Magazine Manual Release | Allows you to release the right magazine when the library is not powered on. |
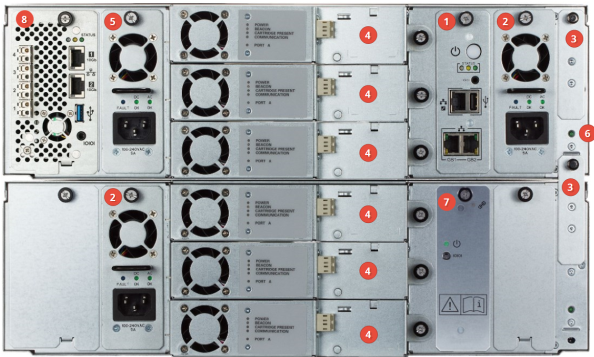
| Item | Name | Description |
|---|---|---|
|
1 |
System Control Board (SCB) |
Controls library functions. Network ports are labeled GB1 and GB2. |
| 2 | Power Supply | Provides AC and DC voltages to the library. |
| 3 | Module Interconnect |
Provides connectivity from the module to the module above. |
| 4 | Drives | Reads and writes data to the tape media. See Supported Drive Types. |
| 5 | Redundant Power Supply |
Provides back up power should the primary power source fail. |
| 6 | Module Interconnect Indicator | Indicates connectivity to the module below. |
| 7 | Cable Spool | Provide robot mobility throughout the library. |
| 8 | iBlade |
Two types of iBlades available: ScalarLTFS iBlade - allows for a converged, fully integrated SLTFS environment for file management Veeam Tape Server iBlade - allows for backups run as with any other Veeam Backup/Tape Server |
The WebGUI is a web-based graphical user interface. The WebGUI is the primary way you will interact with the library. All library operations can be performed through the WebGUI. You access the WebGUI by typing the library IP address into a web browser.
When using the WebGUI, do not use the browser refresh button. It will end your session and require you to log in again.
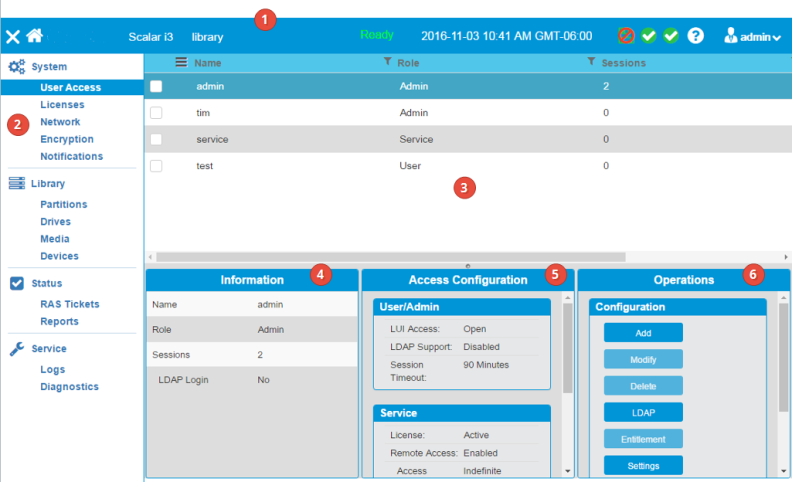
| Item | Name | Description |
|---|---|---|
|
1 |
Header | Provides visual indications of library status and quick access to frequently used functions. |
| 2 | Menu | Allows you to select the main functional areas within the library. The menu is in the order you would use to configure your library the first time. |
| 3 | North Panel | Displays the choices available for each menu selection. Select an item in the north panel by selecting the item’s checkbox. This may change your available options in the operations panel. If you click on another item in the north panel while a checkbox is selected, the item will be highlighted and the information panel and the center panel will change to reflect the highlighted item. The operations panel, however, will reflect the checked item. |
| 4 | Information Panel | Displays contextual information based on what is highlighted in the north panel. |
| 5 | Center Panel | Displays information based on the selection highlighted in the north panel. If there is graphical information for the highlighted selection it will appear in this panel. |
| 6 | Operations Panel | Allows you to make changes to the library and perform procedures. The changes and procedures are dependent on what is selected in the north panel. |

| Item | Name | Description |
|---|---|---|
| 1 | Hide/Show Menu | Hides or shows the menu. |
|
2 |
Library Type | Displays the type of library |
| 3 | Library Name | Displays the name of the library. |
| 4 | Ready Status |
Displays the library’s ready status. There are four states of ready:
|
| 5 | Date/Time | Displays the date and time. |
| 6 | Current Configuration | Indicates whether the current configuration is saved. |
| 7 | Device Status | Displays the status of library devices, such as the robot, the I/E area and storage. |
| 8 | System Status | Displays the number of RAS tickets and the severity of the most severe ticket. |
| 9 | Help | Allows you to access library help. |
| 10 | Service Mode | Indicates library is in Service Mode. |
| 11 | Current User | Displays the user name and the role of the person logged in to the library. Allows you to log off, restart, shut down, and access preferences. |
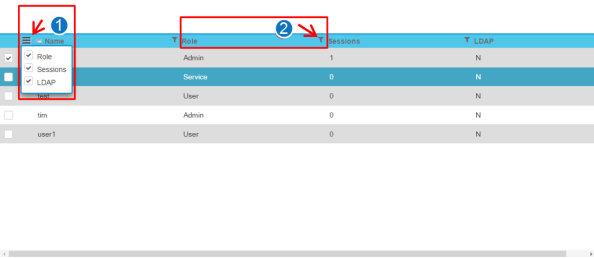
The north panel displays the choices available for each menu selection. Select an item in the north panel by selecting the item’s checkbox. This may change your available options in the operations panel. If you click on another item in the north panel while a checkbox is selected, the item will be highlighted and the information panel and the center panel will change to reflect the highlighted item. The operations panel, however, will reflect the checked item.
| Item | Name | Description |
|---|---|---|
|
1 |
Column selection Navicon | Clicking this navicon opens a dialog box where you can select the columns you want to display in the north panel. |
| 2 | Filter Symbol | Clicking the filter symbol allows you to filter the rows in the north panel based on the column. Please note the filter for each column is to the right of the column name. In the example shown, clicking the filter symbol would allow you to filter the north panel rows by Role. |

| Name | Description |
|---|---|
| Operations Panel Buttons |
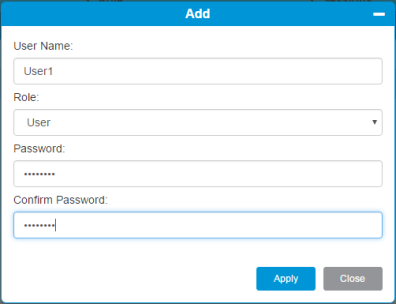
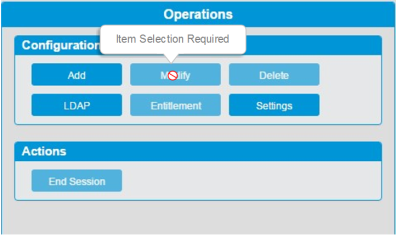
This is where you make changes to the library and perform procedures. The changes and procedures are dependent on what is selected in the north panel. Note that some buttons have an ellipse - the three dots to the right - and some don’t. Buttons without an ellipse will cause an immediate action when pressed. For instance, if you press the Offline button, you will take the partition selected in the north panel offline immediately. If you press a button with an ellipse, another dialog window will open that will allow you to make selections before you take an action. If you hover your cursor over an inactive button, a popup will appear that will tell you why the button is inactive. |
| Name | Description |
|---|---|
| Dialog Windows | Dialog windows require your input. The Apply button becomes active after you enter the required information. Click the Apply button to execute your input. |
| Name | Description |
|---|---|
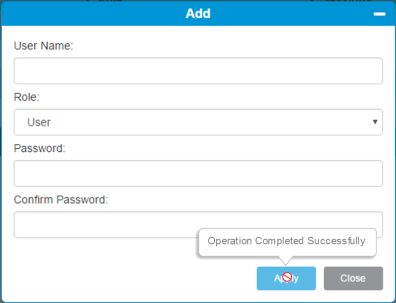
| Action Completion Confirmation | After you click the Apply button, it becomes inactive. Roll your cursor over the button to see a popup that confirms the operation was completed successfully. |
| Name | Description |
|---|---|
| Rollover Message | Roll your cursor over an inactive button to learn why that button is inactive. |
Now that your library is up and running, you need to perform some basic and recommended configuration operations to start using your library. The library has various settings that have defaults defined, but other require user configuration and some depend on the configured licensed featured.
To manage your library operations with a host or backup software, you must create a partition before you configure the host application. The Scalar i3 library does not create a default partition during installation.
Have all your purchased licenses available while you do configuration tasks. Licenses will have been packaged separately from your library (see About Licenses for more details).
Additional Information
- Before configuring your library, you will want to download and install all necessary drivers. Click here and then select the Drivers tab to see all available drivers for your library.
- Scalar i3 does not support Internet Explorer.
Once you have installed your SLTFS iBlade, you need to configure it for access.
- From the Navigation panel, select Network.
- From the North Panel, expand the + next to your iBlade.
- Select the checkbox for Interface 1.
-
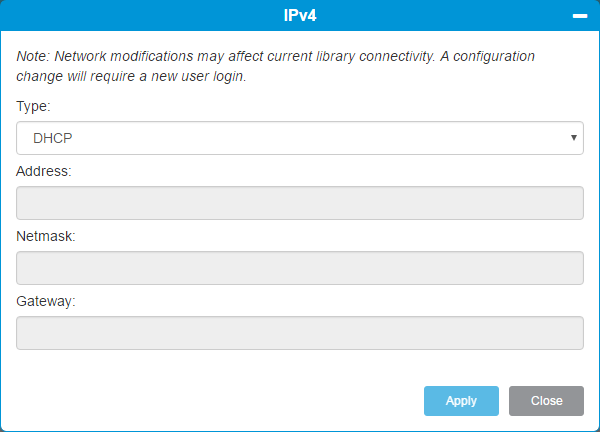
From the Operations panel, click IPv4.

- Complete the fields. See Setting up IPv4 settings for specific instructions.
- From the Navigation panel, select Library.
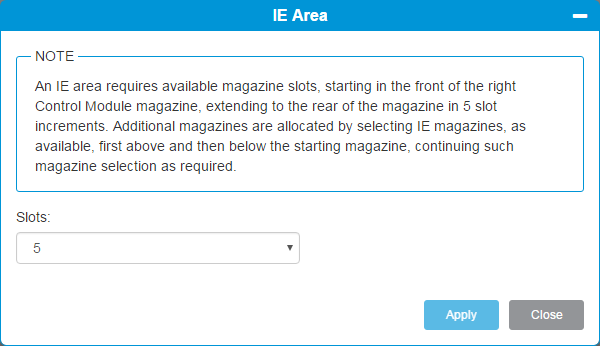
- From the Operations panel, select I/E Area.
-
From the drop-down, select the number of slots you want assigned as I/E slots.
- Click Apply and then click Close.
- From the Navigation panel, select Library.
-
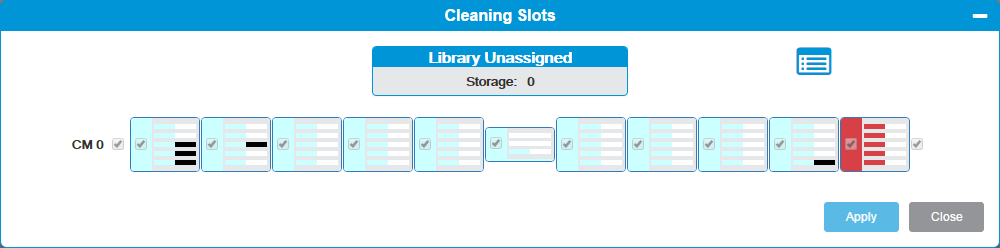
From the Operations panel, select Cleaning Slots.

- Assign cleaning slots. See Library Cleaning Slots for specific instructions.
- Add cleaning media. See Import Cleaning Media for specific instructions.
- From the Navigation panel, select Partitions.
- From the North Panel, select the SLTFS partition.
-
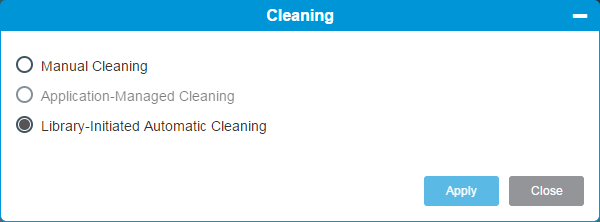
From the Operations panel, select Cleaning.
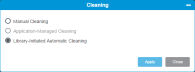
- Select Library-initiated Automatic Cleaning.
- Click Apply and then click Close.
- From the Navigation panel, select Partitions.
- From the North Panel, select the SLTFS partition.
-
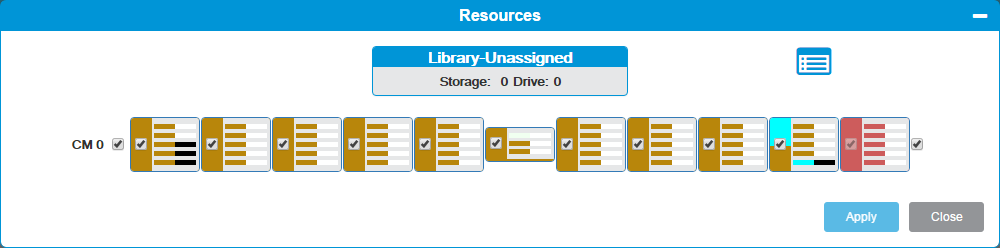
From the Operations panel, select Resources.
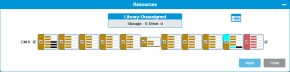
- Select which slots you want to add to the SLTFS partition. See Partition Resources for specific instructions.
- From the Navigation panel, select Partitions.
- From the North Panel, select the LTFS partition.
- From the Operations panel, select Online.
- From the Navigation panel, select Devices.
- From the North Panel, expand the + next to the LTFS Blade.
- Select the check box next to the iBlade.
-
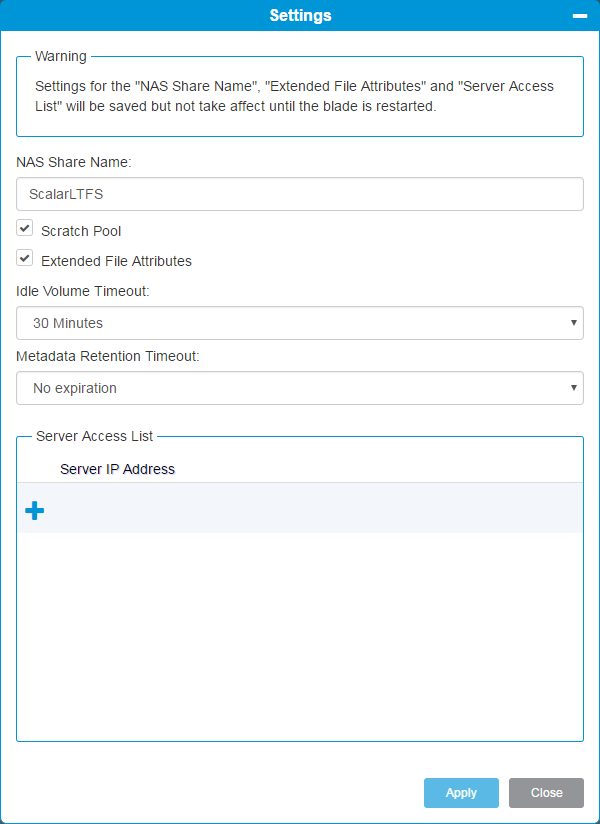
From the Operations panel, select Settings.

- Change the LTFS blade settings as desired. See Devices Settings for specific instructions.
-
From the Navigation panel, select Media.
- In the North Panel, you will see all the partitions listed and any media that is currently unassigned to any partition. Click the + next to a partition name or the Unassigned media. The + will expand and all media assigned to that partition or unassigned will display.
- Select the check box next to the media you want to import. You can select multiple tapes to import but the media must be in an I/E slot before it can be imported.
-
In the Operations panel, click Import.
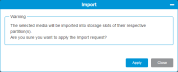
-
Click Apply to import the selected media to the correct partition. The North Panel is updated with the new location information for the media.
- Click Close to exit the Import window.

- From the Navigation panel, select NAS - iBlade.
- From the North Panel, select the tapes you want to assign to the LTFS partition in Discovered Media.
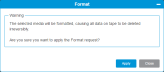
-
From the Operations panel, select Format. For more information, see Format Media.

- From the Navigation panel, select NAS - iBlade.
-
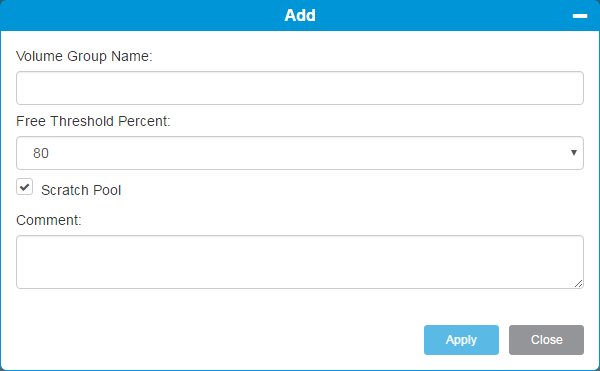
From the Operations panel, select Add.

- Create a volume group(s) as desired. See Add a Volume Group for specific instructions.
- From the Navigation panel, select NAS - iBlade.
- From the North Panel, click the + next to Scratch Media.
- Select the check box next to the scratch media you want to add to a volume group.
-
From the Operations panel, select Assignment.
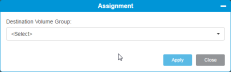
- Select the volume group from the drop-down menu. See Media Assignment for specific instructions.

- From a host computer, click the Map Network Drive button.
- Type in the following in the address Folder field: \\[IP Address of SLTFS Blade]\ScalarLTFS
Once you have configured your Scalar LTFS iBlade, review the Best Practices and FAQ pages for more details on how to use Scalar LTFS.
Once you have installed your Veeam Tape Server iBlade, you need to configure it for access.
Additional Information
- If Microsoft Hyper-V or any other hypervisor is installed on the Veeam Tape Server iBlade, the Virtual Machine (VM) Operating System (OS) will not be able to see the blade FC/SAS controller. This will cause the Scalar
- Bridging interfaces on the Veeam Tape Server iBlade is not supported and can cause network card issues.
- You must have the iBlade network ports plugged-in to successfully configure them.
- From the Navigation panel, select Network.
- From the North Panel, expand the + next to your iBlade.
-
Select the checkbox for Interface 1.
-
From the Operations panel, click IPv4. The IPv4 screen is displayed.
- Complete the fields. See Setting up IPv4 settings for specific instructions.

-
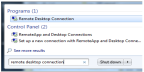
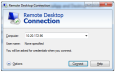
In the Windows search bar, type remote desktop connection.
-
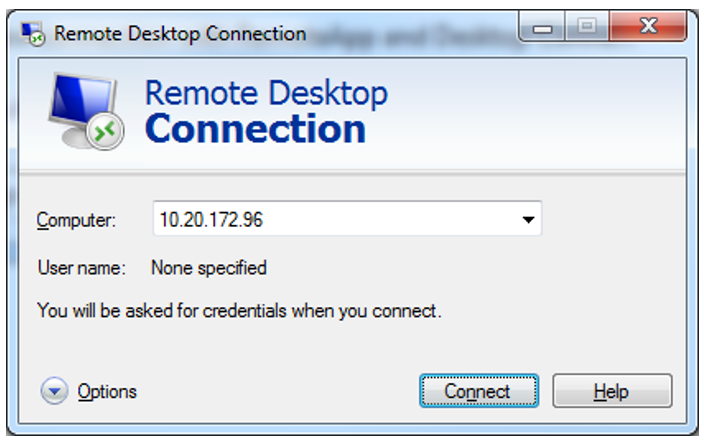
In the Remote Desktop Connection window, enter the iBlade IP address.
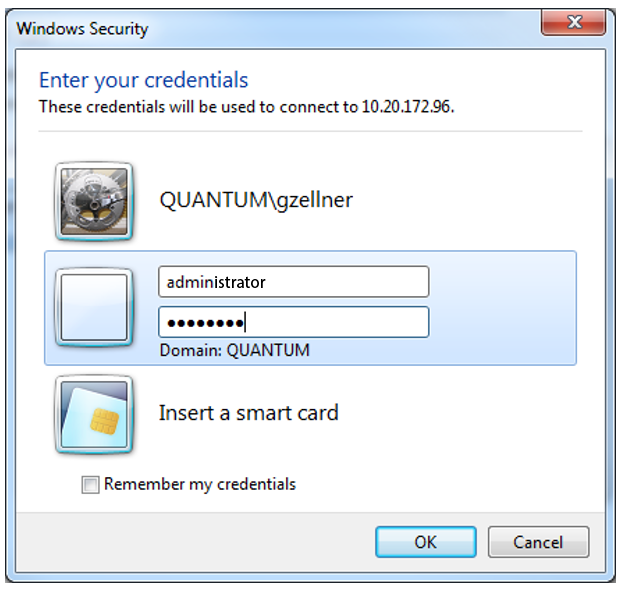
-
Enter User Name and Password.
- User Name: administrator
- Password: password

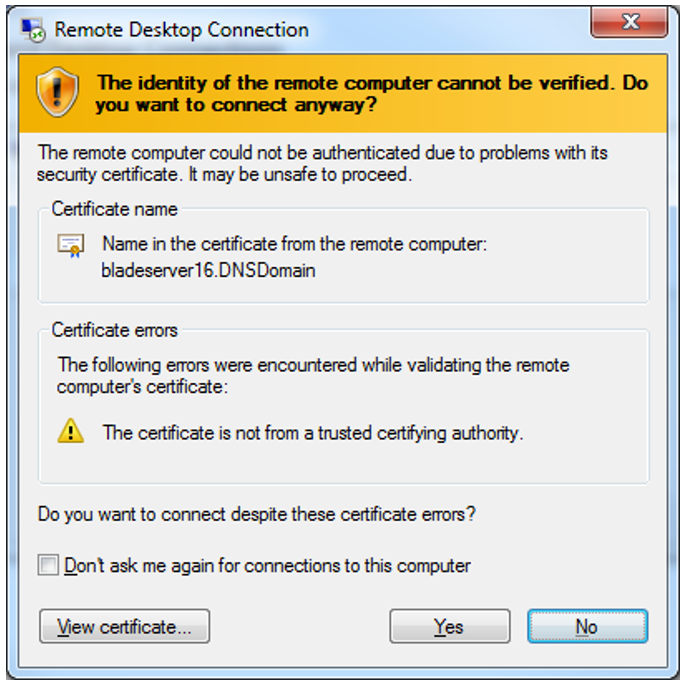
-
Click Yes.


- From the Navigation panel, select System.
-
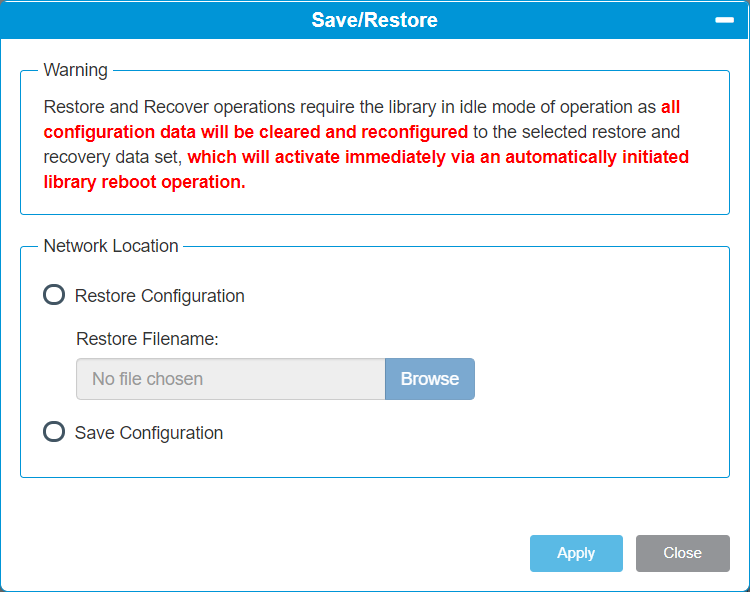
From the Operations panel, click Save/Restore.

- Complete the fields. See Save and Restore for specific instructions.
Note: This step is for libraries with SAS LTO drives only. If your library does not have SAS drives, go to Step 5.
If your library contains SAS LTO drives, you must install the ATTO driver to allow the iBlade to communicate with the drives and Veeam.
-
Add the ATTO driver into the following directory on the iBlade:
C:\Quantum\packages\atto\
- Install the ATTO driver.
To install and configure Veeam tape server software, access your Veeam master server and run the Launch New Tape Server Wizard.
Veeam help center support for adding tape servers can be accessed at https://helpcenter.veeam.com/docs/backup/vsphere/adding_tape_server.html?ver=95u4.
Quantum recommends creating a system state backup for the Veeam Tape Server. This system state backup can be utilized to resolve configuration issues with Windows Server 2016 if Remote Desk Protocol (RDP) is not available.
- Log in to the Veeam Tape Server via RDP as an Administrator.
-
Double-click on the Backup icon.
A command window opens and will start the backup. If a backup has already been completed, then a dialog box pops up indicating this. A backup can take 60-90 minutes.
-
Once the backup has completed successfully the Backup icon remove.
-
To run a backup from the command line, run the following command from an Administrator command shell:
C:\Quantum\scripts\backup.cmd
System Backup
Quantum recommends creating a system state backup for the Veeam Tape Server. This system state backup can be utilized to resolve configuration issues with Windows Server 2016 if Remote Desk Protocol (RDP) is not available.
- Log in to the Veeam Tape Server via RDP as an Administrator.
-
Double-click on the Backup icon.
A command window opens and will start the backup. If a backup has already been completed, then a dialog box pops up indicating this. A backup can take 60-90 minutes.
- Once the backup has completed successfully the Backup icon remove.
- To run a backup from the command line, run the following command from an Administrator command shell:
C:\Quantum\scripts\backup.cmd
