Note: The HA conversion process is required for initial installations.
If you are upgrading from StorNext 4.7.x (or later), and have previously converted your system to HA configuration, the conversion process is unnecessary. Previously-converted systems will not be taken out of HA configuration, so the option to convert to HA is unavailable. However, for StorNext releases prior to StorNext 4.7.x, an HA conversion is necessary after StorNext software upgrades.
This section describes the configuration steps necessary to convert two StorNext MDC servers into a High Availability MDC pair connected to a shared file system. Converting to HA consists of selecting the dedicated unmanaged StorNext file system for use as the controlling shared file system, and then instructing StorNext to convert each MDC server to operate as one MDC server of the HA pair.
The following note and bullet items apply only to customer-supplied MDCs.
Note: The Convert menu option will be unavailable (grayed out) on the Tools menu if you have not specified a secondary system. If you have not already done so, specify a secondary system by using the Name Servers function. For more information, see Step 2: Configure a File System Name Server.
The following are considerations you should be aware of concerning the HA conversion process:
- The HA shared file system MUST be configured as an unmanaged file system. The file system should not have quotas enabled. Enabling quotas on this file system can interfere with the proper functionality of Storage Manager and the HA infrastructure.
- The conversion process converts one MDC server at a time. The second MDC should be converted as soon as possible after the first server.
- StorNext operating files will be moved to the HaShared file system, and this move cannot easily be reversed.
- Following conversion, the primary MDC is identified by the vIP for Replication/Deduplication.
- Replication/Deduplication policies must be changed to use the vIP:
- The global policy for each file system must use it as the “Address for Replication and Deduplication”
- Replication policies must use it as the Target for Replication Schedules
- If multilink is configured, the vIP address should be used.
Considerations for All MDCs
The following applies to all MDCs used in an HA configuration:
- The UIDs for the quantumdb and tdlm users and the adic group must be identical on both MDC server servers of an HA pair. If the UIDs are not identical, the MySQL database will not start (due to file permission errors), which in turn prevents storage manager from fully starting up. Quantum recommends creating the UIDs for the quantumdb and tdlm users along with the adic group on both servers prior to running the install.stornext script.
Follow these steps to configure HA:
-
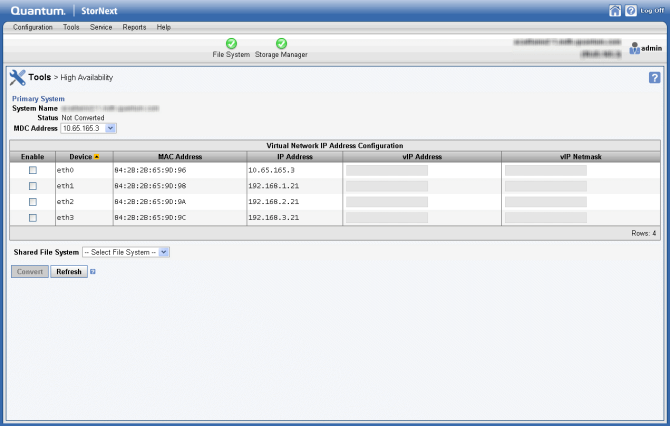
Using the StorNext GUI, on the Tools menu, click High Availability, and then click Convert. The High Availability page appears.
Note: If the system has previously been converted to HA mode, continue to Step 6.
-
On the Shared File System option, select the shared file system you want to use for the HA pair.
Caution: Once you convert a file system to HA you cannot undo the operation, so choose carefully when selecting the file system.
Note: The file system should not have quotas enabled. Enabling quotas on the file system can interfere with the proper functionality of Storage Manager and the HA infrastructure.
Caution: On the Tools > High Availability page, it is critical that you assign the Metadata network IP address in the MDC Address field and not the Management network IP address.
Caution: Double-check that the Shared File System option is set to the shared file system on the metadata array for the metadata appliance/HA pair and NO OTHER shared file system on the list before applying changes. The file system selection on this page may only be done once, so make sure you select the shared file system on the metadata array.
Note: A virtual IP (VIP) may also be set at this time. Use the IP addresses assigned to the port used for the Management network on each MDC server for the VIP values. Do not use the IP addresses assigned for the ports used for the Metadata network.
- For the MDC Address, select one IP address to be placed in the
ha_peerfile for use in administrative operations between the MDC servers in the HA pair. - For non-Lattus systems ONLY: If your HA cluster also runs the blockpool, select Enable and then enter the virtual IP address and virtual netmask. Ask your network administrator for the vIP address and netmask.
-
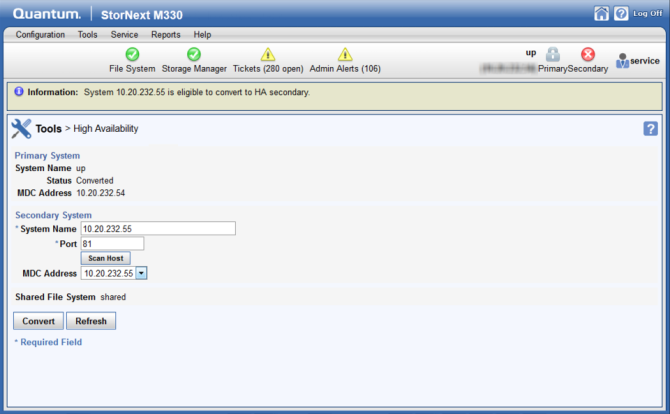
Click Convert to convert the primary MDC server to HA.
Note: Once the primary MDC server has been converted, the Status displays Converted.
- Enter the IP address of the secondary MDC server in the System Name field along with a port number on the same LAN as the primary MDC server.
-
(If the system is configured with a DNS entry, you may choose to use that name in place of the IP address in this field.) Click Scan Host. The system should resolve the secondary MDC server - the MDC Address will auto-fill with a value. If you do not already have licenses for the secondary system in the license file, you will be required to switch to the license page to import them before continuing. The information comes from the license.dat file
Note: .Until you have performed the scan, you cannot import the license file for the secondary system using the StorNext import function. After you have performed the scan you can import licenses for the secondary. Following the conversion to HA, the license file contains licenses and is present on the servers.
-
Click Convert to convert the secondary MDC server.
Note: Both MDC servers will reboot, which can take 30 minutes or more per server to complete.
- Storage Manager may need to be started following the HA conversion if the system was in config mode at the time that HA conversion was initiated. To restart the Storage Manager components, click Start button in the Storage Manager panel of the Tools > System Control page.
There are some indications within the GUI that the system is being upgraded. Here are some notes about this visual feedback:
-
After the StorNext upgrade has completed, and the HA configuration has been done, the GUI for the secondary MDC server provides a message stating it is not the primary MDC server and a link to launch the primary MDC server.
Caution: Do not log in to the GUI of the secondary MDC server at any point during the upgrade/HA conversion process. System configuration and licensing for the system could be compromised.
- When you are able to log into the primary system/server, after accepting the EULA, the system will automatically display the Tools > System Control page. Click Start to restart the Storage Manager components.
- Wait until the system icons for both MDC servers of the system as well as File System and Storage Manager are green, which indicates normal operation.
If you are using the DDM feature, perform the following:
- If you use the secondary MDC server as a DDM mover, make sure the file systems are mounted.
- Edit the fs_sysparm or the fs_sysparm_override files to use your preferred DDM mode: All or Threshold. Use the adic_control restart TSM command to put this change into effect.
After an initial conversion of your system to HA, your may want to verify HA failover. To initiate the failover of a system that has just been converted to HA:
- Open an SSH connection to the MDC server operating as the primary.
-
Log in to the command line of the primary MDC server, using the following credentials:
User: stornext
Password: (You (the customer) should have the password for the StorNext account)
- Type
sudo rootshto gain root user access. Enter the password again. -
Confirm that the MDC server is operating as the primary by entering the following at the command prompt:
snhamgr -m status -
Verify the output is (bold used for clarification):
:default:primary:default:running: -
Initiate an HA failover on the primary MDC server to the secondary MDC server.
Caution: Only use the
snhamgr force smithorcvadmin -e hamon smithcommands to initiate a system failover the first time the system is converted to HA and should only be done when the system is operating in a non-production environment. These commands cause a HARD RESET of the MDC server, and will impact StorNext operations. For initiating a failover any other time, see Initiate a Graceful System Failover for the graceful HA failover procedure.-
Issue the following command to stop StorNext services on the primary MDC server:
adic_control stop -
Then, issue the following command to initiate the failover:
snhamgr force smith
Note: Restarting StorNext more than once every three minutes can trigger a startup delay of three minutes. The delay slows down looping HA resets so that an administrator can correct any configuration problems that are causing the resets.
-
- Wait 3 minutes until the MDC server previously operating as the secondary becomes the primary.
- Open an SSH connection to the MDC server now operating as the primary.
- Log in to the command line of the primary MDC server.
-
Confirm that the MDC server is operating as the primary by entering the following at the command prompt:
snhamgr -m status -
Verify the output is:
:default:primary:default:running:
-
Repeat if desired to fail over to the original system operating as the primary.
Note: When the command
force smithis used on an MDC server, the system will reboot, and it may take a significant amount of time for the MDC server to come back online, so plan for this additional delay. Wait until the MDC server reboot has completed before initiating another fail over to the MDC server originally operating as the primary. - Once the failover has completed, restart SNFS services on any clients that were stopped earlier.
- Mount the SNFS file systems on each client machine, if needed.
- Verify that all clients have full access.
- Verify access to all file systems and move files to/from disk and tape.
During the upgrade of the server originally operating as the primary, the server originally operating as the secondary server becomes the primary. After the database updates are complete and the upgrade of the original primary completes, a failover of the server currently operating as the primary should be triggered so it once again is operating as the secondary, and to reinstate the original primary server to operate as primary again. During StorNext 5.x or later upgrades, the Metadata Appliance fails over once. Because of this single failover, the MDC server originally operating as primary is set as the secondary after the upgrade. This procedure provides the steps necessary to set the MDC servers back to the system state prior to the upgrade for this scenario.
To initiate the graceful failover of an HA pair:
- Open an SSH connection to the MDC server operating as the primary.
-
Log in to the command line of the primary MDC server, using the following credentials:
User: stornext
Password: (You (the customer) should have the password for the StorNext account)
- Type sudo rootsh to gain root user access.
- Enter the password a second time.
-
Confirm that the MDC server is operating as the primary by entering the following at the command line:
snhamgr -m status -
Verify the output is (bold used for clarification):
:default:primary:default:running: -
On the MDC server operating as the primary, initiate an HA failover to the MDC server operating as the secondary:
service cvfs stop - Wait until the secondary MDC server becomes the primary, and leave your SSH connection to this server open. The time may vary.
- Open an SSH connection to the MDC server now operating as the primary.
-
Log in to the command line of the primary MDC server, using the following credentials:
User: stornext
Password: (You (the customer) should have the password for the StorNext account)
- Type sudo rootsh to gain root user access.
- Enter the password a second time.
-
Confirm that the MDC server is operating as the primary by entering the following at the command line:
snhamgr -m status -
Verify the output is:
:default:primary:default:stopped: -
From the SSH connection to the MDC server now operating as the secondary, enter the following:
service cvfs start -
Confirm that the MDC server is operating as the secondary by entering the following at the command line:
snhamgr -m status -
Verify the output is:
:default:running:default:primary: - Repeat if desired to fail over to the original system operating as the primary.
- Verify that all clients have full access.
- Test access to all file systems.
