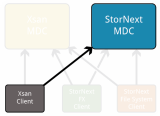
Connecting Xsan Clients to StorNext MDCs
Requirements
In order to connect Xsan Clients to StorNext MDCs, ensure the following:
StorNext MDCs and Xsan clients must be connected to the same SAN and be able to see the same LUNs
StorNext MDCs must have license.dat file in the configuration directory of the system.
For Linux MDCs, the configuration directory is:/usr/cvfs/config/
For Windows MDCs, the configuration directory is:
C:\Program Files\StorNext\config\
If the system configuration includes both Xsan and StorNext MDCs, and Xsan clients, ALL machines in the configuration must have the identical .auth_secret file. However, if the only MDCs in use are StorNext MDCs, the .auth_secret files should be removed from the Xsan clients, the StorNext clients, and the MDCs.
The fsnameservers file must be identical on all StorNext MDCs, StorNext and StorNext FX clients, and Xsan clients.
Mounting the StorNext File System on Xsan 4.1
To connect Xsan 4.1 clients to StorNext MDCs:
- Generate a configuration profile:
|
mdc# cd /usr/cvfs/config mdc# /usr/cvfs/lib/make_profile mysan |
- Copy the resultant profile to the Xsan 4.1 client:
|
mdc# scp mysan.configprofile root@xsan41client:/tmp |
- Remove any existing Xsan profiles from the client:
|
xsan41client$ sudo profiles –L | grep com.apple.xsan | awk '{print $NF}' > /tmp/oldprofiles xsan41client$ for i in `cat /tmp/oldprofiles`; do sudo profiles –R –p $i; done |
- Install the new profile:
|
xsan41client$ cd /tmp xsan41client$ sudo profiles –I –F mysan.configprofile |
- Restart Xsan:
Note: On a new Xsan 4.1 driver installation, an Xsan client may not have been loaded and an error will be displayed when you execute launchctl unload. Quantum recommends you verify a driver is loaded and skip the unload step if the driver is not loaded.
When the Xsan client is loaded using the command launchctl load, the client will need to be rebooted before the Xsan client is loaded. Quantum recommends you reboot the client.
If an upgrade to Xsan 4 or later has been performed, Xsan is disabled after the upgrade. Re-enable Xsan using the commands below.
|
xsan41client$ sudo launchctl unload /System/Library/LaunchDaemons/com.apple.xsan.plist xsan41client$ sudo launchctl load -w /System/Library/LaunchDaemons/com.apple.xsan.plist |
- Execute the command
cvadminto verify the file systems are present. - Execute the command
cvdamin –e disksto verify the all the LUNs used for file systems are displayed. - In the Terminal type
xsanctl mount<fsname>, where<fsname>is the file system name displayed incvadmin. See Special Considerations for Xsan 4.1 Clients.
- Verify the StorNext file system is mounted on the Mac OS X computer.
Special Considerations for Xsan 4.1 Clients
- The client attempts to mount all of the StorNext file systems automatically, including the High Availability (HA) shared file system.
- By default, the Distributed LAN Client (DLC) is enabled for all file systems.
- If the
automount.plistfile exists, the client ignores the/Library/Preferences/Xsan/automount.plistfile. On a fresh installation, theautomount.plistfile does not exist. - To only mount a given file system, execute the command similar to the example below. The command enforces mounts on
snfs1andsnfs2only.sudo defaults write /Library/Preferences/com.apple.xsan onlyMount –array snfs1 snfs2 - To disable DLC for a list of file systems, execute the command similar to the example below. The command disables DLC on
snfs1andsnfs2file systems only.sudo defaults write /Library/Preferences/com.apple.xsan denyDLC -array snfs1 snfs2
Note: For additional information, see the Apple support article available online at https://support.apple.com/en-us/HT205333.
Mounting the StorNext File System on Xsan 4
To connect Xsan 4 clients to StorNext MDCs:
- Generate a configuration profile:
|
mdc# cd /usr/cvfs/config mdc# /usr/cvfs/lib/make_profile mysan |
- Copy the resultant profile to the Xsan 4 client:
|
mdc# scp mysan.configprofile root@xsan4client:/tmp |
- Remove any existing Xsan profiles from the client:
|
xsan4client$ sudo profiles –L | grep com.apple.xsan | awk '{print $NF}' > /tmp/oldprofiles xsan4client$ for i in `cat /tmp/oldprofiles`; do sudo profiles –R –p $i; done |
- Install the new profile:
|
xsan4client$ cd /tmp xsan4client$ sudo profiles –I –F mysan.configprofile |
- Restart Xsan:
Note: On a new Xsan 4 driver installation, an Xsan client may not have been loaded and an error will be displayed when you execute launchctl unload. Quantum recommends you verify a driver is loaded and skip the unload step if the driver is not loaded.
When the Xsan client is loaded using the command launchctl load, the client will need to be rebooted before the Xsan client is loaded. Quantum recommends you reboot the client.
If an upgrade to Xsan 4 or later has been performed, Xsan is disabled after the upgrade. Re-enable Xsan using the commands below.
|
xsan4client$ sudo launchctl unload /System/Library/LaunchDaemons/com.apple.xsan.plist xsan4client$ sudo launchctl load -w /System/Library/LaunchDaemons/com.apple.xsan.plist |
- Execute the command
cvadminto verify the file systems are present. - Execute the command
cvdamin –e disksto verify the all the LUNs used for file systems are displayed. - In the Terminal type
xsanctl mount<fsname>, where<fsname>is the file system name displayed incvadmin. - Verify the
/Library/Preferences/Xsan/automount.plistfile is created. - Verify the StorNext file system is mounted on the Mac OS X computer.
Mounting the StorNext File System on Xsan 2.3 through Xsan 3 Clients
To connect Xsan 2.3 through Xsan 3 clients to StorNext MDCs:
Note: If you are removing clients from an Xsan MDC and connecting them to a StorNext MDC, remove the clients using the Xsan Admin tool on the Xsan MDC. In addition, make sure your Xsan clients do not have a .auth_secret file in the Xsan config directory.
| 1. | Connect the Xsan client computer to the StorNext metadata and fibre channel (SAN) networks. |
| 2. | Create a /Library/Preferences/Xsan/config.plist file using the xml template below: |
Note: Items in red indicate data you should enter which applies to your configuration. Do not enter the literal red text shown in the template.
In other words, for<string>My IP Address/Subnet</string>, you would enter your system metadata IP address or the regular system IP address, not the words My IP Address.
For example, <string>192.168.5.0/24</string>.
|
|
| 3. | From the StorNext MDC copy the fsnameservers file to /Library/Preferences/Xsan on the Macintosh client. |
On Unix: the fsnamerservers file is located at /usr/cvfs/config/.
On Windows: the fsnamerservers file is located at \%cvfsroot%\config\ (where %cvfsroot% is the directory where the StorNext software is installed). This directory is usually located in C:\Program Files\Stornext\config\.
Note: The content of the fsnameservers file should be an IP address, not a machine name or fully qualified domain name (FQDN).
| 4. | Run the following in Terminal to update Xsan with the new file system information: |
|
|
Note: You can use the Preference Pane to disable and re-enable Xsan.
| 5. | Run cvadmin to verify the file systems are present. |
| 6. | Run cvlabel -l to verify the all the luns used for file systems are displayed. |
| 7. | In the Terminal type Xsanctl mount <fsname>. |
Where <fsname> is the file system name displayed in cvadmin.
| 8. | Verify the /Library/Preferences/Xsan/automount.plist file is created. |
| 9. | Verify the StorNext file system is now mounted on the Mac OS X computer. |
Mounting the StorNext File System on Xsan 2.2 and Older Releases
| 1. | Connect the Apple computer to the SAN's metadata Ethernet and fibre channel networks. |
| 2. | Install Xsan 2 software on the Apple computer. (Xsan 2 is supported only by the Leopard operating system.) |
| 3. | Create the file /etc/systemserialnumbers/xsan using that Macintosh’s Xsan serial number. |
You must create the directory /etc/systemserialnumbers if it doesn’t already exist. If an Xsan serial number has information printed for <Licensed to> and <Organization>, these must be part of the serial number string separated by a vertical bar or “pipe” character on two lines. For example:
XSAN-020-XXX-X-XXX-XXX-XXX-XXX-XXX-XXX-X
<
Licensed to|<Organization>
Note: The file does not have a trailing return on the last line. Use the following:cat /etc/systemserialnumbers/xsan
Note: If you are unable to browse to the systemserialnumbers directory, use the cat or echo commands to insert information into the Xsan file under that directory.
| 4. | Create a /Library/FileSystems/Xsan/config/config.plist file using the xml template below: |
Note: Note: Items in red indicate data you should enter which applies to your configuration. Do not enter the literal red text shown in the template.
For example, for <stringMy IP Address</string you would enter your system metadata IP address or the regular system IP address, not the words “My IP Address.”
|
|
| 5. | From the StorNext MDC, copy the fsnameservers file to the /Library/Filesystems/Xsan/config/ directory on the Macintosh client. This file should contain the IP addresses of the name server machines. |
On Unix: the fsnamerservers file is located at /usr/cvfs/config/.
On Windows: the fsnamerservers file is located at \%cvfsroot%\config\ (where %cvfsroot% is the directory where the StorNext software is installed). This directory is usually located in C:\Program Files\Stornext\config\.
Note: The content of the fsnameservers file should be an IP address, not a machine name or fully-qualified domain name (FQDN).
| 6. | Run RegisterSeRV in Terminal to ensure that the serial number is recognized. |
| 7. | Run the following in Terminal to update Xsan with the new file system information: |
|
|
Note: If you are using Xsan 2.3, you can use the Preference Pane to disable and re-enable Xsan.
| 8. | Run cvadmin to verify the file systems are present. |
| 9. | Run cvlabel -l to verify the all the luns used for file systems are displayed. |
| 10. | In the Terminal type Xsanctl mount <fsname>. |
Where <fsname> is the file system name displayed in cvadmin.
| 11. | Verify the /Library/Filesystems/Xsan/config/automount.plist file is created. |
| 12. | Verify the StorNext file system is now mounted on the Xsan client. |
Xsan 2.3 and later
There are notable differences between earlier Xsan version 2.2 and Xsan 2.3 or later. Before performing the procedures in these section you should determine which Xsan version you have and make adjustments as appropriate.
For example, file locations differ between earlier Xsan versions and Xsan 2.3 or later, as noted in the following table:
|
Xsan File Type |
Xsan 2.2 File Locations |
Xsan 2.3 and later File Locations |
|
Bin Files |
|
And a symlink to |
|
Config Files |
|
|
|
Debug Logs |
|
Xsan Debug logs are can be viewed via Console in this location:
|
|
Man Pages |
|
|
|
RAS Logs |
|
Xsan RAS logs are can be viewed via Console in this location:
|
Other Xsan 2.3 and later Changes
Xsan 2.3 or later is built into the Macintosh operating system. Consequently, for 2.3 there is no serial number and nothing additional to install. (However, a StorNext Server license is still required for a StorNext Metadata Controller.)
Mounting SNFS on the Mac OS X Computer
Mount Procedure
| 1. | Make sure the Xsan MDC has a valid license.dat file. |
| 2. | Create file systems/Volumes on Xsan MDC |
| 3. | Install StorNext client build on your desired systems. |
| 4. | Verify the StorNext clients can see the same disks/LUNs as the Xsan MDC (use "cvlabel -L" or "cvadmin -e disks" to verify this) |
| 5. | Copy the .auth_secret and fsnameservers files from the Apple Xsan MDC to each StorNext client (may need to change permissions on both files). |
| a. | For Linux Clients: |
Place both files under the /usr/cvfs/config directory
| b. | For Windows Clients: |
Place both files under the C:\Program Files\StorNext\config directory
| 6. | Restart the StorNext services on the client |
Verifying Access to Xsan File Systems
Use the following procedures to verify access to the Xsan file systems
| 1. | For Linux Clients: |
| a. | From the command line, type: |
/usr/cvfs/bin/cvadmin -e select
| b. | Output similar to the following is shown: |
Select FSM "none"
List FSS
File System Services (* indicates service is in control of FS):
1>*Xsan1[0] located on pan:33355 (pid 7484)
2>*Xsan2[0] located on pan:33355 (pid 7485)
| 2. | For Windows Clients: |
| a. | Click Start > Programs > StorNext > Client Configuration. |
| b. | Verify file system are displayed here and they can be mounted. |
To Mount File Systems on Linux Clients:
| 1. | Create mount points to mount the file systems (.i.e mkdir -p /stornext/Xsan1). |
Add mount entries in the /etc/fstab file similar to:
Xsan1 /stornext/Xsan1 cvfs rw 0 0
| 2. | Mount the Xsan File System on Linux client by issuing below mount command: |
mount -t cvfs Xsan1 /stornext/Xsan1
