DXi4800 Capacity Upgrade
Overview
WARNING: Read these instructions completely before installing any hardware components in the DXi4800. Failure to correctly follow the instructions may cause the capacity upgrade to fail.
This document provides instructions for upgrading the storage capacity of a Quantum DXi4800 disk backup system. There are two methods for upgrading storage capacity:
| Adding a Storage Capacity License |
Upgrade the usable capacity of the system by adding license keys to enable increased hardware capacity. For example, you can upgrade the usable capacity of a 8 TB system to 11 TB simply by adding a storage capacity license key. See below for the licensed usable capacities that are available for each hardware configuration. Also see I haveLicense Keys and Video: Install the Capacity License. |
|
Adding Additional Hardware Capacity |
Upgrade the usable capacity of the system by installing additional hardware capacity along with a storage capacity license key. See below for supported configurations.
IMPORTANT NOTES
|
|
Configuration1 |
Licensed Usable Capacity2 |
8 GB System Memory3 |
16 GB System Memory |
Expansion Modules (JBODs) | Total Rack Space Required | |
|---|---|---|---|---|---|---|
|
8 - 11 TB4 | 48 GB | 96 GB | 0 | 2U | |
| 16 - 27 TB | 48 GB | 96 GB | 0 | 2U | ||
| 45 - 99 TB | 96 GB | 96 GB | 1 | 4U | ||
| 117 - 171 TB | 96 GB | 96 GB | 2 | 6U | ||
| 189 - 243 TB | 144 GB | 160 GB | 35 | 8U | ||
| 261 - 315 TB | 144 GB | 160 GB | 45 | 10U | ||
|
Note: Usable space is presented as a decimal (1000) value (TB or Terabyte) in the DXi GUI. Backup applications may report the binary (1024) value (TiB or Tebibyte) but incorrectly label it as "TB". For example, 172 TB will be seen in the DXi GUI; however a backup application may report 146.43 TB. 146.43 "tebibyte (TiB) = 161.001488 "terabyte (TB)" |
||||||
Prepare for the Capacity Upgrade
Before you begin the DXi4800 storage capacity upgrade, make the following preparations:
This capacity upgrade information assumes that the DXi4800 has been upgraded to software version 4.9.1.1 and above. If the DXi4800 is not upgraded to version 4.9.1.1 and above, capacity upgrades using the Gen2 Expansion module will fail.
For more information on software upgrades, see the Software Upgrades section of the DXi4800 User’s Guide.
WARNING: In order to support 16 TB drive expansion in the node, you MUST upgrade to DXi software version 4.91 or later before expanding the NODE storage!!! Version 4.9.1.1 includes added support for 16 TB NODE capacity expansion.
Make sure the following conditions are met before you continue with the capacity upgrade:
- All backup jobs are completed and there is no pending I/O.
- All replication jobs are completed, and replication is paused (Replication > Actions page).
- All space reclamation tasks are completed without errors (Utilities > Space Reclamation page).
- All healthchecks are completed without errors (Utilities > Space Reclamation page).
- All components in the system display Normal status (Status > Hardware page).
- All outstanding administration alerts are deleted (Alerts > Admin Alerts page).
- All service tickets are closed (Alerts > Service Tickets page).
For more information, see the DXi4800 User’s Guide or click Help > Help Contents in the remote management console to display the DXi online help.
The following tools are required for unpacking and installing the DXi4800 system:
- Small flat head screwdriver
-
Phillips #2 screwdriver
Some components within this DXi4800 system contain static-sensitive parts. To avoid damaging these parts while performing installation procedures, always observe the following precautions:
- Keep the system turned off during all installation procedures.
- Keep static-sensitive parts in their original shipping containers until ready for installation.
- Do not place static-sensitive parts on a metal surface. Place them inside their protective shipping bag or on an anti-static mat.
- Wear anti-static wrist bands when unpacking and handling the units, and avoid touching connectors and other components.
Note: Dry climates and cold-weather heating environments have lower relative humidity and are more likely to produce static electricity.
Capacity Upgrade Overview
To upgrade the usable capacity of the DXi4800 by enabling hardware capacity that is already installed in the system, simply enter the storage capacity license keys (3 TB, 8 TB, and 18 TB increments). Skip directly to Step 7 - Install the Storage Capacity License.
To upgrade the usable storage capacity of the DXi4800 by installing additional hardware, you need to install one or more components. The components you need to install depend on the initial usable capacity and the total usable capacity after the upgrade:
- Node hard drives (16 TB each) (6)
- Memory modules (16 GB DIMMs) (6 to 12)
- H840 RAID controller card. This supports Gen1 Expansion Modules (1)
- 9580 RAID controller card. This supports Gen2 Expansion Modules (1)
- Gen1 Expansion Modules (JBODs) (1 to 4)
- Gen2 Expansion Modules (JBODs) (1 to 4)
- 480 GB SSD (1) for 3rd JBOD
Note: A second 480 GB SSD must be installed to run DXi4800 systems using 3 or 4 JBODs. See 2 - Install Second 480 GB SSD for 3rd JBOD. Systems purchased with a 3rd or 3rd and 4th JBOD arrive with the second SSD preinstalled.
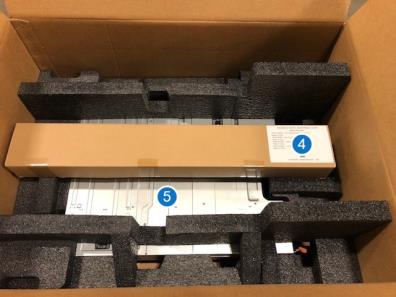
Step 1 - Unpack the Upgrade Components
Depending on the hardware capacity upgrade you are performing, the necessary components ship in one or more boxes. Each box includes a label that notes the number of the box and the total number of boxes in the shipment (for example, box 1 of 3). MAKE SURE THAT YOU HAVE ALL BOXES IN THE SHIPMENT BEFORE YOU BEGIN THE UPGRADE.
Note: Make sure to retain all packing materials, as well as the documentation and other items included in the shipping box. The packaging materials must be used if the system is relocated.
Depending on the configuration, additional Node components may ship in separate boxes along with the rest of the system:
- Node hard drives (16 TB each) (6)
- Memory modules (16 GB DIMMs) (4 or 8)
- H840 RAID controller card for Gen1 Expansion Modules (1)
- 9580 RAID controller card for Gen2 Expansion Modules (1)
- 480 GB SSD (1)
Carefully unpack and remove the components from the packing materials.
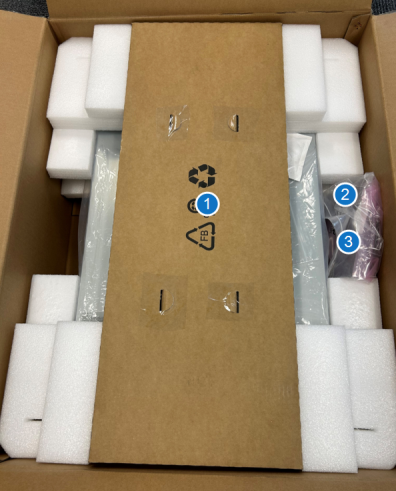
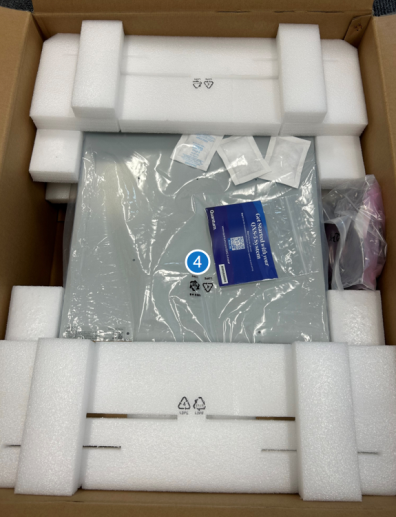
Unpacking the Additional Node Components
|
|

|

|
|
|


Depending on the upgrade, (1 to 4) Expansion modules (JBODs) may ship in separate boxes. The box containing each DXi4800 Expansion Module contains the items shown in the next two images.
For each Expansion module (if any), carefully unpack and remove the components from the packing materials.

| Item | Description |
|---|---|
| 1 |
C13 to C14 power cord (2), North American power cord (2) |
| 2 | SAS interconnect cable (1m) (2) |
| 3 | Bezel |
| 4 | Rack mount rails |
| 5 | Expansion module (JBOD) |
| Item | Description |
|---|---|
| 1 |
Rack mount rails |
| 2 | SAS interconnect cable (1m) (2) |
| 3 | C13 to C14 power cord (2), North American power cord (2) |
| 4 | Expansion module (JBOD) |
Step 2 - Shut Down the System
Important - Generate and Download System Logs
Generate and download the latest version of the following system logs before shutting down the system. this will provide a record of the system prior to any hardware configuration changes.
- Utilities > Diagnostics > System Diag File
- Utilities > Diagnostics > Storage Array Diag File\
To shut down the system:
Caution: Before shutting down the DXi4800, make sure that all backup and replication jobs are finished, and that space reclamation activity is complete.
-
In the remote management console, navigate to the Utilities > Reboot & Shutdown page.
For information about accessing the remote management console, see the DXi4800 User’s Guide.

-
Select Shutdown and click Apply.
-
Close the browser window.
-
After the Node shuts down, turn off both power switches on the back of all installed Expansion modules (JBODs).
Gen1 Power Switches

Gen2 Power Switches

Step 3 - Install Components in the Node
Depending on the upgrade, you may need to install additional components in the DXi4800 Node. To install the additional Node components, see the following sections:
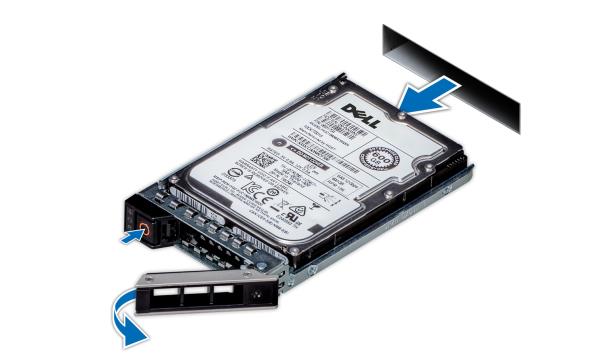
The Node has a total of 12 hard drive slots. For all configurations, 6 hard drives (4 TB, 8 TB, or 16 TB each) are pre-installed in hard drive slots 0–5. Hard drive blanks are installed in hard drive slots 6–11.
If required for the upgrade, remove the hard drive blanks from slots 6–11 and install 6 hard drives (16 TB each) in the Node. The additional hard drives must be installed in hard drive slots 6–11.
Caution: Do not remove the hard drives pre-installed in hard drive slots 0–5. If these drives are removed for any reason, you must re-install them in their original positions.
Node Hard Drive Configurations
| System Configuration | Node Hard Drives | Actions to Take |
|---|---|---|
|
8 TB - 11 TB |
6 |
|
|
16 TB - 315 TB |
12 |
|
Note: A second 480 GB SSD must be installed to run DXi4800 systems using 3 or 4 JBODs. See 2 - Install Second 480 GB SSD for 3rd JBOD.
Node Hard Drive Locations

| Item | Description |
|---|---|
| 0 | HDD Slot 0 (Do not remove) |
| 1 | HDD Slot 1 (Do not remove) |
| 2 | HDD Slot 2 (Do not remove) |
| 3 | HDD Slot 3 (Do not remove) |
| 4 | HDD Slot 4 (Do not remove) |
| 5 | HDD Slot 5 (Do not remove) |
| 6 | HDD Slot 6 |
| 7 | HDD Slot 7 |
| 8 | HDD Slot 8 |
| 9 | HDD Slot 9 |
| 10 | HDD Slot 10 |
| 11 | HDD Slot 11 |
To install the additional hard drives in the DXi4800 Node:
Caution: Use appropriate ESD precautions, including the use of a grounding strap, when performing this procedure.
-
To remove the drive blank, press the release button and slide the blank out of the drive slot.

-
Press the release button on the front of the drive carrier to open the release handle.

- Insert the drive carrier into the drive slot and slide until the drive connects with the backplane.
- Close the drive carrier release handle to lock the drive in place.
- Repeat steps 1 - 4 until all drives are installed in the DXi4800 Node.
A second 480 GB solid-state drive (SSD) must be installed at the rear chassis to run DXi4800 systems using 3 or 4 JBODs. The second SSD is installed in the drive slot directly below the first.

WARNING: You must shut down the system to install the second SSD.
-
Press the release button on the front of the drive carrier to open the release handle.
- Slide the hard-drive carrier out until it is free of the drive slot.
To install the Second SSD in the DXi4800 Node:
-
Press the release button on the front of the drive carrier to open the release handle.

- Insert the drive carrier into the drive slot and slide until the drive connects with the backplane.
- Close the drive carrier release handle to lock the drive in place.
To remove the DXi4800 Node from the rack and remove the top cover:
WARNING: Opening or removing the system cover when the system is on may expose you to a risk of electric shock.
Caution: Use appropriate ESD precautions, including the use of a grounding strap, when working inside the Node.
- If installed, remove the front bezel by lifting the latch on the left side of the bezel.
- Disconnect all power, SAS, Ethernet, and Fibre Channel cables from the rear of the Node. Make sure to label the cables so they can be easily identified when they are re-connected to the Node after the upgrade procedure is complete.
- Press the locking tab on either side of the Node, then pull the Node out from the rack until the inner rails lock.
- Locate the lock levers on the sides of the inner rails. Unlock each lever by rotating it up to its release position.
- Grasp the sides of the Node firmly and pull it forward until the rail standoffs are at the front of the J-slots.
- Lift the Node up and away from the rack and place it on a flat, stable surface.
- Press and hold the power button on the front of the Node for three seconds to fully drain the system of stored power prior to removing the cover.
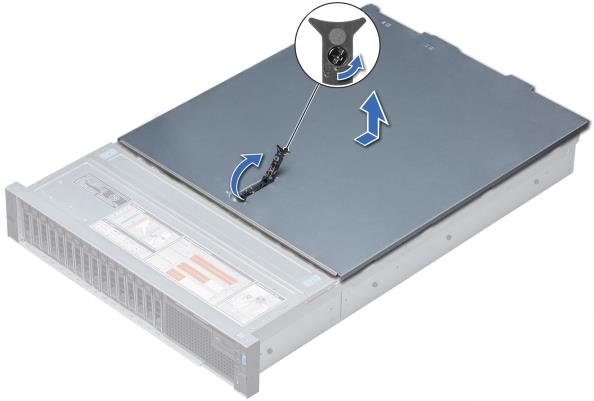
- On the Node cover, use a 1/4-inch flat head or Phillips #2 screwdriver to rotate the latch release counter clockwise to the unlocked position
- Lift the latch until the system cover slides back and the tabs on the system cover disengage from the guide slots on the system.
-
Hold the cover on both sides, and lift the cover away from the system.
Caution: Ethernet and Fibre Channel cables can be easily damaged when tightened with plastic zip ties. Use hook-and-loop cable straps instead.
Note: If necessary, remove the optional screws securing the Node to the front of the rack (behind the locking tab).
Removing the Node from the Rack
| Item | Description |
|---|---|
| 1 | Rear rail standoffs |
| 2 | Rear rail J-slots |
| 3 | Slide-release lock button |
| 4 | Lock lever |
| 5 | Inner slide rails |
WARNING: The DXi4800 Node and Expansion module (JBOD) weigh 72.9 pounds (33.1 kg) and 63 pounds (28.6 kg) respectively. A minimum of two people are required to lift either chassis.

The figure below illustrates the interior of the DXi4800 Node with the cover removed.
Inside the Node

| Item | Description |
| 1 | Drive backplane |
| 2 | Backplane expander card |
| 3 | Cooling fans (6) in the cooling assembly |
| 4 | Cooling shroud |
| 5 |
Expansion card riser 3 |
| 6 | Network daughter card |
| 7 | Expansion card riser 2 |
| 8 | System board |
| 9 | Expansion card riser 1 |
| 10 | Storage controller card |
|
11 |
NVDIMM-N battery |
The Node has 24 memory sockets divided into 2 sets (A and B) of 12 slots each. Each set (A or B) is dedicated to one CPU.
Previously, the Node shipped from the factory with 8 GB memory modules (DIMMs) pre-installed in 6 memory sockets, for a total of 48 GB of memory. With the release of DXi 4.9.1.1 software and above, the Node is now shipped from the factory with 16 GB memory modules (DIMMs) pre-installed in 6 memory sockets, for a total of 96 GB of memory.
For systems with 48 GB of system memory that will use Veeam or DAE, install the provided 16 GB memory modules in the Node. 96 GB memory is required for systems running DAE or Veeam.
Memory modules must be installed in the correct sockets in order for the system to function properly.
Table 1: No JBOD - Memory Upgrade for Veeam/DAE
| Configuration | Current System Memory | Actions to Take | Upgraded System Memory |
|---|---|---|---|
|
8 - 27 TB (Veeam/DAE) |
48 GB |
|
112 GB |
Table 2: Add 1st JBOD
| Configuration | Current System Memory | Actions to Take | Upgraded System Memory |
|---|---|---|---|
| 45 - 171 TB | 48 GB |
|
112 GB |
| 45 - 171 TB | 112 GB | No action required. | 112 GB |
Table 3: Add 3rd JBOD
| Configuration | Current System Memory | Actions to Take | Upgraded System Memory |
|---|---|---|---|
| 189 - 316 TB | 48 GB |
|
176 GB |
| 189 - 316 TB | 112 GB |
|
176 GB |
Node Memory Module Locations

Table 4: Add 3rd JBOD
| Configuration | Current System Memory | Actions to Take | Upgraded System Memory |
|---|---|---|---|
| 189 - 316 TB | 96 GB |
|
160 GB |
Node Memory Module Locations
To install the memory modules in the DXi4800 Node:
Caution: Use appropriate ESD precautions, including the use of a grounding strap, when performing this procedure.
Caution: Handle the memory modules by the card edges and avoid touching the components on the memory module.
Note: Memory socket numbers are displayed on the clear window on the cooling shroud.
-
Remove the cooling fan assembly by lifting the release levers upwards.

- Lift the cooling fan assembly out of the Node.
-
Remove the plastic memory blank from the socket by pressing down and out on the ejectors on each end of the socket until the memory blank pops out of the socket.
Note: The plastic memory blanks are recyclable.

Item Description 1 Memory module 2 Ejector latch 3 Socket alignment tool -
Align the memory module’s edge connector with the alignment key of the memory module socket, and insert the memory module in the socket. The memory module socket has an alignment key that allows you to install the memory module in the socket in only one way.
- Press down on the memory module with your thumbs until the ejector latches snap into a locked position.
- Repeat steps 1–3 for each memory module.
-
Replace the cooling fan assembly:
- Align the guide rails on the cooling fan assembly with the standoffs on the system.
- Lower the cooling fan assembly into the system until the cooling fan connectors engage with the connectors on the system board.
- Press the release levers to lock the cooling fan assembly into the system.

-
Replace the cooling shroud:
- Align the tabs on the cooling shroud with the securing slots on the chassis.
- Lower the cooling shroud into the chassis until it is firmly seated.
-
For proper seating of the cooling shroud in the chassis, ensure that the cables inside the system are routed along the chassis

The PERC H840 RAID controller allows you to connect up to 4 Gen1 Expansion modules to the DXi4800 Node and is required for 45 TB and larger configurations. Install the provided H840 RAID controller card in PCI slot 3, located in expansion card riser 1.
RAID Controller Configurations
| Configurations | Expansion Modules | Actions to Take |
|---|---|---|
|
8 TB - 27 TB |
0 |
No action required. |
| 45 TB - 99 TB | 1 |
Install an H840 RAID controller card in PCI slot 3. |
| 117 TB - 171 TB | 2 |
Install an H840 RAID controller card in PCI slot 3. |
| 189 TB - 243 TB |
3 |
Install an H840 RAID controller card in PCI slot 3. |
| 261 TB - 315 TB | 4 |
Install an H840 RAID controller card in PCI slot 3. |
H840 RAID Controller Card Location

| Item | Card Option(s) |
|---|---|
| 1 | H840 RAID controller card |
Caution: Use appropriate ESD precautions, including the use of a grounding strap, when performing this procedure.
To install the H840 RAID controller card in the DXi4800 Node:
-
Lift the expansion card latch out of the slot of expansion card riser 1.
The expansion card latch is located to the right of PCIe slots as you face the rear of the Node. The latch will remain attached to the system.
Installing an Optional Card in Riser 1
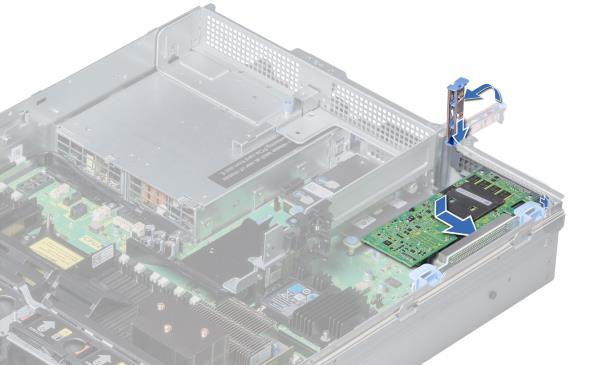
- Remove the metal slot covers from the slots by sliding it out of the slot.
- Holding the network card by its edges, position the card so that the connector on the card aligns with the expansion card connector on the riser.
- Insert the card-edge connector firmly into the expansion card connector until the card is fully seated.
- Push the expansion card latch down to lock the card in place.
The 9580 RAID controller allows you to connect up to 4 Gen2 Expansion modules to the DXi4800 Node and is required for 45 TB and larger configurations. Install the provided 9580 RAID controller card in PCI slot 6, located in expansion card riser 2.
Note: The 9580 RAID controller card includes a battery that must be connected to the card.
RAID Controller Configurations
| Configurations | Expansion Modules | Actions to Take |
|---|---|---|
|
8 TB - 27 TB |
0 |
No action required. |
| 45 TB - 99 TB | 1 |
Install an 9580 RAID controller card and battery in PCI slot 6. |
| 117 TB - 171 TB | 2 |
Install an 9580 RAID controller card and battery in PCI slot 6. |
| 189 TB - 243 TB |
3 |
Install an 9580 RAID controller card and battery in PCI slot 6. |
| 261 TB - 315 TB | 4 |
Install an 9580 RAID controller card and battery in PCI slot 6.. |
9580 RAID Controller Card Location

| Item | Card Option(s) |
|---|---|
| 1 | 9580 RAID controller card and battery |
Caution: Use appropriate ESD precautions, including the use of a grounding strap, when performing this procedure.
To install the 5280 RAID controller card in the DXi4800 Node:
-
Using the cable provided, attached the cable provided with the 5280 RAID controller card to the card and the battery.


-
Using a Philips screwdriver, remove the black handle on the rear of the node.


-
To access slot 6, you will need to remove any cards ins slot 4 and 5 in expansion card riser 2. You do not need to remove the riser.
Removing Cards in Riser 2

-
Lift the blue expansion card latch out of slot 6.

- Remove the metal slot covers from slot 6 by sliding it out of the slot.
- Holding the network card by its edges, position the card so that the connector on the card aligns with the expansion card connector on the riser.
- Insert the card-edge connector firmly into the expansion card connector until the card is fully seated.
-
Secure the card by reinserting the blue expansion card latch to slot 6.
- Push the expansion card latch down to lock the card in place.
-
Insert the battery into the bracket. Using the double-sided tap on the bracket, place the battery in the location below.

-
Route the cable between the card and the battery carefully out of the way.
-
Re-install the cards you removed in expansion riser 2 to access slot 6. Make sure you re-install the cards in the slots they were originally removed from.
Re-install Cards in Riser 2

To close the DXi4800 Node cover:
- Lift the latch on the cover.
- Place the cover onto the Node chassis and offset the cover slightly back so that it clears the chassis hooks and lays flush on the chassis.
- Push down the latch to move the cover into the closed position.
-
Using a 1/4 inch flat head or Phillips #2 screwdriver, rotate the latch release lock clockwise to the locked position.

Step 4 - Install Expansion Modules
Depending on the upgrade, you may need to install 1 - 4 Expansion modules (JBODs) in the rack.
Component Installation Recommendations
To make it easier to correctly cable the system, and for safety reasons, follow these recommendations when installing the DXi4800 system in the rack:
- When installing components, start with the lowest Expansion module in the configuration, and then proceed upward in the rack as you add additional components.
- Make sure to leave enough space below the lowest installed component for future system expansion. The DXi4800 can be expanded to a maximum configuration requiring 10U of rack space.
Recommended Component Rack Order (Maximum Configuration)

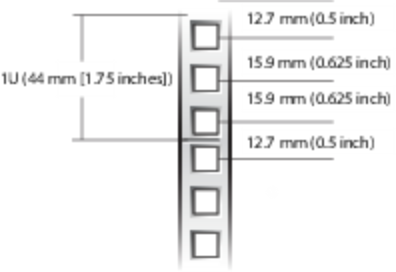
The DXi4800 system is designed to fit in a standard 19 inch (48.3 cm) wide rack. It is important for the chassis installation to locate the hole pattern in the rack rails. You must allow 2U (3.4 inches or 8.7 cm) of vertical space for the DXi4800 Node and an additional 2U for each Expansion module (JBOD) installed in the rack.
Rack cabinets that meet EIA-310 standards have an alternating pattern of three holes per rack unit with center-to-center hole spacing (beginning at the top hole of a 1U space) of 15.9 mm, 15.9 mm, and 12.7 mm (0.625 inch, 0.625 inch, and 0.5 inch) for the front and back vertical rails. Rack cabinets may have round or square holes. For more information, refer to the DXi4800 Site Planning Guide.
WARNING: If the rack is empty at the time of installation, do NOT install the DXi4800 chassis too high in the rack. The weight of the chassis may cause the rack to become “top heavy” and unstable if installed in the top of an empty rack.
To mark the rack, place a mark (or tape) on the rack’s front vertical rails where you want to locate the bottom of the unit you are installing in the rack. The bottom of each 1U space is at the middle of the narrowest metal strip between holes (marked with a horizontal line on some rack cabinets).
Follow the installation procedure for the Gen1 or Gen2 Expansion Module below:
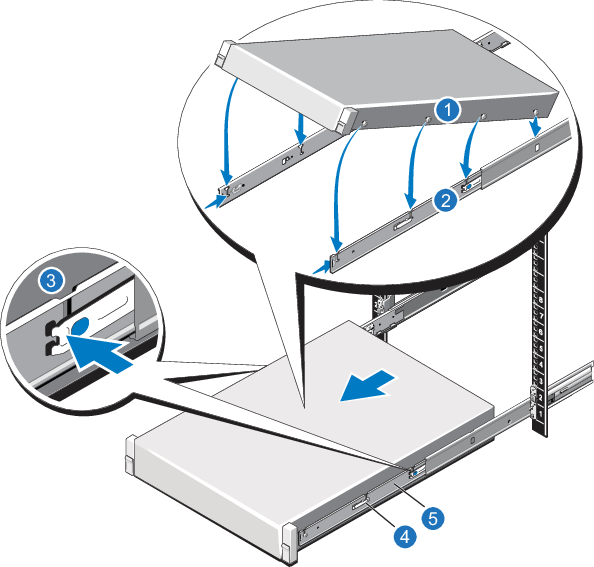
- Position the left and right rail end pieces labeled FRONT facing inward, and orient each end piece to seat in the holes on the front side of the vertical rack flanges.
- Align each back end piece in the bottom and top holes of the desired U spaces.
- Engage the back end of the rail until it fully seats on the vertical rack flange and the latch clicks into place. Repeat these actions to position and seat the front end piece on the vertical rack flange.
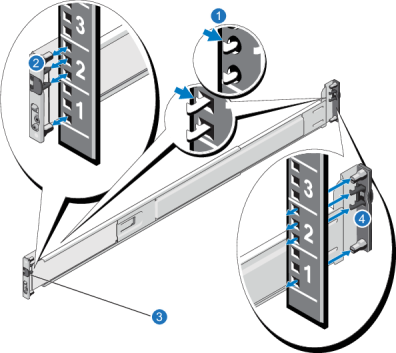
| Item | Description |
|---|---|
| 1 | Latches click into place in rack flange (round or square holes). |
| 2 | Rail front end. |
| 3 | Latch release button. |
| 4 | Rail back end. |
WARNING: The DXi4800 Expansion module (JBOD, including hard drives) weighs 63 pounds (28.6 kg). A minimum of two people are required to lift the chassis. To lift the chassis, use the slots in the packing foam to place your hands under the sides of the chassis.
Caution: Before proceeding, ensure that all hard drive latches are completely closed. Quantum recommends that you do not remove the hard drives from the chassis. If they have been removed for any reason during or after the installation, you must install the hard drives in the same position in which they were removed.
- Align the Expansion module with the rails, and then slide the module into the rack.
-
Tighten the thumbscrews on each side of the Expansion module’s front panel.
Note: To remove the Expansion module, loosen the thumbscrews and slide the Expansion module out of the rack.
-
Install the end caps on either side of the module by inserting the top of the end cap first and then snapping the bottom into place.
Install the end cap with the indicator icons to the left of the module, and install the end cap with the drive numbers to the right of the module.
Note: To remove the Expansion module, remove the screws and slide the module out of the rack.
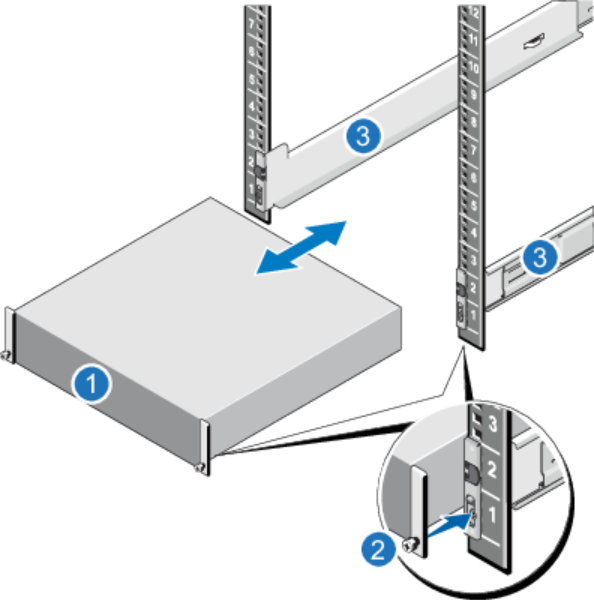
| Item | Description |
|---|---|
| 1 | Front of Expansion Module |
| 2 | Thumbscrew |
| 3 | Rails |
-
Remove both outer rail assemblies from their packaging.

Item Description 1 Left front mount bracket 2 Left front outer rail 3 Left rail slides 4 Set screw, front
5 Set screw, rear 6 Left rear mount bracket -
Orient the outer rail with the LH FRONT embossed on it to your left, the other with the RH FRONT embossed on it to your right, and each emboss toward you, facing inward.
-
Loosen, but do not remove, the 2 set screws on each outer rail with a Philips screwdriver.
-
Facing the left side of the rack cabinet, slide the left front mount bracket pins into holes in the front rack post.
-
Bias the left rack mount bracket as far inward as possible, then verify the entirety of the lower rail tab is visible just beyond the inner edge of the front rack mount bracket. This step is crucial to safety and proper storage enclosure operation.
-
Hold the biased mount bracket in that position.
-
Insert a Philips-head M5 x 15 screw into the center hold of the front mount bracket and barely tighten against the front rack using a Philips screwdriver or 8mm nut driver.

-
Extend the length of the rail until fully mating the rear mount bracket pins in the mirror location on the rear rack post.

-
Verify that the rails are level at the same height on both rack posts, and that all mount bracket location pins fully seat in indentical locations in the rack posts.
-
Facing the rear of the cabinet rack, insert a Phillips-head M5 x 15 screw into the center hole of the rear mount bracket.

-
Hand tighten firmly against the rack post using an 8mm nut driver or a Philips screwdriver.
-
Facing the front of the rack cabinet, hand tighten the Phillips-head M5 x 15 screw using an 8mm nut driver or a Philips screwdriver so that the hex head flange is flush with the front rack post.
-
Fix the adjusted length of the left outer rail by hand tightening both rail slide set screws using a Philips screwdriver.
-
Repeat the process for the right outer rail.
WARNING: The DXi4800 Expansion module (JBOD, including hard drives) weighs 71 pounds (32.2 kg). A minimum of two people are required to lift the chassis. To lift the chassis, use the slots in the packing foam to place your hands under the sides of the chassis.
Caution: Before proceeding, ensure that all hard drive latches are completely closed. Quantum recommends that you do not remove the hard drives from the chassis. If they have been removed for any reason during or after the installation, you must install the hard drives in the same position in which they were removed.
-
Confirm that the outer rails are properly and securely installed in the rack cabinet.
-
Moving only the 2U chassis, position it so that the attached inner rails align with the outer rails on in the rack.

-
Guide the chassis inward with the leading edge of each inner rail inside the top and bottom lip of the outer rail.
-
Conduct a visual inspection of both sides to verify both inner rails are an equal distance along the outer rail and that the direction is straight, no at an angle.
-
Facing the front of the enclosure, carefully exert even pressure on both sides of the storage enclosure front, inserting the storage enclosure until the rack ear flanges are flush with the front rack posts.
-
Facing the rear of the enclosure, insert and tighten a Panhead M5 x 8 screw into the tail of each outer rail and through the 2U chassis to secure the rear of the chassis.

-
Facing the front of the 2U chassis, insert a Panhead M5 x 8 screw into the operator's (ops) panel with an 8mm nut driver or Philips screwdriver.

-
Hand tighten firmly against front rack post at the center of the rack ear flange.
-
Slide the ops panel cover over the left rack ear flange until flush with the rack post.
-
Repeat the process for the right rack ear flange and cover.
Step 5 - Cable the System
After the components are installed in the rack, reconnect all power, SAS, Ethernet, and Fibre Channel cables on the rear of the Node, and connect SAS cables to any new Expansion modules.
Caution: The cables removed from the Node and labeled in step 2 of 3 - Open the Node Cover must be replaced in the same ports from which they were removed. Follow this section to cable additional JBODs.
-
Connect each Gen1 Expansion module (JBOD) to the DXi4800 Node.
Node JBOD 1 JBOD 2 JBOD 3 JBOD 4 SAS port 1 (left) Primary SAS In port 1 (top) SAS port 2 (right) Secondary SAS In port 1 (bottom) Primary SAS port 2 (top) Primary SAS port 1 (top) Secondary SAS port 2 (bottom) Secondary SAS port 1 (bottom) Primary SAS port 2 (top) Primary SAS port 1 (top) Secondary SAS port 2 (bottom) Secondary SAS port 1 (bottom) Primary SAS port 2 (top) Primary SAS port 1 (top) Secondary SAS port 2 (bottom) Secondary SAS port 1 (bottom) 
Note: After all cables are attached, move each cable to the left and right, then gently pull straight out to confirm that the cable is locked.
WARNING: If cables are not secure when connected to the modules, the software will not recognize the modules at startup.
-
Connect each Gen2 Expansion module (JBOD) to the DXi4800 Node.
Node JBOD 1 JBOD 2 JBOD 3 JBOD 4 SAS port C1 (left) Top IOM - SAS Port B SAS port C2 (right) Bottom IOM - SAS Port B Top IOM - SAS Port C Top IOM - SAS Port A Bottom IOM - SAS Port C Bottom IOM - SAS Port A Top IOM - SAS Port C Top IOM - SAS Port A Bottom IOM - SAS Port C Bottom IOM - SAS Port A Top IOM - SAS Port C Top IOM - SAS Port A Bottom IOM - SAS Port C Bottom IOM - SAS Port A 
Note: After all cables are attached, move each cable to the left and right, then gently pull straight out to confirm that the cable is locked.
WARNING: If cables are not secure when connected to the modules, the software will not recognize the modules at startup.
- Connect each power supply to a primary and secondary AC power source using the provided power cables. Use the attached straps to secure the power cords to the chassis.
Note: Quantum recommends connecting each power cord to a separate AC circuit to ensure system availability in case of a power failure. Power supplies should be checked periodically for audible and LED warnings
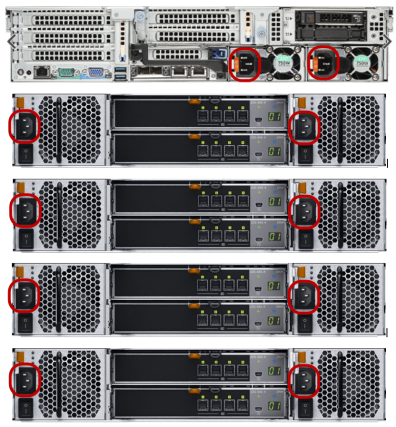
Node and Gen1 Expansion Module Power Supplies
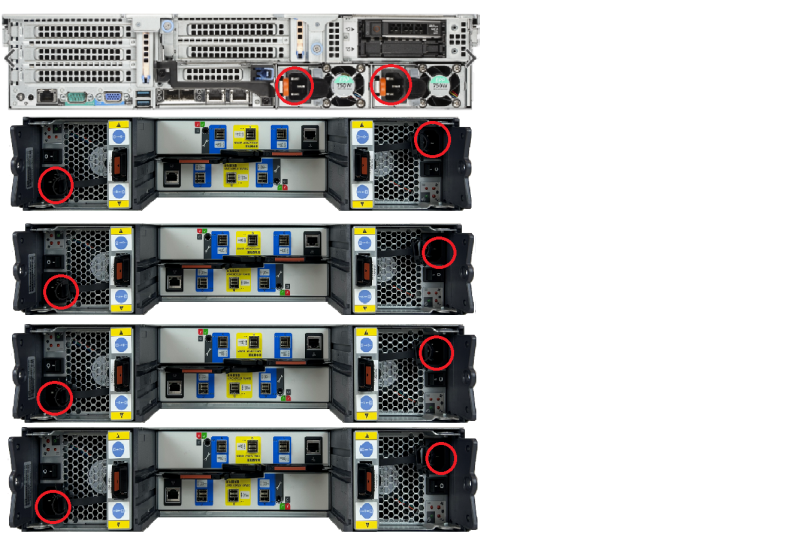
Node and Gen2 Expansion Module Power Supplies
Step 6 - Turn On the System
Turn on the DXi4800 system components in the following order:
- Turn on both power switches on the back of each Expansion module. Wait 30 seconds for the Expansion modules to initialize. Verify on the front panel that the modules have power and there were no hard drive failures (Drive status indicator on hard drive blinks amber four times per second).
-
Press the power button on the front of the Node. Wait for the system to boot before continuing with the procedure. (This can take up to 30 minutes.)
Note: The system may reboot one or more times depending on the components that were installed. If all components are properly installed and cabled, the LEDs on all hard drives in the Node and the Expansion modules will be lit. (The top LED will be solid and the bottom LED will blink.)
- Open a supported web browser and enter the Management IP of the DXi into the browser address field. You may need to wait a few minutes before you see the login screen. Log in with the proper credentials. After approximately 30 minutes, the DXi may report “Diagnostic Mode” in the GUI. View the GUI Home page and click on Admin in the banner. Click on any Admin Alerts and look for text such as, "Failed to set the profile on the expansion RAID controller: a1. Please wait until all background operations on the expansion RAID controller: a1, have completed. Then reboot the system to set the controller profile."
- If the text is seen, delete all Admin Alerts and reboot the DXi. Navigate to Utilities > Reboot & Shutdown, and then click on Recover from Diagnostic State. Click Apply and continue until the GUI reports that the DXi is rebooting.
- If the Admin Alert text is not seen, shutdown the DXi. Navigate in GUI to Utilities > Reboot & Shutdown, and then click Shutdown and Apply and wait for power on the node to turn off.
Step 7 - Install the Storage Capacity License
Before the newly installed hardware capacity can be used to store data, you must add a license key to enable the new usable capacity of the system. The 3 TB, 8 TB, and 18 TB licenses each need to be installed separately.
Locate the Storage Capacity License Certificate that was included with the upgrade components.
-
Open two Web browser windows on a computer with Internet access.
Note: During this procedure, you can copy and paste required numbers between these two windows.
-
In one browser, navigate to the Utilities > License Keys page in the DXi remote management console. Note that the system serial number displays directly above the New Key box.
For information about accessing the remote management console, see the DXi4800 User’s Guide.
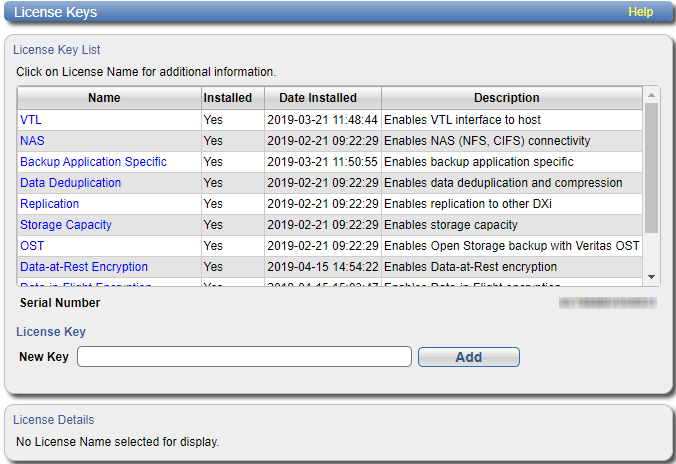
-
In the other browser, enter the address for the License Key Management Web site:
http://www.quantum.com/licensekeys
https://www.quantum.com/oem/fujitsu/licensekeys

-
-
On the License Key Management Web site, perform the following steps:
- Enter the system serial number in the Serial Number box and click Submit.
-
Enter the authorization code (printed on the License Certificate) and click Get License Key.
The Licensed Feature page returns a storage capacity key.
-
Switch to the Utilities > License Keys page in the DXi remote management console.
-
Enter the license key in the New Key box and click Add.
The file system is automatically expanded. (This can take up to 10 minutes.)
-
Click the Storage Capacity license link on the License Keys page. The maximum allowed storage capacity appears under License Details.
Verify that the licensed capacity equals the expected total storage capacity of the system.
Note: After installation, the DXi4800 performs background initialization of all new storage arrays. The time to complete the initialization depends on the level of I/O to/from the unit. You can use the DXi4800 normally during this time. To monitor the progress of background initialization, navigate to Status > Hardware > Details > Storage Arrays in the remote management console. Click a storage array, and then click Volumes to view initialization status.

Troubleshooting
If you encounter problems while installing or configuring the DXi4800, see the table below for troubleshooting steps.
DXi4800 Installation Troubleshooting
| Problem | Corrective Action |
|---|---|
| The system does not power on. | Make sure all power cords are connected to a grounded electrical outlet and the power switches located on the back of the power supplies are on. |
| The following message displays when you log on to the remote management console: There are service tickets that require attention. | Click OK to display the Service Tickets page, or navigate to the Alerts > Service Tickets page. Click a ticket number to view details about the service ticket. Perform any suggested steps listed in the ticket details. |
| The Home page does not display the expected total Disk Capacity. | Make sure the storage capacity license is installed. |
| The storage capacity license is correctly installed, but the Home page still does not display the expected total Disk Capacity. |
|
